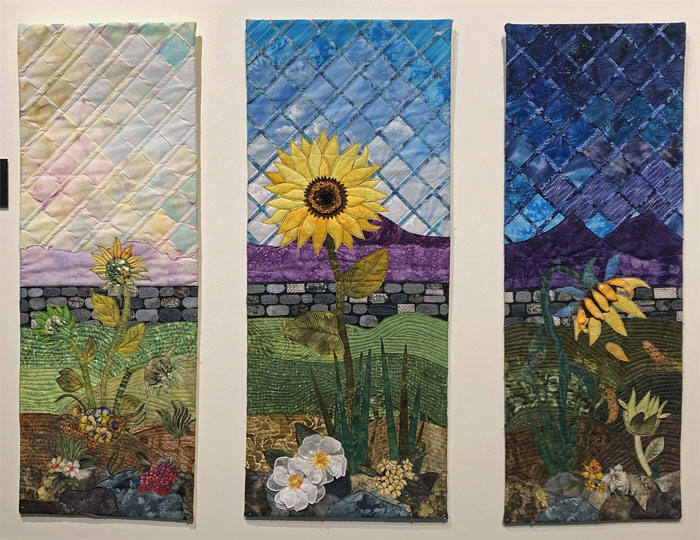
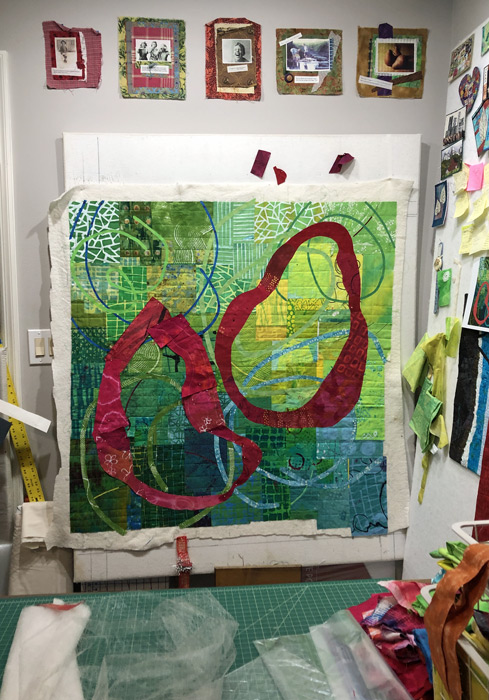
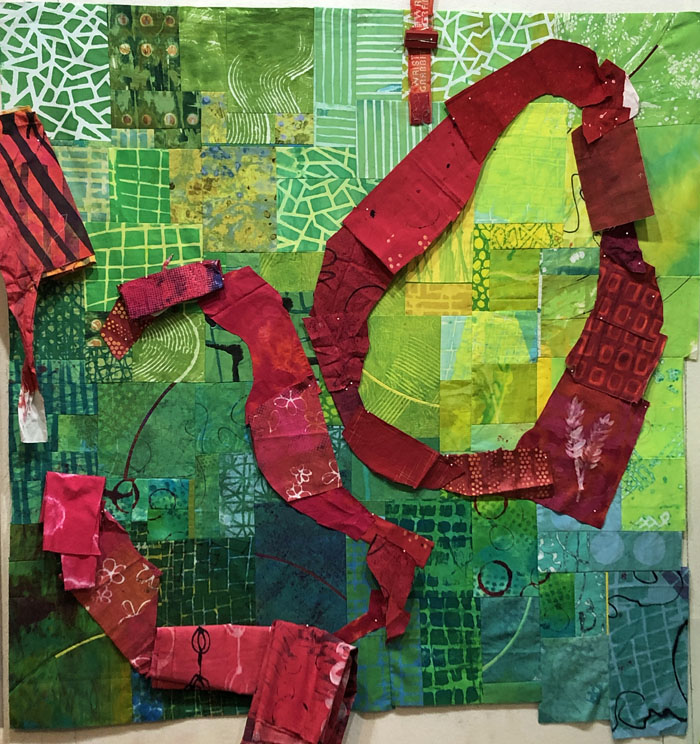
Designing in Maine, Part One

I recently taught two classes. One was “Design Your Own Nature Quilt,” and the ladies did a great job. The supply list includes artistic courage and they did not disappoint.

After a morning learning about design and preparing a sketch, the students start creating their fabric collages in the afternoon. It can be a little intimidating because it requires INTERPRETING their inspiration photos, rather than just COPYING them.

With only a few hours to work with fabric, they still made excellent progress on their quilts. Each student worked from her own inspiration photo, so each quilt was different and each student had her own issues to contend with.

Michelle’s photo was taken while canoeing on a very calm lake. I cautioned her about the subtleties of merging water colors, but she came with the right fabrics and was willing the spend the time needed to create her effects.

And this is where she left off. I think it’s very successful. Can you see all the time she spent shredding fabrics in order to give a feel of the water reflection? She’ll add French knots to emulate rivets on the point on the canoe.

Heather’s photo featured a favorite tree.

She cropped it to improve the composition and made excellent progress on her quilt.

Sharon chose a beautiful sunset.

She had to leave class early, but still made a good start on her piece.

Susan’s photo included two different types of flowers, with a foliage background.

She simplified shapes and made a good start on her quilt.

Jenn used a wonderful photo featuring lupines.

She knew she couldn’t easily replicate the entire image, so she cropped it down and simplified. She’ll be able to cut her flower petal/shapes more irregularly, which will speed things up.

Charlene selected a VERY complex photo of lily pads and flowers. She knew she’d have to simplify and crop, so she got to work.

She still had her work cut out for her, but had no qualms about cutting many lily pads. As  you can see, it began to take shape nicely right away.

Won’t these be great? I’ll show you more quilts in-progress in the next post.

Ellen Lindner

4

The Quilts They Chose

In my last post I told you how I’m giving away quilts to my nieces and nephews, and I thought you might like to see what they picked.

When David bought his first house I gave him these three “on indefinite loan.” But, they’re now officially his. They look great hanging above his bed.

Silk Study, 1-3

Amy helped me dye the fabrics for this quilt, so of course, it became hers. (This one has actually won awards.)

Cut Glass

Those first two were years ago and I’ve just recently given away these others. (They got to choose in birth order.)

Wishes on the Wind, an art quilt by Ellen Lindner. AdventureQuilter.com/blog

Wishes on the Wind – selected by Jason Pugh

This is photo that’s been tweaked, printed and stitched with black thread. A cool technique that I need to revisit.

Curly Crotons
Selected by Dillon Harris


Slightly Unexpected, an art quilt. Ellen Lindner, Adventurequilter.com

Slightly Unexpected
Selected by Alex Lindner

Very diverse, right? I’ll show you more of their choices in the next post.

Ellen Lindner

2

Giving Away Quilts – and the Prep that Goes with It

My inventory of quilts has gotten just WAY too big! I estimate that I have 250 in the house. Granted, some of them are only 5 x 7, but most are poster sized or larger. Of course, they’re not all master pieces, but they’re still nice enough to hang as art. So, I decided to give away some of them, starting with my nieces and nephews. I let each of them pick one and started prepping the hanging gear.

This is my dining room table now, (at the end of several days of work.)

Prepping quilts for shipping. Ellen Lindner, AdventureQuilter.com/blog

Each quilt has a hanging sleeve on the back and I cut a wooden slat to fit into it. Typically the quilts are hung with 2 nails. The slat and the sleeve have corresponding holes. The slat shown below fits into the white quilt that’s face down. (Oops, I drilled an extra nail hole.)

A hanging slat, and prepping quilts for shipping. Ellen Lindner, AdventureQuilter.com/blog

Once inserted, I feel around for the hanging holes and cut corresponding “wounds” in the sleeve.

A quilt hanging sleeve with a wound for the nail. Ellen Lindner, AdventureQuilter.com/blog

It all hangs very nice and flat on the wall.

But, sometimes a different method is called for. For instance, some of these are going to apartment dwellers, who can’t use nails in their walls. In that case, I still use a sleeve and slat. But, this time, I staple half of a Command Strip through the sleeve and slat. The staples go through far enough to make it all secure, but not so far as the protrude out the front. The corresponding half of the Command strip is velcroed in place and it’s ready to go.

A quilt with Command strips. Ellen Lindner, AdventureQuilter.com/blog

Once the hardware is handled, the quilts are rolled onto pool noodles, right sides facing out. I wrap them in fabric and they’re ready for shipping. (Although in this case I’ll be hand delivering five quilts. Three are wrapped together in the brown roll. Those recipients live near one another.)

It’s very satisfying to see them all prepped and ready to go. I’ll see my nieces and nephews at an upcoming family reunion and I’m looking forward to handing them off.

Quilts rolled and ready for shipping. Ellen Lindner, AdventureQuilter.com/blog

I’m feeling good about this.

Is your inventory growing? What do you do the not-quite-show-worthy ones?

Ellen Lindner

14

Bird of Paradise Quilt Complete

My slightly abstracted Bird of Paradise quilt is now complete.

Arabesque, an art quilt by Ellen Lindner. AdventureQuilter.com

Arabesque

I intended for this piece to be more abstracted. Therefore, I pieced it, thinking that this would automatically simplify the shapes. Well, apparently my piecing skills are better than I thought, because I found the shapes to be almost perfect. So, I purposefully sliced into them to create irregularity. (Or, was the problem with my brain just not wanting to deviate from my original image, which I loved.?) At any rate, I’m happy with it.

Arabesque - detail. An art quilt by Ellen Lindner. AdventureQuilter.com

This piece uses exclusively my own hand-dyed and printed fabrics.

I’ve named it Arabesque, which is a strong ballet pose. In it, the dancer balances on one foot (toes) with arms spread forward and back and her remaining leg out-stretched behind her. The petals of this flower reminded me of that.

See larger images and find other information on this quilt

Ellen Lindner

2

Now I Like it Better

You may remember this piece that I made last year, Adrenaline Rush.

Adrenaline Surge, an art quilt by Ellen Lindner. AdventureQuilter.com

Adrenaline Rush

I liked it pretty well, but I never felt like it really sang. So, when my art group had a critique session, I took this quilt for comments. As it turns out, the group liked it very well, except for one thing. I took their advice and made their suggested change.

This is the result:

Adrenaline Rush, an art quilt by Ellen Lindner. AdventureQuilter.com

Adrenaline Rush

That’s right, I just rotated it 90 degrees. Incredible! I like it SO much better!

Why does it work better this way? There could be several reasons, but I suspect the most likely one is this: in Western society we read left to right and top to bottom. Therefore, we tend to scan artwork and other things with this same pattern. That is, top left to bottom right. Perhaps the skinny strips in the top left corner of the turned version are more interesting than the white print of the first version. Or maybe the very slight diagonal line, where the red and white meet, is more pleasing in the new orientation, since it sort of mimics the diagonal scanning pattern. Whatever it is, I like it!

Time to move the sleeve.

Ellen Lindner


2

Color Combos

This post is a continuation of things we did in a color class I taught. This one didn’t publish promptly, so you might want to read the other (June 11th) post first.

After learning about warm and cool colors, we learned about opposite colors and similar colors. These are easy to identify by looking at a color wheel. Opposite colors have opposite locations and similar ones have similar ones.

Color in Carlisle. A class with Ellen Lindner, AdventureQuilter.com/blog

Still working with community papers each table of students made pages as examples of these additional concepts. We saw some of these as favorites during our mid-afternoon “field trip.”

These colors are similar: yellow-green, green, blue-green, and blue. There are MANY other examples! This combination is considered an easy one to work with.

Color in Carlisle. A class with Ellen Lindner, AdventureQuilter.com/blog

Students also learned about the idea of expanding a concept.  Below is an example of an expanded complementary/opposite combination: yellow-green with it’s opposite color, red-violet. But, the adjacent colors have also been added: red, and violet. It has the drama of an opposite color scheme but with even more interest.

Color in Carlisle. A class with Ellen Lindner, AdventureQuilter.com/blog

And here’s another: blue-green with its opposite color, red-orange. But, with the addition of red and orange. Love these!

Color in Carlisle. A class with Ellen Lindner, AdventureQuilter.com/blog

We also played around with idea of a “near” combo. So, this is a NEAR expanded complementary. The complement of yellow-orange is blue-violet, which we see. Two more colors have been added, but they’re all toward the green side of the color wheel: blue, and blue-green. It has the drama of a dead hit, but with some nice variation.

Color in Carlisle. A class with Ellen Lindner, AdventureQuilter.com/blog

The weather was PERFECT that day, so some of us drug tables outside for lunch. It was delightful!

 Color in Carlisle. A class with Ellen Lindner, AdventureQuilter.com/blog

It was an exhilarating and fun day for all of us.

Ellen Lindner
P.S. The correct art speak, which I don’t necessarily use in my class: opposite = complement, similar = analagous.

2

Fiber Art in Dunedin, FL

The Dunedin Fine Art Center, in Dunedin, FL, is currently showing FOUR fiber art exhibits. One features work by Hannah O’Hare Bennett. She showed some flat wall pieces, but I was especially intrigued by her little 3D manipulations. Here you can see lots of small canvasses arranged in a grid. They have quite a presence like this, but I appreciate the individual ones even more.

Fiber art in Dunedin, FL. Artwork by Hannah O'Hare Bennett. AdventureQuilter.com/blog

Like these.

Fiber art in Dunedin, FL. Artwork by Hannah O'Hare Bennett. AdventureQuilter.com/blog

And these.

Fiber art in Dunedin, FL. Artwork by Hannah O'Hare Bennett. AdventureQuilter.com/blog

She also had some wonderful little 3D objects arranged on a low table. Each of these was interesting in its own right, but the combination and arrangement of them added even more interest.

Fiber art in Dunedin, FL. Artwork by Hannah O'Hare Bennett. AdventureQuilter.com/blog


Fiber art in Dunedin, FL. Artwork by Hannah O'Hare Bennett. AdventureQuilter.com/blog

Fiber art in Dunedin, FL. Artwork by Hannah O'Hare Bennett. AdventureQuilter.com/blog

Detail shot of above.

Fiber art in Dunedin, FL. Artwork by Hannah O'Hare Bennett. AdventureQuilter.com/blog

This wall-hung piece had two components.

Fiber art in Dunedin, FL. Artwork by Hannah O'Hare Bennett. AdventureQuilter.com/blog

I didn’t understand the stack of fabric at right, but I thought it was very cool. (And an excellent example of the role lighting plays in an exhibit.)

Fiber art in Dunedin, FL. Artwork by Hannah O'Hare Bennett. AdventureQuilter.com/blog

All four fiber exhibits will be on display through August 12, 2023. If you’re in the area (near Tampa) I recommend a visit.

Ellen Lindner


2

A Nice Award!

My quilt, Daydreamrecently won a Second Place award at an exhibit in Vero Beach, FL.

Ellen Lindner with her fabric collage, "Daydream." AdventureQuilter.com

The exhibit was to celebrate the gallery’s 15th anniversary, so the pieces were supposed to be joyful and upbeat. I thought this piece fit the bill and, apparently, the judge did as well. This was a mixed media exhibit, so it was extra exciting to have fiber art recognized among the paintings, photography, and sculptures.

Daydream, an art quilt by Ellen Lindner. AdventureQuilter.com

Daydream

This exhibit, Crystal Jubilee, is at Gallery 14 and it will be up until September 1st. There will be THREE MORE receptions! The next one will be July 7th, and I plan to attend. If you’re in the area, please stop by and introduce yourself.

Ellen Lindner

0

Color in Carlisle

I had forgotten how much fun it is to cut colored paper and glue it down. But, the ladies in my Adventures in Color class, in Carlisle, PA helped me remember! Gee, did we have fun!

In this class I encourage table mates to share their materials. This adds to the fun, since everyone is immediately sorting through things and helping one another look for the perfect item.

Color in Carlisle. A class with Ellen Lindner, AdventureQuilter.com/blog

Doesn’t this look enjoyable? Each student made a workbook using the materials you see here. First, they learned about the color wheel. Then, cool and warm colors.

We had a mid-afternoon “field trip” around the room, with each person showing her favorite page. Several people loved the cool colors.

Color in Carlisle. A class with Ellen Lindner, AdventureQuilter.com/blog

They include every version of yellow-green, green, blue-green, blue, blue-violet, and violet/purple.

They can be pastel and muted.

Color in Carlisle. A class with Ellen Lindner, AdventureQuilter.com/blog

Or bright. Or dark.

Color in Carlisle. A class with Ellen Lindner, AdventureQuilter.com/blog

Students were encouraged to show a variety of values and brightness on their pages.

Color in Carlisle. A class with Ellen Lindner, AdventureQuilter.com/blog

Cool colors can be calming. They tend to recede, so they’re especially good for backgrounds.

And then there are the warm colors.

Color in Carlisle. A class with Ellen Lindner, AdventureQuilter.com/blog

They include every version of yellow, yellow-orange, orange, red-orange, red, and red-violet.

Color in Carlisle. A class with Ellen Lindner, AdventureQuilter.com/blog

Warm colors are dramatic and they tend to come forward. They’re especially good for foregrounds.

Color in Carlisle. A class with Ellen Lindner, AdventureQuilter.com/blog

And then, of course, it gets even more exciting when you start mixing warm and cool colors. I’ll show you examples in my next post.

Ellen Lindner
P.S. I’m so sorry that I didn’t record who made each of these pages! Ladies, if you identify your page, please let me know and I’ll give you credit.


4

Double Reverse Applique in Lebanon, PA

My class in Lebanon, PA was small, but the students were enthusiastic. Just look at their great results!

Double Reverse Applique in Lebanon, PA. Ellen Lindner, teacher. AdventureQuilter.com/blog

Back row, L-R: Christenna, Cheryl, and Ann. Front row, L-R: Donna and Dian

I have to brag on Cheryl, who was also my hostess. Her sewing machine gave her all sorts of problems in class, so she HAND STITCHED her apple! (And did it about as fast as most of her classmates, who were using machines.)

Double Reverse Applique in Lebanon, PA. Ellen Lindner, teacher. AdventureQuilter.com/blog

Later, she sent me a photo of her finished apple. She gets a gold star for effort and perseverance!

Double Reverse Applique in Lebanon, PA. Ellen Lindner, teacher. AdventureQuilter.com/blog

I had a great time with these ladies.

Ellen Lindner
P.S. In person Double Reverse Applique class
P.P.S. Double Reverse Applique eBook and online class.

0