


Fabric Dyeing Results
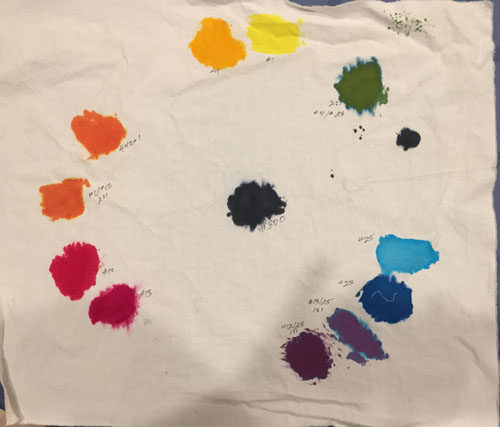
I spent all of last week learning about dye painting and other dying techniques. Once I used fabric that was properly treated, my color wheel turned out as I expected.
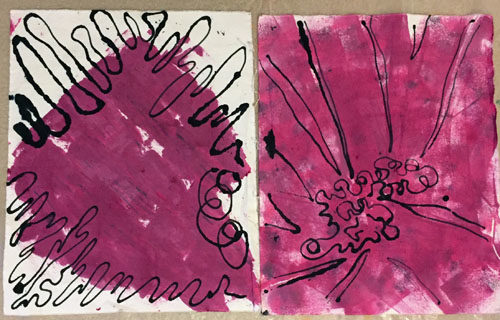
One of the things I was anxious to try was drawing a black line with a syringe. Here, I’ve done it on berry colored (fuchsia + black) fabrics. Kinda cool, right?
I was also experimenting with different ways to apply paint to fabric. The one on the left was done with a putty knife and the right one was done with a sponge brush. As you can see, I’m aiming for imperfection.
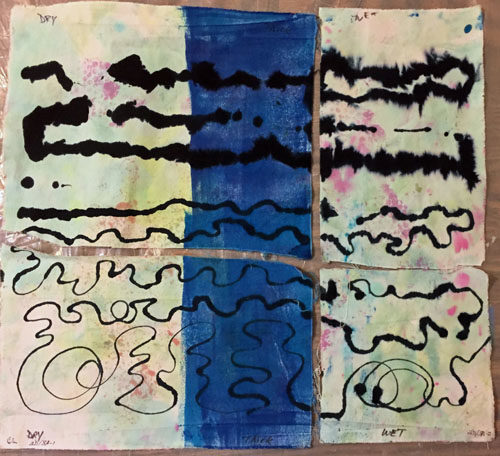
I experimented with the syringe line some more to see how much it would spread on dry fabric, vs. fabric with thickened dye, and fabric with thin dye. As you can see, my dye in the syringe was too thin at the top. But, once I thickened it up (about double) I was happy with all the bottom versions. I love this effect and will definitely be doing some more of it.
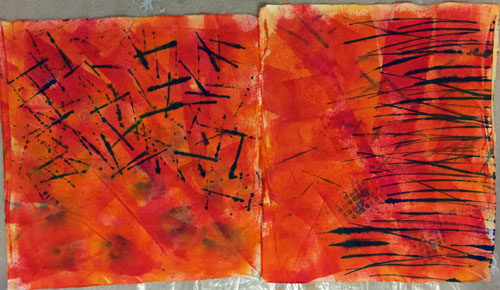
These two orange pieces started out as peach colored duds from Batch #1. I added a bunch of dye and then made marks with a credit card. I like the design a lot.
These next two pieces are actually sisters. I started with the left one, trying to do some stenciling. The bottom left blobby area was done with a piece of thickly crocheted “lace.” I tried to stencil through it with a sea sponge, but the fabric nature of the lace wiggled around too much and I just got a mess. The top right blog was a piece of shelf liner, through which I also tried to stencil. Two big fails.
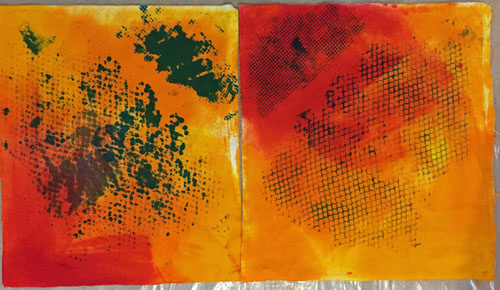
But, then I noticed all the paint sitting on top of my two “stencils” and wondered if I could get a monoprint from them. So, I laid on a plain piece of white and got the resulting print. MUCH better! I painted the background after the print was dry.
As you can see, I was learning from both my successes and my failures. And I was just getting started.
Ellen Lindner


Hello Ellen,
I have taken several of your classes and I really enjoy following your painting and art making struggles and lovely outcomes.
I discovered an app called True Color. The Ultimate Color Mixing Assistant. Cost 2,99 USD in App store.
Perhaps this is an app could be of interest for you?
Thanks, Ann-Mari. That sounds very useful and I’ll check it out!
Interesting stuff, but you’ve got me totally perplexed as to how you painted the background after the print was dry. HOW can you paint a background after you’ve printed the foreground? I can’t conceive of it!
Good question, Lif. It’s because the dyes are transparent. So, whatever’s added second (in this case the background color,) WILL alter the color of the first layer, but with some planning it generally works. This, however, is one of those things I’m still learning about. Actually, I saved one hideous fabric by over painting it with thin dye. It completely changed the colors, which was a very good thing.
Can you be more specific about the syringe? With or without needle? Are they hard to find? I love what you did with this!
Isn’t it cool, Suzanne? Here’s a link: https://www.amazon.com/Easy-Glide-Curved-Syringes-Needle/dp/B01H0IAM7K/ref=sr_1_3?ie=UTF8&qid=1535045235&sr=8-3&keywords=syringe+with+curved+tip (Although mine was given to me, so this probably isn’t the same exact thing.)
I’ve found that the thickened dye needs to be thickened again with about equal parts first version and print paste (thickener.) But, experimenting is definitely required.
An amusing aside: my brain is so trained to do stipple quilting, that it didn’t want to cross the dye lines. I automatically did that stippling pattern until I realized what was up and forced myself to do circles.
Would LOVE to know the step by step “formula” for how you did your color wheel. The colors are marvelously intense!
Soda Ash >> dry >> then what?
Hi Candy,
I used the dyes recommend in Ann Johnston’s book, “Color by Design.” (2 sets of primaries and a black.) She gives instructions for mixing the colors pretty strong, which gives this great color. Of course, I mixed the secondary colors. I labeled everything, so I’ll know what to expect.
Email me if you want the exact colors and measurements. You’d have a blast with this.