

Raw Edge Collage:Fabulous Flexibility
©2010 Ellen Lindner
Published in SAQA Journal Spring 2011
There are many ways to create imagery and designs on quilts: from piecing and appliqué to painting and dyeing. My technique of choice, however, is raw edge collage. It is very flexible, allowing me to easily make changes right up to the minute I start quilting, (and beyond, if needed.) It’s also faster than many methods, since the “quilt top” is assembled as part of the quilting process. In fact, there is no stand-alone quilt top. The entire collage is held together with pins, which remain in place as machine quilting begins.
As with any quilt, my first step is to come up with a design. This is often rather loose, since I plan to refine it as I go. Next, I decide on the dimensions of my finished quilt, cut a piece of muslin to size, and pin it to my design wall. This serves as a structural base for the collage pieces, allowing me to later move everything from the design wall to the sewing machine.
With my process, I completely fill the background before working on the foreground elements. I simply cut and place fabrics to fill the space, often using the irregular shapes left over from previous projects. I secure the pieces of fabric with pins inserted parallel to the floor, like push pins. The white pinheads can be seen in the in-progress photo, below. After completing the background, I begin to place the foreground elements.
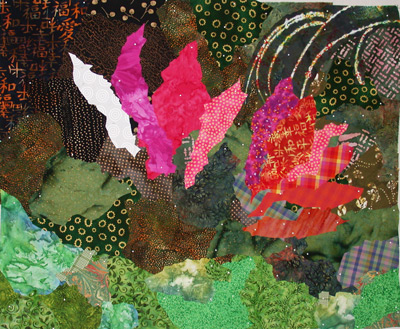
Freehand cutting by eye, I often cut multiple fabric shapes before composing. This allows me to work faster, helping me to work more loosely.
When creating foliage, I often cut my fabrics with jagged edges. This is very easy to do simply by scrunching the fabric into the blades of my scissors while cutting.
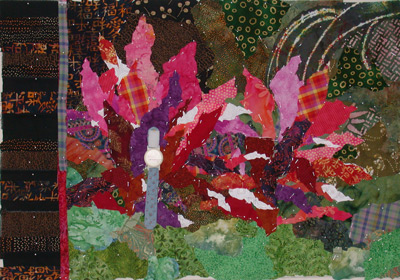
Sometimes, I decide to add a border. However, since the muslin was originally cut to the size of the interior portion, I don’t have enough to support additional collage pieces. No worries: I just use a glue stick and add the needed muslin strips to the back of the existing muslin. This is how I was able to add the in-progress border, shown at right.
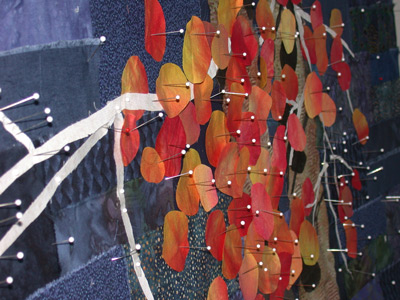
As you might imagine, by the time I pin together one of these quilts, I have TONS of pins stuck into the design wall! See the side view of Ripening, in-progress, at left.
People frequently ask if I fuse my work. I don’t typically do this for a couple of reasons: 1 – it’s simply not my habit, 2 – I use A LOT of different fabrics in each quilt and I don’t want to commit to having fusible on them for the long haul. Having said that, there are a couple of quilts for which I regret not using fusible web. They were excellent candidates since they used a lot of the same fabric. Ripening, shown pinned at left, falls into that category.
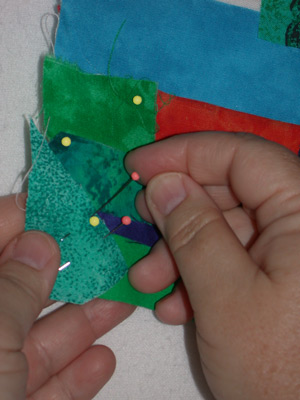
Of course, the big question is “how do you get it to the sewing machine?” Well, it takes a good bit of repinning. However, this process is made easier by the very long pins I use.* With them I’m able to pull all the muslin forward to the head of the pin, without pulling it loose from the design wall. This gives me room to work a pin through all layers.
The photo at right shows this. My left hand is behind the muslin and has pulled all the fabrics forward to the heads of the yellow pins. These pins are still inserted in the design wall. Using pink pins, I’ve begun to pin through all layers, freeing them from the design wall. Next, the bottom yellow pin will come out, allowing me to move my left hand further behind the muslin, to the next spot.
I continue in this fashion, working my way across the piece, until all fabrics are pinned through to the muslin, and it is no longer pinned to the design wall. At that point, it’s portable and I move the entire thing to a layer of batting. After securing with a little spray adhesive, I’m ready to stitch. As I quilt, I’m not only adding texture, but also attaching the fabrics to one another, structurally securing the design. The abundance of pins will occasionally scratch me, but I consider that a small price to pay for the ease and versatility of this technique.
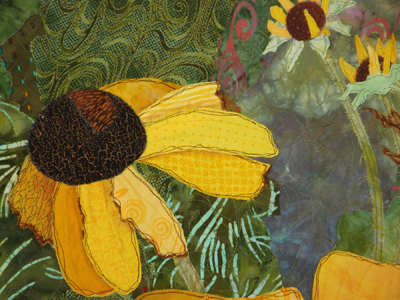
When quilting, I don’t try to enclose or cover the raw edges. Instead, my goal is to hold the many pieces securely in place. When stitching the background, this generally means stitching from one fabric shape across an edge to another. But, for key elements, I usually stitch around the perimeter. Sometimes, I add definition by stitching with a contrasting thread. This can be seen in Natural Progression (detail,) at left.
I love the fabulous flexibility of working this way. Perhaps you’d like to give a try, too.
*Resources
Long pins: IBC Glass Head Silk Pins #5003, 1 3/8” long, from Clotilde
Finished quilts shown in this article: Ti Plants A-Glow-Glow, Ripening, and Natural Progression.
You may also be interested in this similar article, which discusses both design and construction.
If you found this information useful, you may be interested in my other free articles, online classes, and e-books. You'll find a full directory here.
©2007-2012 Ellen
Lindner
|