

A shorter version of this article was published in Art Quilting Studio , Winter 2012.
Second Look
©2012 Ellen Lindner
Here in Florida we have colorful plants in our yards all year long. In the month of December this includes poinsettias and Christmas Palms. Aptly named, the Christmas Palm’s berries ripen at different rates, so both red and green are present at the same time. This provided the inspiration for my quilt “Ripening.”
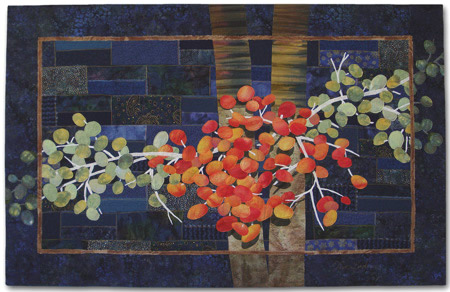
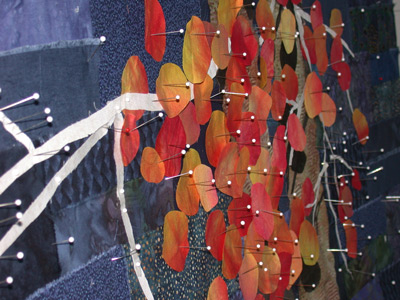
Working on a design wall, I constructed this quilt with my usual raw edge collage technique. Starting with a muslin base, I pinned fabric pieces onto it as I created and revised the design. Once I was happy with the composition I layered it with batting – along with all those pins – and quilted it. The stitching is used to not only hold the layers together but also to hold all the design elements in place.
This process gives me lots of flexibility, which I love. No decision is final until I do the quilting.
Since the berry shadows create a 3D effect, I thought it was important to include them. I did so, initially, by cutting and placing small pieces of black silk organza. That gave the desired effect, but it was pretty tricky. After a while, I switched to simply drawing the remaining shadows with a black marker. They were still transparent, and oh so much easier!
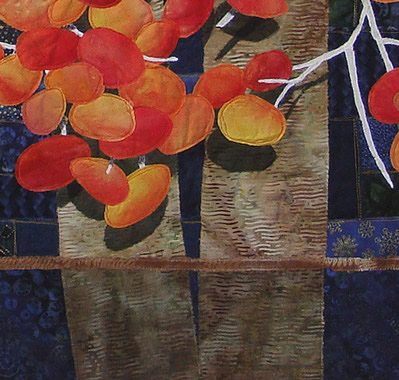
For the border, I wanted a darker version of the image extending out to the edge. In the case of the berries and twigs, I simply chose darker fabrics. But for the trunk, above, I wanted to maintain the striations of the fabric, so I used two layers of tulle: one brown and one black.
Using tulle to alter colors like this is very effective and easy to do. With both tulle fabrics layered, I cut them into a shape that’s larger than needed. After pinning them in place, I stitch the desired shape with clear thread, and then trim it closely. Since tulle is not woven it won’t ravel. How great is that?
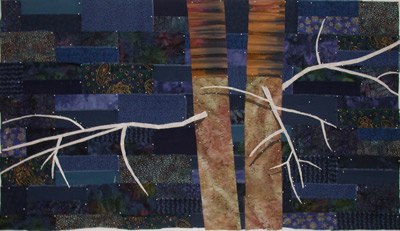
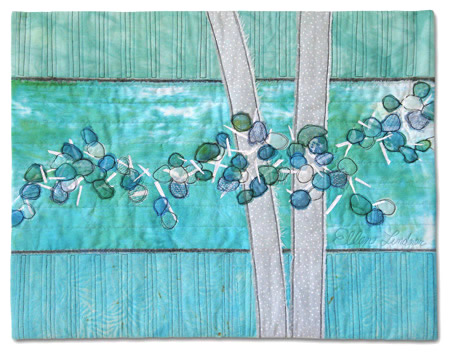
At one point during construction, only the trunks and white branches were in place. The stark contrast between the dark background and the white twigs was very intriguing, and, I thought, very effective. This caused me to take a second look at my subject, thinking that I might depict it in an entirely different way. Sure enough, those twigs stuck in my brain, and before long, I set out to make a second quilt inspired by them.
With this new quilt, I changed the colors and abstracted the twigs – turning them into sharp little white triangles. I was delighted with the energy of these little shapes! Since I wanted to play up the branches, I decided to use sheer fabrics for the berries, allowing the twigs to show through. First, I cut a multitude of circles from synthetic fabrics, using a soldering iron to draw and cut.
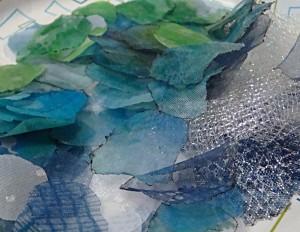
These worked perfectly. Sprinkling them across the quilt surface provided lots of movement without obscuring those sharp little twigs.
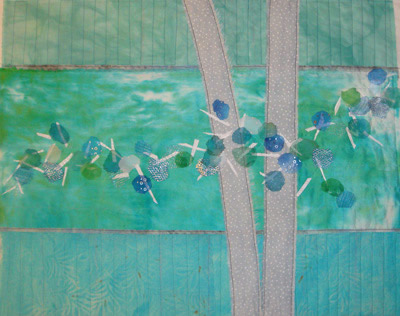
I was happy with the composition at this point, but thought it lacked contrast. I corrected that by stitching twice around each berry with black thread. That did the trick!
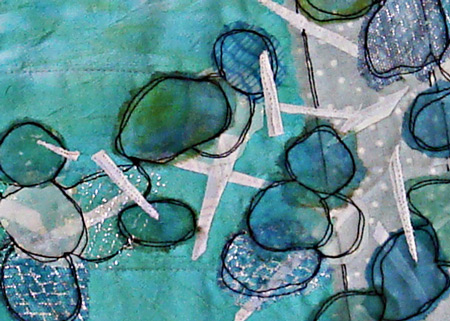
I really like the effect of this irregular and imperfect outline stitching and I use it frequently. It was the ideal addition to Rhapsody in Blue Berries.
Melting sheer fabrics to create shapes:
As I mentioned earlier, non-woven sheers can be stitched and then cut to shape. However, woven synthetic fabrics (and silks) tend to ravel badly, requiring a different technique. Using a soldering iron makes it possible to draw and cut these fabrics while simultaneously melting the edges.
To work safely you’ll need to take a few precautions. First, you’ll need a heat resistant surface to work on. You can buy glass work plates at hobby stores, but I just use the glass from an old frame, after covering the edges with sturdy tape. Next, you’ll need a way to put the hot soldering iron down without burning anything. They come with little stands, but I’ve found them to be unreliable. Instead, I use an old brick. A terra cotta flower pot also works well. Also, have some fine steel wool handy. This is useful for cleaning the hot tip when it starts to get a buildup of melted plastic. (See my set up here.)
It’s also possible to melt synthetic fabrics by passing them through the flame of a candle that’s secured in a candle holder. Obviously, this provides less control. But, it can produce the perfect effect when an irregular edge is desired.
Either way, you need one more very important piece of equipment: a respirator. That’s because melting any sort of plastic releases toxic fumes. Give your brain a break and purchase an inexpensive respirator. Also, be sure to work in a well-ventilated area: either outdoors or under an exhaust hood that vents outside.
Finding inspiration around me is always exciting. From that spark I can begin a quilt without knowing exactly how it will turn out. The collage technique allows me to continually modify my quilt as it progresses. As a result, the quilt evolves, and I stay engaged with the creative process all throughout design and construction. A wonderful adrenalin high!
Here’s a suggested respirator: 3M 5000 half-face model
If you found this information useful, you may be interested in my other free articles, online classes, and e-books. Full directory