Taking Inspiration from the Starting Fabric

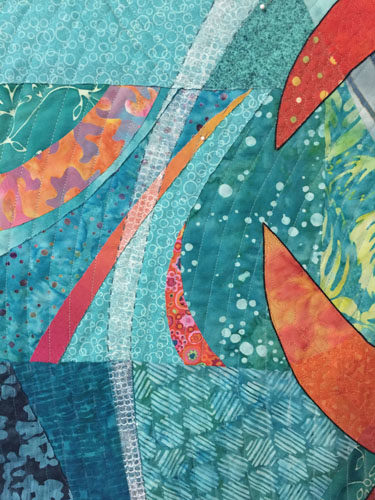
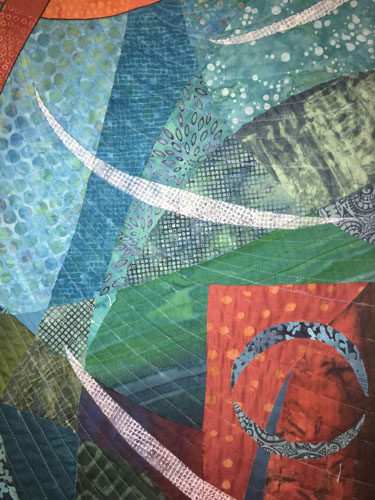
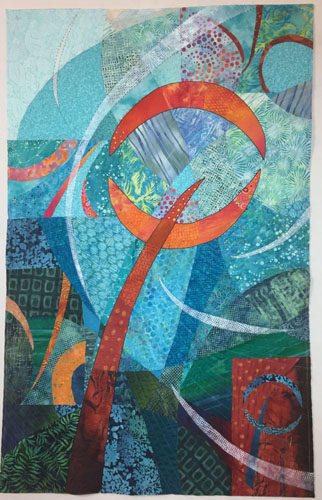
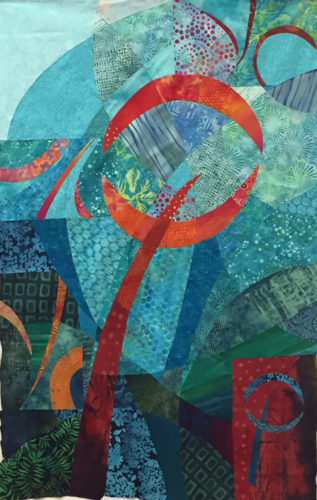
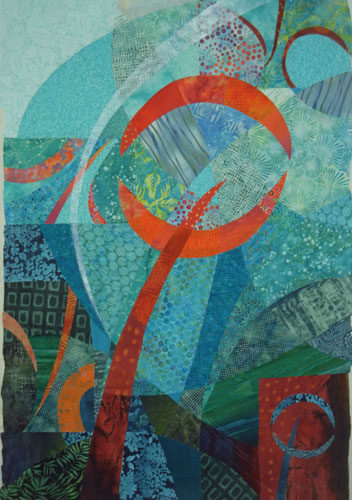
As I worked on the abstract quilt, I continued to take clues and inspiration from the original fabric.  Since it was very angular, I wanted my pattern to be the same. Can you see how the shapes and lines of the side fabrics are extensions of the central fabric lines?

It all Started with a Beautiful Fabric. Ellen Lindner, AdventureQuilter.com/blog

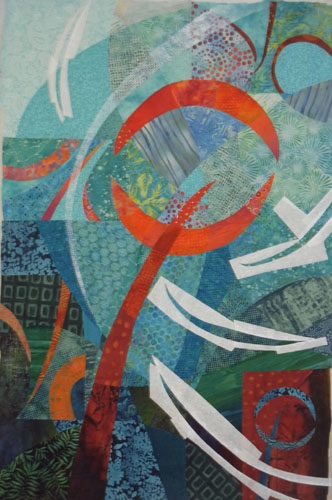
Same for the quilting.  First, I stitched parallel lines on the two sides and in the middle I stitched around each little line.

Taking Inspiration from the Starting Fabric. Ellen Lindner, AdventureQuilter.com/blog

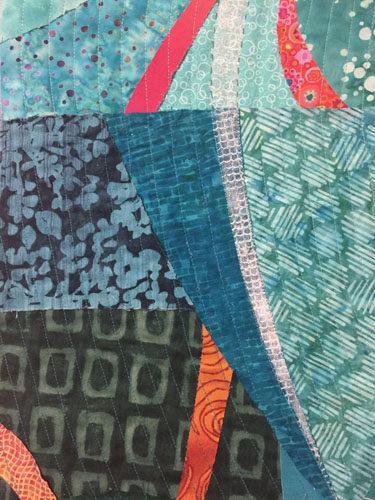
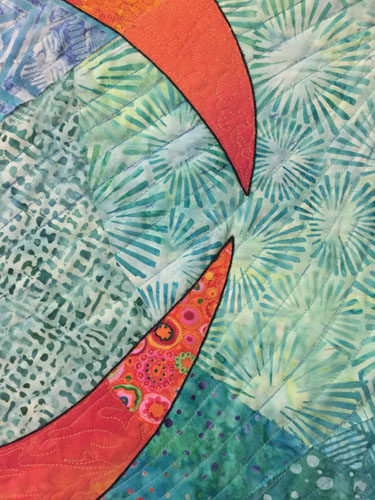
Then, I decided to stitch parallel lines in this central area.  Oh my!  WHAT was I thinking?  It was WAY too much starting and stopping for me and I gave up after the few lines shown above.

Plan B: concentric lines.  It worked pretty well, except for the fact that my variegated thread gave too much contrast in some of my messy spots.  I have a bit of redoing ahead of me.

Taking Inspiration from the Starting Fabric. Ellen Lindner, AdventureQuilter.com/blog

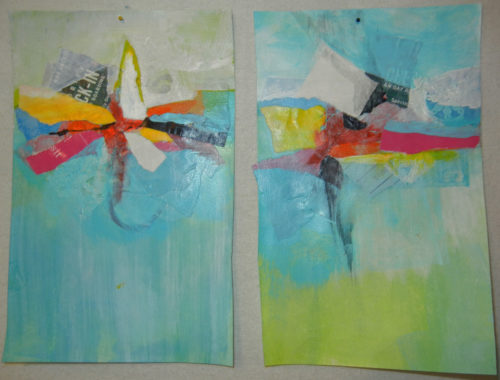
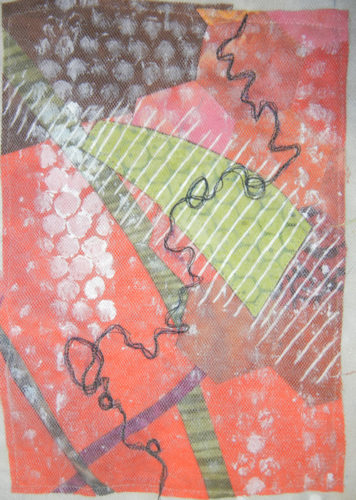
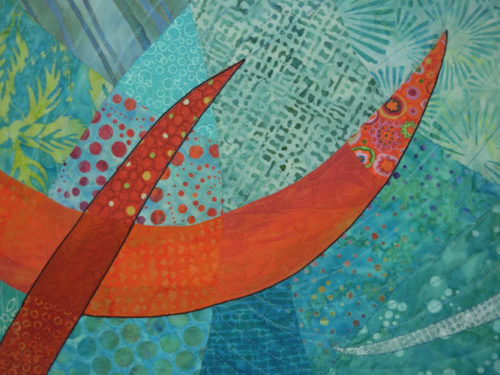
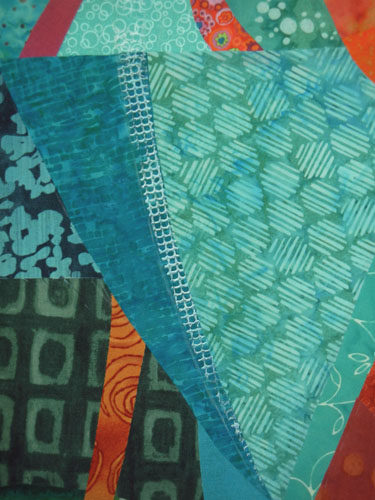
Next, it was time to think about the main design elements to be placed in the foreground of this piece.  Again, I wanted something angular, but when I checked, my sketchbooks I didn’t have anything like that.

Taking Inspiration from the Starting Fabric. Ellen Lindner, AdventureQuilter.com/blog

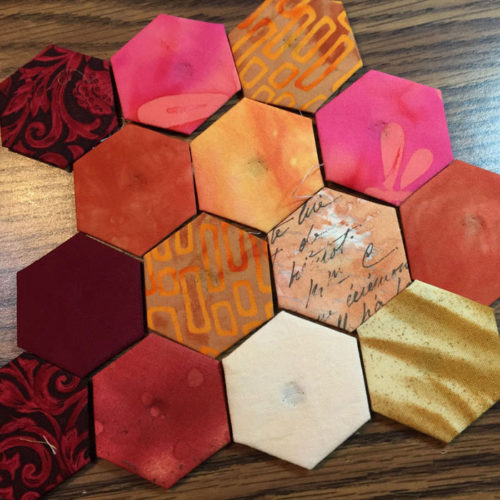
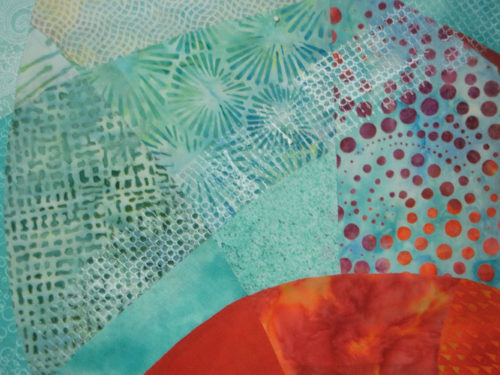
So, I turned, once again, to the fabric itself.  I took close up shots of several of the fabric shapes and found one I liked. (Although I edited it quite a bit.)

Taking Inspiration from the Starting Fabric. Ellen Lindner, AdventureQuilter.com/blog

And, so here is the plan for the final motif.

It all Started with a Beautiful Fabric. Ellen Lindner, AdventureQuilter.com/blog

I’m liking it a lot.  Next will be determining what color to make the motif.  Light or dark versions of the colors already present would be an obvious choice.  But, I think I want to do something a little unexpected.  We’ll see.  Red maybe???

It’s been really fun to let the fabric inspire so many choices.

Have you ever done something inspired by a particular piece of fabric?

Ellen Lindner


6

It all Started with Beautiful Fabric

Back in July I bought this beautiful painted piece of fabric from Pat Pauly.

It all Started with a Beautiful Fabric. Ellen Lindner, AdventureQuilter.com/blog

Isn’t it gorgeous?  I knew it could be the start of something wonderful.  The only problem is that the scale of this fabric is much larger than I normally use. Which meant that I didn’t have other similarly scaled fabrics to work with.  Still, I thought I could feature this inspiration fabric and add simpler fabrics to it.

First, I had to figure out how much of this fabric to use and a rough idea of the size of the quilt.  I decided to use half of the fabric.

It all Started with a Beautiful Fabric. Ellen Lindner, AdventureQuilter.com/blog

Then, I auditioned how I might cut it and reassemble it.  Folding helped me visualize the new shape of the fabric.

It all Started with a Beautiful Fabric. Ellen Lindner, AdventureQuilter.com/blog

So, I did this. The piece on the right has been turned 180 degrees.

It all Started with a Beautiful Fabric. Ellen Lindner, AdventureQuilter.com/blog

Next, I began to audition other fabrics.  I thought these looked pretty good.

It all Started with a Beautiful Fabric. Ellen Lindner, AdventureQuilter.com/blog

At every turn, I used the starting fabric to help me make decisions.  Such as the angles for the side pieces.  I wanted them to enhance the angular nature of the starting fabric’s pattern. See what I mean?

It all Started with a Beautiful Fabric. Ellen Lindner, AdventureQuilter.com/blog

Here’s the left side completed. (That is, pinned.)

It all Started with a Beautiful Fabric. Ellen Lindner, AdventureQuilter.com/blog

And here’s the entire background when I THOUGHT it was finished.

It all Started with a Beautiful Fabric. Ellen Lindner, AdventureQuilter.com/blog

I decided that one of the yellow fabrics on the right showed up too much, so I had to address that.  Trial and error!

Thus far, I’ve shown you only the background.  But I was also working on an idea for a foreground motif.  I’ll show you that next time.

What would you do?

Ellen Lindner


6

Prepping for Shibori

I’m getting ready for a shibori dying day with my art quilt buddies.  (Shibori is a type of dying which uses manipulation of the fabric to resist the dye in certain areas.  Tie dye is an example.)  There are a TON of ways to fold, roll, scrunch, and stitch fabric prior to dying to get a variety of patterns.  This time I decided to do something new for me: hand stitching.

Here I’ve stitched parallel rows.  When the threads are pulled tight, they create a sort of messy smocked effect.  The folds will make it difficult for the dye to get into the crevices, creating a pattern.

Prepping for shibori. Ellen Lindner, AdventureQuilter.com/blog

I also stitched little rows of tucks. This photos shows them before being drawn up.

Prepping for shibori. Ellen Lindner, AdventureQuilter.com/blog

Then I got very industrious.  Here, I stitched tucks in small circles and pulled them tight.

Prepping for shibori. Ellen Lindner, AdventureQuilter.com/blog

With my fabric folded in half I drew concentric semi-circles for stitching.  These will yield full circles when dyed.

Prepping for shibori. Ellen Lindner, AdventureQuilter.com/blog

Allow me to say that this stitching and pulling and knotting took A LOT of time!

Prepping for shibori. Ellen Lindner, AdventureQuilter.com/blog

Next, I used a long basting stitch on my machine and did some more parallel rows and rows of tucks.  MUCH faster!  The only trick is to pull up only the bobbin thread.

Prepping for shibori. Ellen Lindner, AdventureQuilter.com/blog

Prepping for shibori. Ellen Lindner, AdventureQuilter.com/blog

Prepping for shibori. Ellen Lindner, AdventureQuilter.com/blog

Finally, I switched to faster non-stitching methods. I used rubber bands to hold scrunched fabric in place.

Prepping for shibori. Ellen Lindner, AdventureQuilter.com/blog

Check this out: rocks caught up in the fabric and secured with rubber bands.  I used a ton!

Prepping for shibori. Ellen Lindner, AdventureQuilter.com/blog

I can’t wait to dye this stuff!

Update: Our dying day has been postponed due to COLD here in Florida!  How weird is that? Our plan was to do it outside with temperatures in the 60s.  That would have been fine for us, but not for the dye.  The water needs to be fairly warm.  I guess I get more time to prep.

Ellen Lindner
P.S.  I know my “cold” story isn’t getting any sympathy from your northerners and you’re right!  I can’t believe the frigid temperatures I’ve seen reported!  Stay warm folks.


10

A Little Christmas Gift

What is utilitarian, personal, and decorative?  Why hand stitched dish towels with my personal recipes printed onto them.

Dish towels with personal recipes and hand stitching. Ellen Lindner, AdventureQuilter.com/blog

This is what I made for several close family members as Christmas gifts. My mom and sister especially appreciated them because we tend to use many of the same recipes.  So, they had fun hunting up their favorites, recognizing hand writing, and such.

Dish towels with personal recipes and hand stitching. Ellen Lindner, AdventureQuilter.com/blog

I scanned the recipes individually and created a computer file the right size.  I found that it looked too much like a photograph, so I removed most of the color and tweaked it a little on my computer.

Dish towels with personal recipes and hand stitching. Ellen Lindner, AdventureQuilter.com/blog

I had my computer image printed onto linen by Spoonflower.com .  If I remember correctly, I had 2 yards printed and that gave me enough to make eight towels.  I just hemmed them and added the hand stitching.

Which was quick and easy.

Dish towels with personal recipes and hand stitching. Ellen Lindner, AdventureQuilter.com/blog

Dish towels with personal recipes and hand stitching. Ellen Lindner, AdventureQuilter.com/blog

I changed the colors of thread for each towel, reflecting the colors of the recipient’s kitchen.

Dish towels with personal recipes and hand stitching. Ellen Lindner, AdventureQuilter.com/blog

This project was super easy and everyone really liked them. (Me too.  I have one in my kitchen drawer.)

Did you make any gifts this year?

Ellen Lindner
P.S. A little research revealed that hand stitched towels are very durable.  They can be used and washed just like any hand towel. I was even told that the towel will wear out before the stitching.


8

What I Learned in 2017

My experiments and play this year have taught me a lot.  Some of it has produced good results and some of it has taught me what to AVOID.  All of which is valuable.

I learned more about abstract composition.

An online class with Jane Davies. Ellen Lindner, AdventureQuilter.com/blog

And how NOT to get transparency with fabric.

At Least I Learned Something. Ellen Lindner, AdventureQuilter.com/blog

I tried my hand at deconstructed screen printing, and loved the results.

Deconstructed Screen Printing: drawn design. Ellen Lindner, AdventureQuilter.com/blog

I learned to blend layers in Photoshop Elements.  What fun!

Blending Layers in Photoshop Elements. Ellen Lindner, AdventureQuilter.com/blog

I learned how to make hexies.

Hand Stitching Hexies. Ellen Lindner, AdventureQuilter.com/blog

AND I painted directly onto a quilt!

Quilting and Cording. Ellen Lindner, AdventureQuilter.com/blog

Just a few of my adventures! What have you learned this year?

Ellen Lindner

8

Dressing Downton: Part Two

Continuing with a glimpse at the “Dressing Downton” exhibit, this is  one of Sybil’s maternity dresses. (The last of the “everyday” outfits.)

Dressing Downton. Ellen Lindner, AdventureQuilter.com/blog

Now, for some more gowns.  In this case, those worn by Lady Cora and Lady Rose at her presentation to the court.

Here’s Lady Cora’s, which features vintage beading on the bodice and shoulders.

Dressing Downton. Ellen Lindner, AdventureQuilter.com/blog

Dressing Downton. Ellen Lindner, AdventureQuilter.com/blog

Dressing Downton. Ellen Lindner, AdventureQuilter.com/blog

And this is Lady Rose’s gown.

Dressing Downton. Ellen Lindner, AdventureQuilter.com/blog

Dressing Downton. Ellen Lindner, AdventureQuilter.com/blog

When I saw this episode I thought the fluffy head pieces were rather ridiculous looking. However, the sign (shown above) explains that these were required, along with a train and the carrying of either a bouquet or flowers.

I saw a recent movie about Queen Elizabeth and the court presentation scene (in the 1960s) showed similar ostrich feather head dresses.  Perhaps it continues today?

Moving to the end of the series, this is the outfit worn by Lady Cora at Edith’s wedding.

Dressing Downton. Ellen Lindner, AdventureQuilter.com/blog

Dressing Downton. Ellen Lindner, AdventureQuilter.com/blog

Dressing Downton. Ellen Lindner, AdventureQuilter.com/blog

These are just a few of the costumes on display as part of this exhibit.  It’s well worth  a visit, if you get the chance.

Ellen Lindner

0

A Wonderful Little Scrawny Tree

Not far from my home I noticed this on the side of the road.

A Wonderful Little Ugly Tree. Ellen Lindner, AdventureQuilter.com/blog

You can’t tell what it is?  It’s a scrawny Christmas “tree,” right there on the side of the road.

I drew it onto this next photo, so you can see it more easily.

A Wonderful Little Ugly Tree. Ellen Lindner, AdventureQuilter.com/blog

What on earth?  Why did someone add a tree here, of all places?

Actually, it’s not a tree at all.  Just a couple of leafy branches whose leaves have now died.

A Wonderful Little Ugly Tree. Ellen Lindner, AdventureQuilter.com/blog

But, it has battery operated lights and ornaments.

A Wonderful Little Ugly Tree. Ellen Lindner, AdventureQuilter.com/blog

Who on earth would put a tree here?  I don’t know but I’m delighted by it!  Mostly by the idea of someone anonymously adding this decoration to our community.  And also, by how pathetic this little scraggly thing looks. I’m sure Charlie Brown would love it.

This little scrawny stick has really made an impression on me.  Someone went out of their way to give a smile to those who drive by.  What a wonderful thing to do, especially at Christmas time.

I hope your holiday will also be filled with unexpected surprises and delights.

Merry Christmas!

Ellen Lindner

8

Dressing Downton: Part One

Are you a Downton Abbey fan?  I am, big time!  So, I was very excited to see “Dressing Downton,” an exhibit of many of the outfits worn on the show.  It’s currently on display at the Lightner Museum in St. Augustine, FL, which is a show-stopping setting in its own right.

Dressing Downton. Ellen Lindner, AdventureQuilter.com/blog

It was originally the Alcazar hotel, built by Henry Flagler in 1888. It was a wonderful backdrop for these period costumes.

Dressing Downton. Ellen Lindner, AdventureQuilter.com/blog

Clothing was showcased in vignettes, with wonderful signs explaining each outfit and how it was used in the series.

Dressing Downton. Ellen Lindner, AdventureQuilter.com/blog

As you can see, the lighting was dim (similar to the period, I imagine,) and flash photography was not allowed. The clothing above was worn for the hospital charity ball.

This sign explained several of the wardrobe conventions of the day.

Dressing Downton. Ellen Lindner, AdventureQuilter.com/blog

But, let’s back up to episode 1: the outfit Lady Mary wore to dinner when she met the infamous Turkish diplomat.

Dressing Downton. Ellen Lindner, AdventureQuilter.com/blog

Weren’t you hooked after that episode?  Who could look away?

Also, from season one, check out the dowager’s bustle.

Dressing Downton. Ellen Lindner, AdventureQuilter.com/blog

And a footman’s outfit/livery.

Dressing Downton. Ellen Lindner, AdventureQuilter.com/blog

There was very informative signage explaining not only the fashions of the day, but the customs, as well.  Read more about footmen below.

Dressing Downton. Ellen Lindner, AdventureQuilter.com/blog

Of course, country pursuits were also depicted.  This shows one of Lady Mary’s riding habits.  Check out that side saddle. I wouldn’t want to try it.

Dressing Downton. Ellen Lindner, AdventureQuilter.com/blog

And then there was hunting.  These two garments were from the scene when Richard Carlisle went hunting with the family.  His outfit was on the left and Lord Granthams on the right.

Dressing Downton. Ellen Lindner, AdventureQuilter.com/blog

Weren’t you a little bit happy when Sir Richard over dressed and was too hot in this dapper outfit? Even his boots were dandy!

Speaking of outdoor pursuits, here’s Edith’s farming outfit.

Dressing Downton. Ellen Lindner, AdventureQuilter.com/blog

Of course, she didn’t own an outfit for the purpose of farming, so this sign explains that one was “cobbled together.”

Dressing Downton. Ellen Lindner, AdventureQuilter.com/blog

It was all very interesting.

Ellen Lindner

7

Quilting and Cording

When quilting my latest piece I decided to mimic the swirls/curves in the background.

Quilting and Cording. Ellen Lindner, AdventureQuilter.com/blog

Quilting and Cording. Ellen Lindner, AdventureQuilter.com/blog

In addition to machine quilting, I also added some hand stitching around several of the curved shapes.

Quilting and Cording. Ellen Lindner, AdventureQuilter.com/blog

My main reason for doing so was to add contrast to the white curves in the light areas. I intended to stitch around all the curved shapes, but the effect was so subtle I changed my mind and used it only in the lightest areas.

Next, I turned my attention to the main motif.  I thought it needed to be set off from the background somewhat.  I considered:
– Lightening the background around the motif with colored pencils, chalk, etc.
– Using tulle to add a dark shadow around parts of the motif.
– Adding a dark line around the motif, by adding cording.

I was leaning toward the cording idea, since I had used it previously. I did some auditioning and started in.  I hand stitched a black cord in place.  That is, I used a cording stitch to capture the cord and secure it to the top of the quilt.  I did not pierce the fabric with the cord.

Here you can see the effect before and after the cording.

Quilting and Cording. Ellen Lindner, AdventureQuilter.com/blog

I think it set it off perfectly.

Quilting and Cording. Ellen Lindner, AdventureQuilter.com/blog

Quilting and Cording. Ellen Lindner, AdventureQuilter.com/blog

And here’s the entire quilt, ready for facing.  Almost finished!

Quilting and Cording. Ellen Lindner, AdventureQuilter.com/blog

Have you got any suggestions for a name?  I’ve got one in mind, but am still slightly undecided.

Ellen Lindner
P.S. Here’s what a hard/precise tulle shadow looks like.  It’s very effective in adding definition, but only if you want to show the top element just slightly above the background.  I wanted this motif to float, so it wasn’t appropriate here.

12

Holding My Mouth Just Right

I recently added paint to a quilt!  Gulp!  This is something I’ve only done once or twice, so I definitely had to get my courage up.

It helped that I had done a bunch of painted exercises a few months ago.  So, I did some practice samples, held my mouth just right and gave it a go.

I had started this quilt at Quilting by the Lake, back in July, and had completed the fabric composition.  After putting the quilt away for a few months, this is where I picked it  up.  I wanted to add some sheer swirling elements to the background.  With paint.  Gulp again.

Translating Sketches to Color. Ellen Lindner, AdventureQuilter.com/blog

I had previously done some experimenting about how to best add a sheer layer with monoprinting. From that I knew that a certain scrap of shelf liner worked well.  Like this.  I thought it looked quite good.

Painting on a quilt: GULP. Ellen Lindner, AdventureQuilter.com/blog

But, it pretty much disappeared in the lighter patterned areas.  Clearly, I’d need to beef it up some how.  Back to experimenting.

Painting on a quilt: GULP. Ellen Lindner, AdventureQuilter.com/blog

I figured out I could stencil on another light coat of paint to get my desired effect.  Like this.

Painting on a quilt: GULP. Ellen Lindner, AdventureQuilter.com/blog

I used freezer paper to mask out the quilt areas that I wanted to stay paint free.

Painting on a quilt: GULP. Ellen Lindner, AdventureQuilter.com/blog

And this was the result. I was happy with it.

Painting on fabric. Gulp! Ellen Lindner, AdventureQuilter.com/blog

At this point, it was time to start thinking about the quilting design.  I’ll show you what I did in the next post, plus something a little unexpected.

Ellen Lindner

8