Tea Bags: “Pretty” Colors

Lately, I’ve seen several mixed media projects using tea bag papers as materials.  This was intriguing to me, so I decided to give it a try.  And since I’m a big iced tea drinker, it was no problem to start saving my tea bags.

After letting the bags dry, usually 2 at a time, I pulled them apart and got these great papers.

Click any image for a larger view

I know you’re supposed to clean all the grounds off, but I found them to be some of the most interesting parts.  So, I gave the papers a coating of diluted gel medium, front and back, and decided to use them with a few grounds attached.

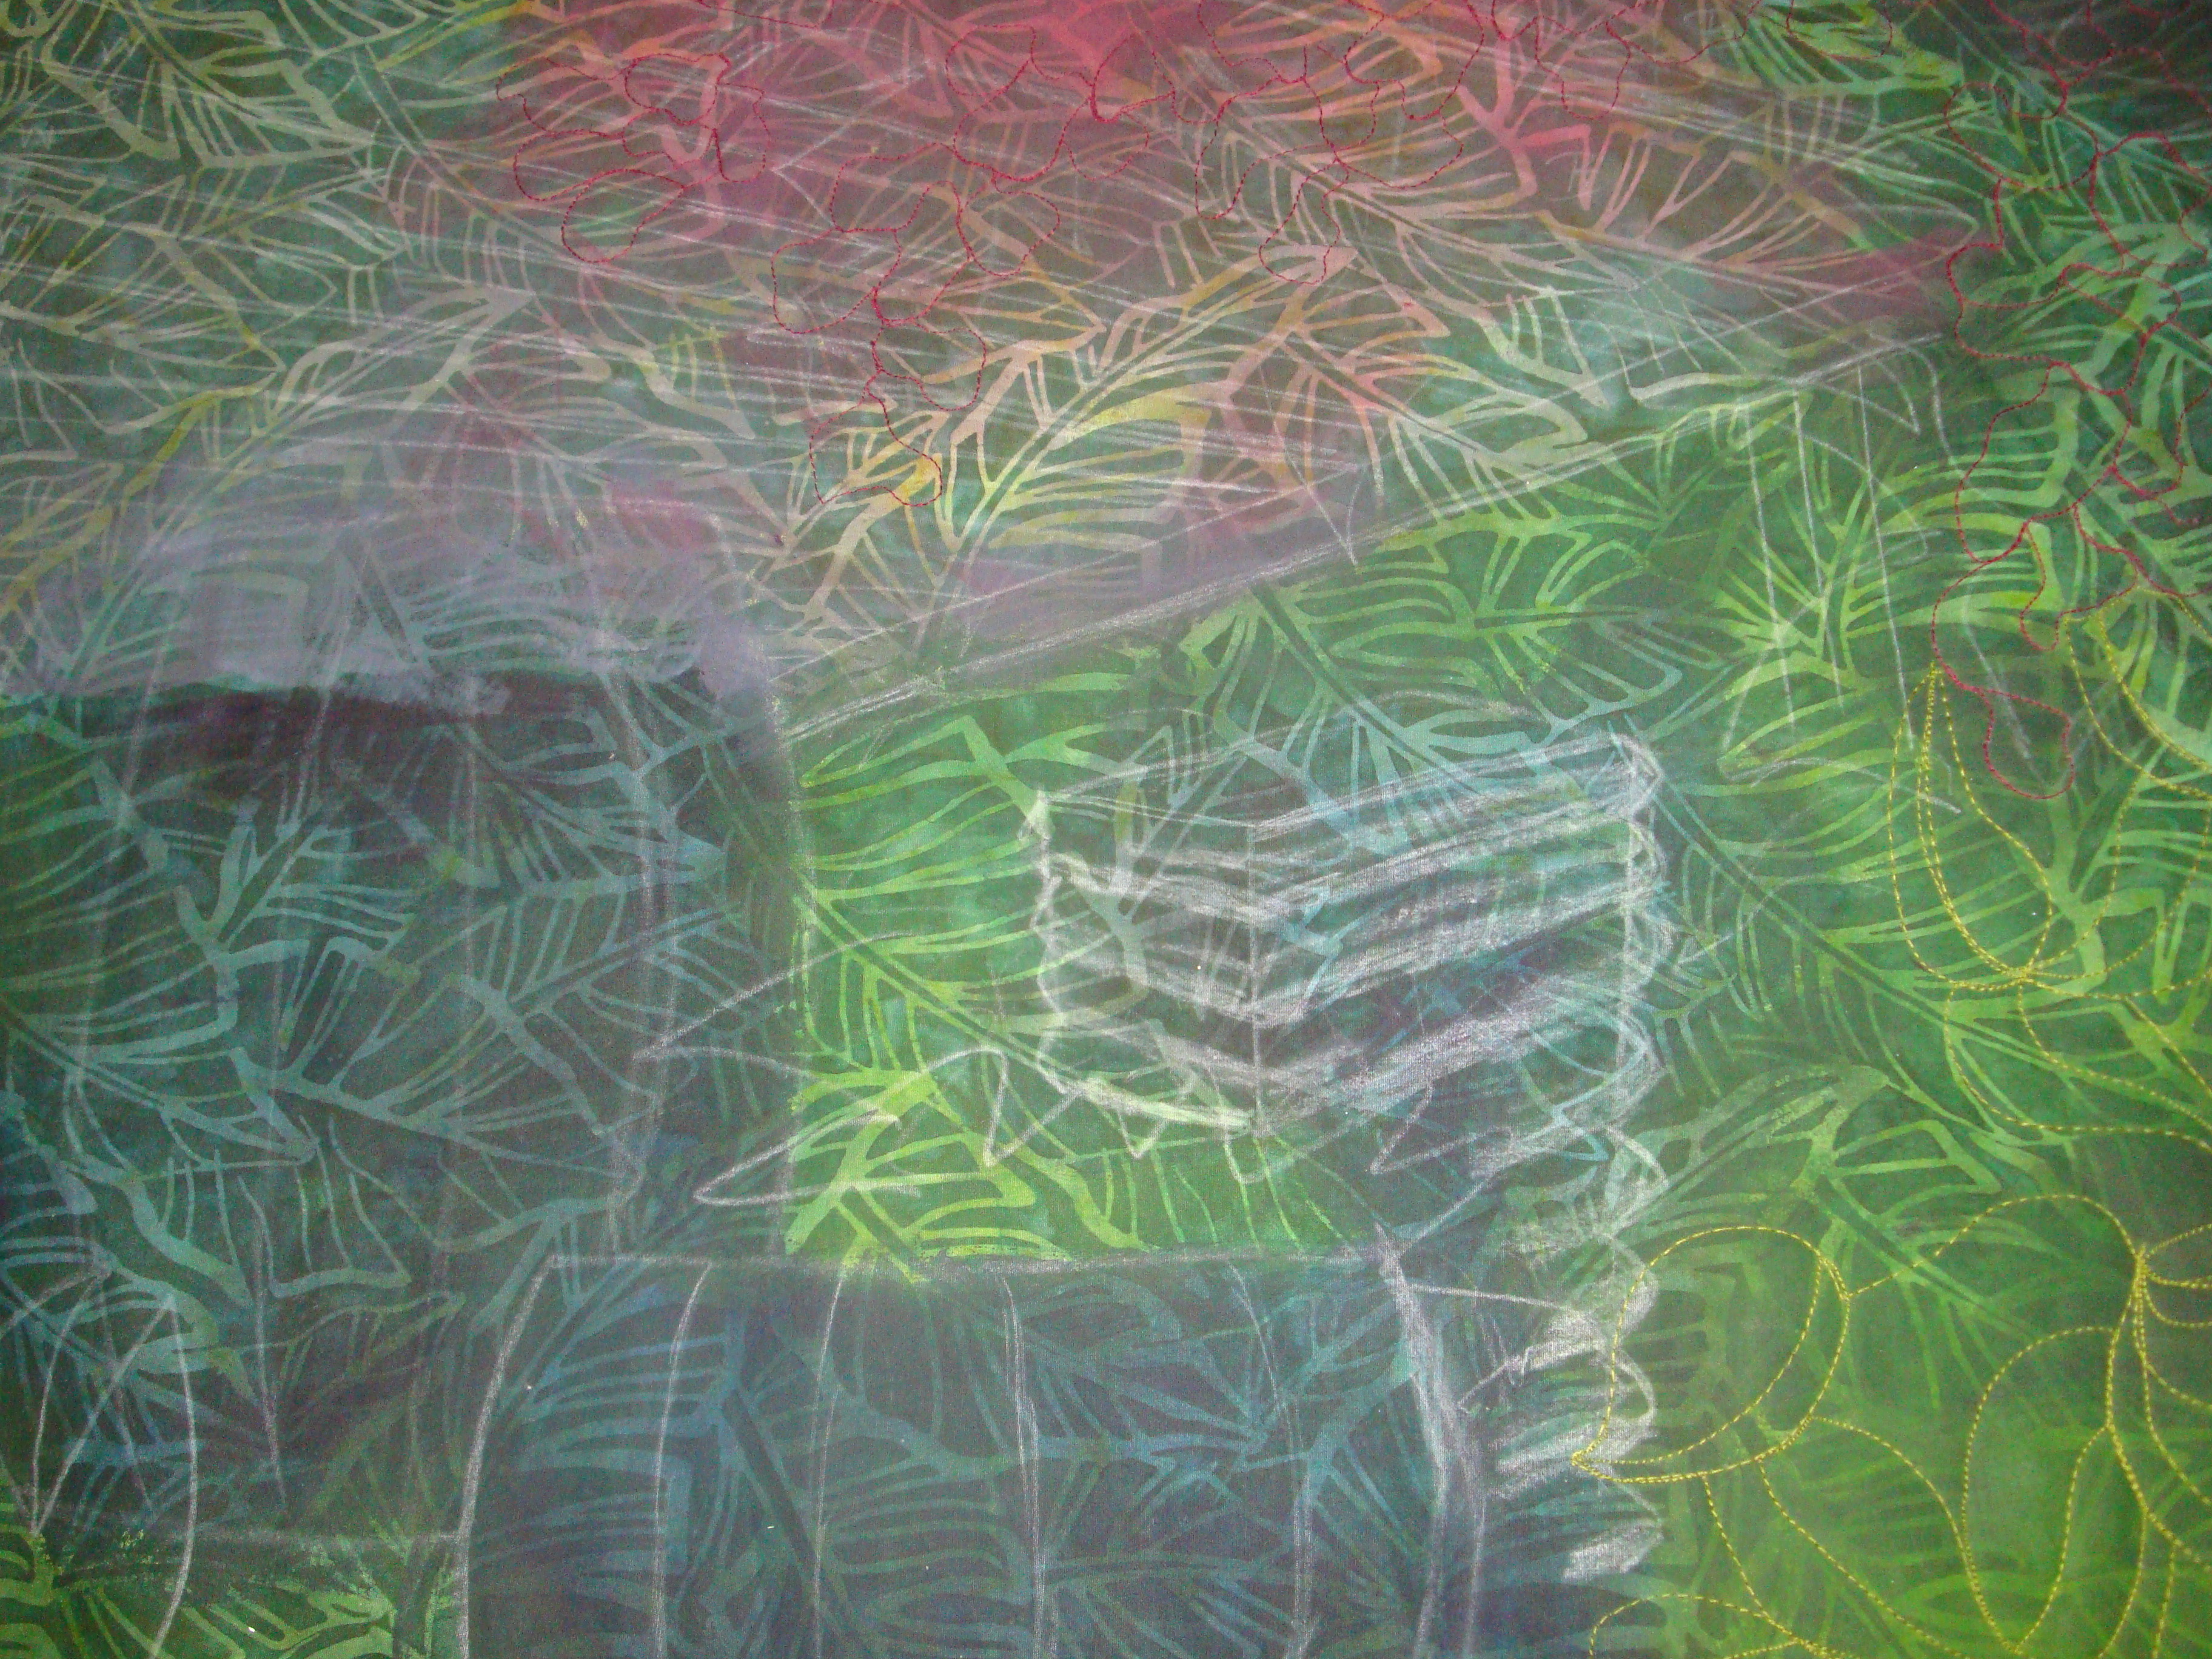
After generating quite a collection of rather uniform tea bag papers, I began to wonder about the possibility of achieving different colors with different types of tea.  So, I bought a sampler box of fruity teas and boiled them up.  Rather impatient at this point, I dumped all 12 of them into the same bowl to dry.  As they did so, I was delighted to see various colors of reds, browns, and orange-reds.  And even some blue!  I wish I had taken a picture so I could show you how lovely this combination of colors was.

Then, I examined them more carefully, and discovered a surprise.  The blue parts were fuzzy!  I had succeeded in growing an excellent crop of mold!  Darn it.  Most of the tea papers were unusable, but I did manage to save a few colorful scraps.

I still had no idea what I’d do with these, but then along came a mixed media book challenge (that I initiated,) and I began to consider using these.

In the next post, I’ll show you my plans and progress.

Ellen Lindner
P.S.  See how Judy Coates Perez created a quilt background with used tea bags.
(Additional links welcome.)

Resolutions Shmesolutions

No New Year’s resolutions for me.  Instead, I’ll create specific short term goals for myself throughout the year, as the need arises.

Having said that, I do hope to continue this year with something I tried to enhance in 2010: the ability to notice my blessings.  What a joy to not only receive a blessing, but to recognize it and be thankful for it!

I imagine my “big” blessings are very similar to those of many other people:  healthy family members, loving family members, financial stability, and so forth.  But, I also recognize these more subtle things as blessings:  running errands with my husband, serious discussions with my son, the touch of a comforting hand on my back, the warmth of my dog on a cold evening, the smell of my Christmas tree, and so much more.

I hope we’ll all be able to notice our blessings more readily this year.  And maybe even provide a few to others, as well.

Ellen Lindner

Garden Quilt: Drawing, Painting, and Stitching

After some designing, I was ready to plunge into unknown territory with my newest quilt.  This was my design “sketch.”

Click any image for a larger view

My plan was to use both stitching and paint to depict the imagery.  I had done this in a very abstract way on an earlier quilt.  In that quilt, my technique was to randomly paint a background piece of muslin, quilt it, then paint it.  The stitching created a texture of hills and valleys across the quilt’s surface.  This caused the paint to hit only certain spots, creating a very pleasing result.  I wanted to do something similar here, but wasn’t sure how it would work with a specific image.  Like I said:  unknown territory.

Rather than using muslin as my background fabric, I started with a batik fabric representative of foliage.  I lightly painted the background, using the colors I wanted to show in the “valleys” of the final quilt.  These areas would be stitched and were unlikely to pick up the paint.  Next, I drew the stitching design and started to quilted it.

Geesh.  That was a fair bit of work, and I didn’t even have any color on this quilt, yet! 
I was anxious to get to that part.  First, the sky.

OK, that was encouraging.  Perhaps this idea is going to work out, after all.

Ellen Lindner

Designing a Plan

In an earlier post, I showed you some of the photos I took in a local florist’s garden area.  Since I was making a quilt with this as my inspiration source, my dilemma was editing the imagery down to something useful, but still visually pleasing.  I decided to use a compilation of images, and began to work in my computer, creating a composite image.

Click any image for a larger view
I started with an arrangement of all my favorite things:

Hmm.  No.  That was just too busy.

Version #2:

That was better.  I liked the over sized bottles and their transparency, but wondered how difficult it would be to achieve.

Version #3:

Not bad.  In this version, I kicked up the hot pink bougainvillea (flowers) quite a bit.  This is about how they’d look at their peak, and one of my favorite parts of this small garden.

I decided to go with this version.  And, since this is a collaboration with a painter, I thought depicting it with stitching and paint would be appropriate.   Definitely new territory for me, and I had some hesitancy about it.  But, I thought it was worth a shot.

In future posts I’ll show you my progress.

Ellen Lindner

Joy to the World!

I hope you and your family are enjoying a leisurely, relaxed, and fun Christmas holiday.  I’ve succeeded in having NO STRESS leading up to Christmas!  Amazing! 

We had a fun evening on Christmas Eve, when we joined our friends for a s’mores cookout in their front yard!  Yeah, I know it sounds wacky, but it was great fun.  Their neighborhood has some amazing Christmas lights and people come by the car loads to see them.  Some are in open trailers, decorated with lights, and might even be singing Christmas carols as they travel.  Plus, Santa is just down the street handing out candy.  A very festive and joyful atmosphere.  So, our friends decided to join in by making s’mores in the front yard.  What fun!  And since it was pretty chilly, the fire served a dual purpose.  We loved it!

Enjoy the blessings of the season!

Ellen Lindner

Too Much Inspiration

I’m involved in a collaborative project in which art quilters and other artists create new work based on a shared theme.  My group has decided to use the garden area of a local florist as our inspiration.

Click any image for a larger view.

There’s certainly PLENTY to pique your interest here!  Hot pink bouganvilla cascading from the pergola overhead, rusted metal lawn furniture, vivid pots that catch the light, babbling water fountains, fragrant blossoms, and of course, lush greenery.

How on earth could I narrow down all this fantastic imagery to just one (or two) impressions of the area?  Any ONE would be sufficient, so what’s a girl to do?

After deciding to go with a severely edited compilation of photos,  I started playing in my computer.  Adding, enlarging, shrinking, flipping, and then mostly deleting.  It’s still evolving.

Ellen Lindner
P.S.  There are a few more photos in the Everday Beauty Album on my Facebook page.  (You don’t have to have a FB account to view it.)

Paper Lace as Hair

After reading my post about making paper lace, A. Carole Grant sent me a photo of a quilt in which she created hair with the same technique.

Carole explained to me her technique for creating the hair.  She used paper that’s designed to be used on doctors’ examining tables.  She placed it on the quilt and drew in the hair.  Then, she stitched it, and washed away the excess paper.  What a great way to control the results!

Very creative.  You can see the entire quilt, called Ironman, on Carole’s blog.  

Ellen Lindner

Tis the season for…well, way too much

Click any image for a larger view
rust ornaments

Are you like me during the Christmas season?  Do you put way more on your “to do” list than you can possibly manage?  Decorating, shopping, wrapping, shipping, writing and mailing cards, baking, and maybe even making a few gifts?  Geesh!  What a load!  I don’t mind telling you that some years I’ve allowed such tasks to really get in the way of my Christmas spirit.  But, that’s not what Christmas is about, is it? 

Jesus and family

Sure, I want to have a nice tree, and put out the nativity set, but thankfully, I’m “over” a lot of that other stuff.  Instead, this year I’ve vowed to have a stress free Christmas.  And so far I’m actually succeeding in doing just that!  Of course, I’ve had to take a few things off my list, but I’m really enjoying the season SO much more!  Christmas music, fun and leisurely decorating, wacky gift wrapping, and more.  Heck, I think I might even be able to enjoy a fruit cake this year.

For the last few years, we’ve been giving my son some practical gifts, in anticipation of college needs.  Since these aren’t that much fun to open, I often wrap them in creative ways.  Perhaps you can guess what he’s getting this year.

A. stocking

We skipped our enormous artificial tree this year, in lieu of a beautiful fir. 
SO much better!  Here it is before ornaments. 
(Remember, I decorated leisurely, so it stayed this way for a few days.)

DSC06035

For the most part, I decorated in the same fashion as previous years.  But, there’s always something new that catches my eye.  This year it was these glittery branches. 
I love them!

glitter branches

Hmm.  Can I get away with leaving them up all year?  (And would I want to?)

These branches remind me of Christmas lights seen in Pensacola, FL. 

St. Anne's, one tree, small

These are huge pecan trees.  They were breath taking when wrapped with lights!  We used to check them out every year.  Another non-stressful and leisurely family event. 
(Unless it was cold.  Then, it wasn’t so leisurely.)

I hope you’ll find ways to limit your stress this Christmas season.  Enjoy your family, traditional activities, and the true meaning of the day.

Ellen Lindner

Beautiful Art Book to Help Accident Victim

On September 30, Cherie Ann Stannard was involved in a car accident, resulting in a spinal cord injury and paralysis. Her whole life changed in an instant.

Her best friend, Elizabeth St. Hilaire Nelson, desperately wanted to help her friend in any way possible.  Therefore, she’s put together a beautiful book of art, called Art with Heart, as a fund raiserImages in the book were provided (at no charge) by the artists involved, so all proceeds could go toward Cherie Ann’s treatment and recovery.

I’m delighted to have my piece, Reconciliation, included in such a wonderful and worthwhile project.  You can see it as part of a preview of the entire book, below. 

I hope you’ll consider purchasing one (or more) for yourself and other art lovers.  $12 from each sale (all the “profit,”) will go to Cherie.  This is a print-on-demand book, and it must be ordered by December 12th, in order to receive it by Christmas. 

It’s the perfect time of year to spread a little good cheer through your generosity.

Ellen Lindner

Paper Lace

I just recently learned about paper lace and decided to give it a try.  If you’ve made thread lace on water soluble stabilizer, the technique is very similar.

Start by layering several layers of paper together.  Select papers that are a little bit fragile, like newspaper or tissue paper.  Next, stitch a grid or other pattern onto the paper.  Go over each line of stitching twice.

After stitching, soak the paper until it becomes fairly fragile.  Then, begin rubbing the paper off, using your finger.  Don’t rub all of it off, though.  Leave little bits hear and there.

Here’s my first attempt, with five layers of newspaper and white thread.

Click on any image for a much larger view.
DSC06027

As you can see, the little bits of paper remaining create a very interesting affect.

My impressions: 
– The newspaper was much more sturdy than I imagined, and it took a good bit of rubbing to get it to come apart.  I’d definitely use fewer layers next time.
– Soaking the paper gave it all a slightly gray color, rather than the crisp black and white of the original paper.

Next, I tried the technique with three layers of tissue paper.  I wanted to experiment with revealing just one or two layers, so I chose three different colors/patterns.

tissue paper layered

I stitched a grid, and found the wet tissue paper very easy to rub off.

DSC06029

Pretty cool, huh?  This shows what it looks like from the white
tissue paper side.  As you can see, the pattern of the central sheet shows
through the white quite a bit.  I’m not sure I like that.

I also stitched some abstract bubbles and attempted a leaf with veins.  As you can see, only one of those was succesful.

DSC06030

The two pieces above are seen from the pink side, so the white thread
gives a bit of contrast.  I’m liking this pretty well.

More impressions:
– The stitching takes a little while, but the results are worthwhile.  I think these will make great additions to mixed media work, such as journal books and collages.

Ellen Lindner