Archive | Uncategorized

Double Reverse Appliqué “in” Ann Arbor

I did a second fun Zoom class with the Ann Arbor gals. This time it was Double Reverse Appliqué.

Double Reverse Applique class sample. Ellen Lindner, AdventureQuilter.com

They made great progress. Just look.
Jennifer chose muted colors and they worked beautifully. (BTW, the focus on Zoom is great. It’s reduced here because the image has been copied and manipulated so many times.)

A student shows off her work in Ellen Lindner's Double Reverse Applique class (via Zoom.) AdventureQuilter.com

Colleen finished in just a few hours. Can you tell she’s pleased with her results?A student shows off her work in Ellen Lindner's Double Reverse Applique class (via Zoom.) AdventureQuilter.com

Susan used a fabric which featured a subway map of New York City. So, you can guess the name of her piece: “The Big Apple.” I love it!

A student shows off her work in Ellen Lindner's Double Reverse Applique class (via Zoom.) AdventureQuilter.com
Claudia took both classes and had great results both times.

A student shows off her work in Ellen Lindner's Double Reverse Applique class (via Zoom.) AdventureQuilter.com

June had taken the class before and had already made an apple. So, she jumped ahead and made a pear.

A student shows off her work in Ellen Lindner's Double Reverse Applique class (via Zoom.) AdventureQuilter.com

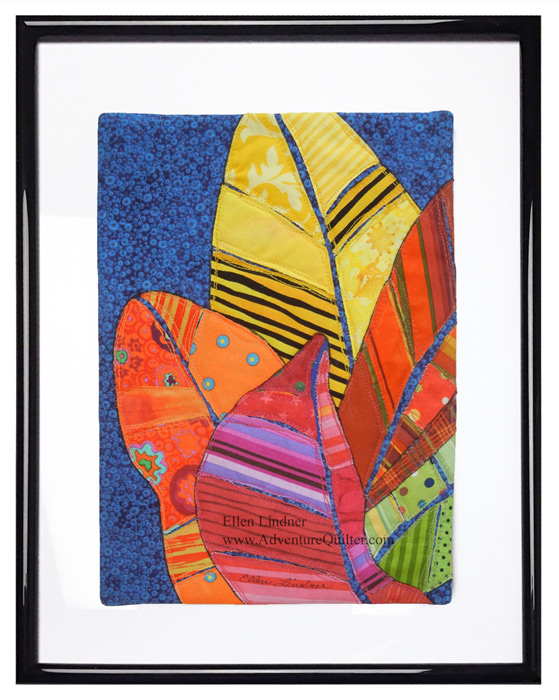
Later, she sent me a photo of the finished project. Great, right? Don’t you love the way the value changes make the pear (or apple) look 3D?

Student results from Ellen Lindner's class, Double Reverse Appliqué. AdventureQuilter.com

June was pretty taken with this technique and designed another pear of her own. She had fun mixing up the colors and I think the results are fantastic.

Student results from Ellen Lindner's class, Double Reverse Appliqué. AdventureQuilter.com

Susan also sent me photos of her finished projects. Here’s her “Big Apple.”

Student results from Ellen Lindner's class, Double Reverse Appliqué. AdventureQuilter.com

And her pear. Nice!

Student results from Ellen Lindner's class, Double Reverse Appliqué. AdventureQuilter.com

All of these ladies did a great job! We had no trouble communicating via Zoom and it was a lot of fun.

If you want to try this technique, you can learn via my eBook, or my on-demand class. (Or, of course, tell your guild program chair to “bring” me to your guild.) There are so many great ways to learn these days!

I hope you’ve had some fun learning opportunities during this pandemic time.

Ellen Lindner

17

Floral Improv “in” Ann Arbor

It sure is great to be able to interact with students and teach, via Zoom, to people across the country. I recently taught “Floral Improv” to a group of students in the Ann Arbor, MI area. They all did an excellent job and these late-in-the-day screen shots are proof.

Floral Improv "in" Ann Arbor

Woah, Grace got a LOT of flowers and foliage cut and placed, didn’t she? She’ll add black stitching to the flowers to add interest.

Working alongside her was her young friend, Emma. She’s only been sewing a few months, but she had no problems with a new technique.

Floral Improv "in" Ann Arbor

Claudia’s colors were actually much more vibrant that this, but this gives you an idea. (Claudia, I cropped you out because your eyes were closed.)

Floral Improv "in" Ann Arbor

Laura settled on her flower colors pretty quickly, but was still auditioning foliage fabrics late in the day. (The down side of having access to ALL your fabric when taking a class at home?)

Floral Improv "in" Ann Arbor

Mary wanted her flowers to be the stars so she opted for very low contrast foliage. Can you see that she’s added black stitching to some of her poppies, already?

Floral Improv "in" Ann Arbor

Lynne’s vibrant background fabric added another level of energy to her composition.

Floral Improv "in" Ann Arbor

Showing me their work can be tricky, but Mary Beth had it figured out. She took a photograph with her phone and held it up to the web camera. Where there’s a will there’s a way!

Floral Improv "in" Ann Arbor

Amy’s composition included a bird and a butterfly on her background fabric. They went well with her acid greens.

Floral Improv "in" Ann Arbor

Jean is already outlining her palest flowers to add contrast. Can you see where she’s done it already? It really makes a difference.

Floral Improv "in" Ann Arbor

Don’t you love how Wanda brought in a few flowers arcing down from the top right?

Floral Improv "in" Ann Arbor

Nico got especially creative. She clustered her flowers and made a vase for them. A very nice option!

Floral Improv "in" Ann Arbor

I had a fabulous day with these ladies and I think they’d say the same. It was SO wonderful to interact in this way after so many months of near isolation!

I strongly encourage your guild to get on the “Zoom wagon,” with me, or with some other teacher. It’s just way too much fun. If a workshop seems scary, start with just a lecture.

Information about my presentations.

Ellen Lindner
P.S. In this class students learn how to make two different types of flowers with no patterns. Then, they learn about composition and arrange their flowers. Leaves and stems are added last, and quilting begins. Students have already learned how to stitch their poppies with black thread in order to make them look more dimensional. Before you know it, it’s completely done.

0

Fresh Fish

What to do when the call for art requests ocean animals smaller than 12″? This is my result: two fish for SAQA’s “Fresh Fish” project.

Fresh Fish. Ellen Lindner, AdventureqQuilter.com/blog

These are made from scraps, most of them hand dyed.

I had fun adding a little hand stitching.

Fresh Fish. Ellen Lindner, AdventureqQuilter.com/blog

It turns out that this shape is VERY hard to turn right side out. The narrow spot between the body of the fish and the tail is a problem. But, I’m happy with the result.

Fresh Fish. Ellen Lindner, AdventureqQuilter.com/blog

I’ll be mailing these off soon.

SAQA (Studio Art Quilt Associates) wants to receive 250 and anyone can donate, so join in if you’d like!

Ellen Lindner

2

Improv Complete: “Fruit Salad”

I’m really loving my latest quilt, Fruit Salad. 

When I was a kid, at least once per summer my parents would get a watermelon, chill it, and then make a big to-do about eating it outside as part of an evening picnic. We ate it outside because my 3 siblings and I made a MESS with that watermelon! We had juice dripping down our chins and, of course, we had to have contests to see who could spit the seeds the farthest.

As this quilt developed that’s what it made me think of.  Thus, the name. Fruit Salad, an art quilt by Ellen Lindner, AdventureQuilter.com

A detail shot:

Fruit Salad - detail, an art quilt by Ellen Lindner, AdventureQuilter.com

This quilt was originally inspired by a photo of lillies. As it evolved, the stronger colors became dominant, and I was disappointed. But, I reminded myself that the inspiration photo was just that – inspiration. If it got me motivated to try something it had served its purpose. With that in mind, I looked at the quilt with new eyes and fell in love with it. I hope you like it too.

Purchase details and more info.

Ellen Lindner
P.S. A design note: can you see how important the neutral white and grey are? Can you imagine the quilt without them?

2

Improv Quilt Nearly Complete

I’ve been having so much fun working on this improvisational quilt. (See the previous two posts for more in-progress photos and explanations.)

After LOTS of piecing, slicing, and repiecing, I finally thought the quilt sections had enough energy and excitement to start thinking about how to put them together. First, I looked for sections with similar dimensions and cut them so they could be pieced into rows. This involved making another few blocks to fill gaps. And finally, I had the sections arranged and ready to be pieced together.


Improv Quilt Nearly Complete. Ellen Lindner, AdventureQuilter.com/blog

Here it is, completely pieced. Of course, it shrunk again.

Improv Quilt Nearly Complete. Ellen Lindner, AdventureQuilter.com/blog

For quilting, I thought I could play up the curving lines. I drew some reference arcs and here’s the quilting in-progress.

Improv Quilt Nearly Complete. Ellen Lindner, AdventureQuilter.com/blog

And a detail shot, again, in-progress.

Improv Quilt Nearly Complete. Ellen Lindner, AdventureQuilter.com/blog

I think the quilting really adds a lot!

Ellen Lindner

0

Improv Energy

Improvisational piecing is really a lot of fun. You sew and slice and reassemble and trim. As you go, the pieces get smaller and things get much more energetic. See where I left off last time.

It was time to downsize some of the colors. This one below, for instance. It had a really large section of green. So, I just sliced it, joined new fabrics in and turned it into two blocks.

Lily Improv. Ellen Lindner, AdventureQuilter.com/blog

Can you find the new blocks in this collection?

Lily Improv. Ellen Lindner, AdventureQuilter.com/blog

It was time to add in some narrow strips. I really love these! They add a lot of interest, but because this is improv, nothing has to match up. This photo shows that I’ve sliced through this block and sewn on the first side of a narrow fabric strip. (3/4 -1″ wide)

Lily Improv. Ellen Lindner, AdventureQuilter.com/blog

There’s no need to match seams when sewing the second side of the strip. Leave a big seam allowance and just lay things in place, (parallel) so you’ll catch both pieces when sewing.

Lily Improv. Ellen Lindner, AdventureQuilter.com/blog

Then, flip it over and sew the second seam referencing the first one. Use whatever distance you like to determine the finished width of the strip. Press seams out and trim off the excess seam allowance.

Lily Improv. Ellen Lindner, AdventureQuilter.com/blog

Ta-da! Pretty neat, huh? You can do the same thing with a gentle curve.

Lily Improv. Ellen Lindner, AdventureQuilter.com/blog

See how much energy they add?

Lily Improv. Ellen Lindner, AdventureQuilter.com/blog

At this point, I began to study what was happening on the design wall and making more purposeful changes. I realized I had missed the mark with my color selection. That’s because I used too much of the darkest red. Not only that, but since it provided some of the highest contrast, it was taking over a little bit. I knew I’d need to reduce the size of the red pieces. And, since they were inspired by flowers, I thought I wanted to make them more triangular, so they wouldn’t be so chunky. On with the plan.

After a bit more work, these blocks had been altered. Much better, don’t you think?

Lily Improv. Ellen Lindner, AdventureQuilter.com/blog

See the three little dark brown dots? They were inspired by the dark stamens in the flowers. They started as a rectangle. Which I then turned into a narrow strip. Which I eventually sliced and repieced off-kilter. I liked them.

I should have this mostly finished by my next post.

Ellen Lindner

0

Lily Improv

Are you familiar with Linda and Laura Kemshall? They’re a mother-daughter duo who make fabulous art – in fabric and paper, and who have a weekly newsletter. Recently, they featured this photo. Isn’t it lovely?

Lily Improv. Ellen Lindner, AdventureQuilter.com/blog

I was enamored with the colors of the lilies and wrote to ask if I could use it for a quilt’s inspiration. Linda had taken the photo and she gave me permission to use it.

I pulled out pretty much all of my pink and green fabrics and began to make selections. I knew I’d also want to add in some grey, too.

Lily Improv. Ellen Lindner, AdventureQuilter.com/blog

(Yes, I have a lot of fat quarters!)

Have you ever made an improv quilt? The critical thing is to get the colors and their proportions the way you want them at the start. Then, you can sew and slash and piece to your heart’s content. (It turns out that I missed the mark, but more on that later.)

To start, I cut a bunch of fabric rectangles. For the critical pinks I cut them about the size of a piece of typing paper. The whites, greys, and greens were only about 1/4 that size. I also sorted through my scraps and pulled out the pieces that would work. Then, everything got stacked into contrasting pairs and taken to the sewing machine.

The scraps had wonky shapes, but I just trimmed them to straight lines.

Lily Improv. Ellen Lindner, AdventureQuilter.com/blog

Lily Improv. Ellen Lindner, AdventureQuilter.com/blog

Now that I think of it, I guess that’s the crux of this improv method: sew things together and then trim them.

Lily Improv. Ellen Lindner, AdventureQuilter.com/blog

This is what my blocks looked like, above, after that first round of piecing. Everything is large and chunky. But, I knew I’d be GREATLY modifying them so I was pretty happy with them. (Maybe too much peach, though.) Then, the fun began.

Sometimes I sliced across seams and rejoined them with mismatched alignment.

Lily Improv. Ellen Lindner, AdventureQuilter.com/blog

And I began to add grey to some of the oddly shaped blocks.

Lily Improv. Ellen Lindner, AdventureQuilter.com/blog

Lily Improv. Ellen Lindner, AdventureQuilter.com/blog

This was just the beginning of the fun. Watch my next post to see how things progress.

Ellen Lindner
P.S. You’ll definitely want to check in on the Kemshall’s website, Design Matters TV, and sign up for their mailing list.
P.P.S. You can see some of my other improv quilts in the links below.


2

When You Give a Girl a Class

My friend, Esther, was a recent “guinea pig” for my newest class, “Love it and Leaf It.” Well! Not only did she make a striking quilt in class, but she continued to play with the idea, altering and tweaking to her delight. Just look what she’s been up to, (all in the last week.)

First, she changed the leaves to one fabric each.

"Love It and Leaf It" student work. Ellen Lindner, AdventureQuilter.com/blog

Then, she experimented with changing the color of the veins.

"Love It and Leaf It" student work. Ellen Lindner, AdventureQuilter.com/blog

And then she designed a triptych variation and added frogs! (Love those red veins!)

"Love It and Leaf It" student work. Ellen Lindner, AdventureQuilter.com/blog

This girl.

I think she should be in all my guinea pig classes, don’t you?

Thanks, Esther!

Ellen Lindner

0

Great First Class

Whenever I plan a new class I try it out on a group of “guinea pigs.” Such was the case this past Saturday. Twenty students showed up to take my “Love It and Leaf It” class, via Zoom. How exciting! They got the class for free, but in return had to give me feedback on both the class content and the Zoom experience. VERY valuable!

And just look at the great work they did!
This was a 3 hour class. Most of this was accomplished in that time, but the facings and frames were done after class.

"Love It and Leaf It" student work. Ellen Lindner, AdventureQuilter.com/blog

Mary Ann Shupe finished her quilt and then later framed it digitally. As you can see, she had fun with patterns.


"Love It and Leaf It" student work. Ellen Lindner, AdventureQuilter.com/blog

Deon Donovan sent me an in-progress photo of hers. Isn’t it going to be striking?


"Love It and Leaf It" student work. Ellen Lindner, AdventureQuilter.com/blog

Rebecca Chianese framed hers right away. The quilting adds a lot to it!


"Love It and Leaf It" student work. Ellen Lindner, AdventureQuilter.com/blog

Jo-Ann Jensen did a great job, (as always.)


"Love It and Leaf It" student work. Ellen Lindner, AdventureQuilter.com/blog

Kat Campau did her own thing and it works. (I can tell she likes batiks.)


"Love It and Leaf It" student work. Ellen Lindner, AdventureQuilter.com/blog

Polly Dombroski’s quilt is completely finished, just waiting for it’s frame. Nice!


"Love It and Leaf It" student work. Ellen Lindner, AdventureQuilter.com/blog

Don’t these little quilts look great when framed? Annette Moore’s is another fabulous example.

Are you wondering what I learned from this experience?
– The Zoom (virtual) platform works really well! We had no technical issues of any sort, and we were able to chat and interact the entire time. It was fun!
– My pattern was too complicated for the time frame. I wanted the students to finish the piece, AND face it, AND frame it in the 3 hours. Since that didn’t happen, I’m working on simplifying the pattern and the process.
– My guinea pigs were super helpful! BTW, one was from France, and one was from Canada. Isn’t that cool?

This short class would be a great one for introducing your guild to the virtual learning world of  Zoom. (And, of course, I have other virtual presentations available, too.)

After months of not teaching it is SO exciting to be back at it!!!

Ellen Lindner

2

New Class: “Love It and Leaf It”

I’m really tickled with the project for my newest class, “Love It and Leaf It.”

Love It and Leaf It #2. Easy class with Ellen Lindner. AdventureQuilter.com

Isn’t it cute? In the 3 hour class, students will completely finish a small quilt like this AND frame it. I’m excited!

Love It and Leaf It #3. Easy class with Ellen Lindner. AdventureQuilter.com

I’m ready to teach this virtually, (via Zoom)
Love It and Leaf It #1. Easy class with Ellen Lindner. AdventureQuilter.com
Soon, I’ll also offer it as an on-demand online class. I think it’s going to be fun!
(And, after so many months of not teaching, I’m ITCHING to get back to it!)

If your guild is interested in scheduling this class or any of my others, you’ll find full information here. Of course, I’m doing virtual lectures, too.

Maybe I’ll see you online before too long! Gee, I’d love that.

Ellen Lindner

4