Double Reverse Appliqué
Supply List for Live Class
NOTE:
– This class is geared toward the intermediate level quilter, who is comfortable with free motion sewing.
Supply List:
Equipment:
Sewing machine that can lower its feed dogs
Presser foot for free motion sewing (darning, big foot, etc.)
Light box (This is integral to the procedure. Two people can easily share.)
Sharp embroidery scissors (the little ones that are sharp all the way to the tip)
Paper scissors
General sewing supplies, including a seam ripper
Wide tip highlighter – not yellow
Black Sharpie, or other permanent marker, regular tip (not fine)
3+ colored pencils, each a different color
If you want to learn how to make your own patterns:
A favorite color photo, with strong light/dark contrasts. An 8 x 10 is best.
Tracing paper, several pieces.
Pencil and eraser
(Optional, but highly recommended) A digital version of your photo on a travel drive. (If this is Greek to you, don’t worry. We’ll work with the printed version of your photo.)
Fabrics, threads, and such:
Sulky Totally Stable (or other lightweight iron-on stabilizer that can be torn away later. See note*)
Thin white fabric (like muslin) for the base, 2 pieces, each ~ 14 x 16″, (36 cm x 41 cm.)
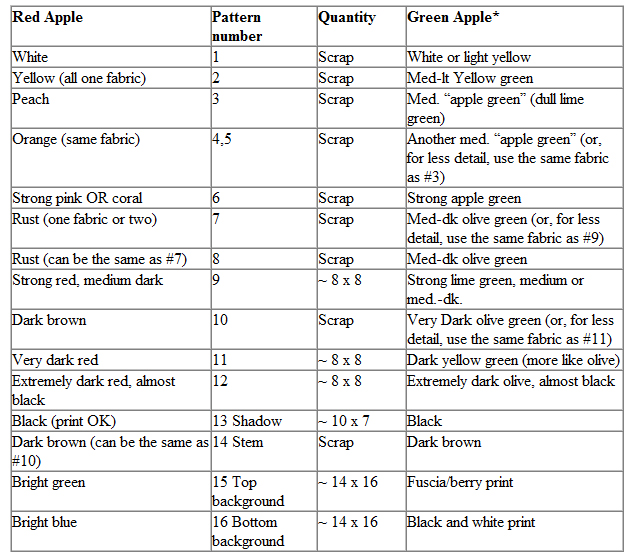
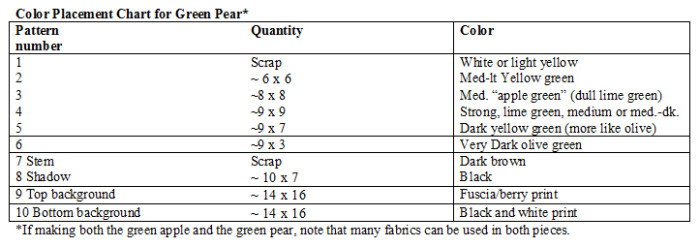
Fabrics: Scroll down to see the color placement chart.
* Small scale or subtle prints work well for the apple. Background and shadow fabrics can be larger prints, if desired.
* Directions are given for a red apple, however, other colors are very stunning. When choosing fabrics for a different colored apple, match the value (light vs. dark,) to the color stated on the pattern.
Clear monofilament thread
Medium gray thread (OR threads that loosely match your fabrics)
You’ll receive the patterns from your local class coordinator.
Class Preparation: Do the following steps twice – once for the apple and once for the pear.
– Join two pieces of stabilizer together, to create a piece at least 14 x 16, (36 cm x 41 cm.). (Overlap the pieces and iron the overlapped area. Pin, on the non-slick side, for security.)
– Using a black Sharpie, trace the pattern lines (but not the numbers) onto the non-slick side of the stabilizer.
–Because the pattern provided is on paper smaller than the finished project, you’ll need to add a few details to the stabilizer drawing. You’ll need to: Finish drawing in the 12” (31 cm) and 13” (33 cm) squares, and the horizontal line. Using a pen or pencil, add the pattern numbers.
– Put the stabilizer, shiny side down, onto the white base fabric. Iron the two together.
– Iron all fabrics. Label fabrics and stack them in order (You can write in one corner. See the number-color chart on the pattern.)
– Set up your machine with monofilament in the bobbin and gray thread on top. (A half full bobbin will be enough.) Increase the top tension to approximately 7.
*Stabilizer note: The purpose of the stabilizer is two-fold. First, the pattern is drawn on it, and later stitched directly onto it. Second, it provides a secure base for stitching. If you can’t find Sulky Totally Stable, you can substitute some other LIGHTWEIGHT iron on stabilizer, (not fusible web.) Some of the stabilizer will remain in place when the quilt is complete.
Double Reverse Appliqué, Color Placement Chart for Apple
(A larger version comes with your pattern)


