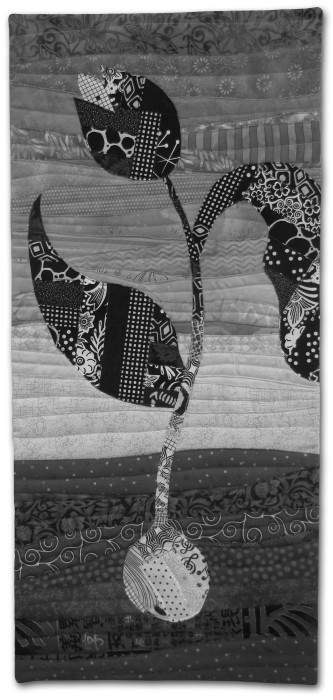
Grow with the Flow Supply List (Live Version)
©2014 Ellen Lindner, AdventureQuilter.com
We’ll cover a lot of ground in this class. Please read the supply list carefully and complete the class preparations so your time will be efficient.
Supplies for classroom
- Muslin, 29 x 14
- Fabrics for design: (Reference sample photo below, or a color version online at http://adventurequilter.com/main_page/live-classes/gwf-gallery/ (Spaces are underscores)
- Choose your favorite color for the background. ANY color will work, as long as you have a good variety of light to dark.
- The background is composed of fabric strips, each 3 x 16. You’ll need:
- 12-15 for the upper portion, ranging from light to medium-dark
- 6-8 for the dark bottom.
- *Accent colors can be long skinny scraps: 1-2 dark, and 3-4 light to medium-dark.
- For the plant design you’ll need a variety of black and white print scraps. Some should be mostly black, while others are mostly white, with some in between.
- Backing fabric, 29 x 14
- One strip of fusible web, 24 x 1 ½ (doesn’t have to be paper-backed)
- Thin batting, 31 x 16
- Threads to match
- Preloaded bobbins: light, medium, and dark to match your color(s,) plus black and white
- Straight pins
- Erasable fabric markers/pencils, both light and dark
- Rotary cutting supplies: 24” mat, plus rotary cutter and 24” ruler. (We’ll share these to save space.)
- Scissors: fabric and paper (sharp)
- Fabric glue that comes out in a thin line. I like Roxane’s Glue-Baste-It. Plus optional glue stick. (Nothing that comes out in a thick line or shows through your fabric.)
- Sewing machine with walking foot AND foot for free motion. (Please be familiar with how to use both of these.)
Optional: a very small quilted sample/practice piece and fabric to back it.
Supplies for Prep
Pattern – supplied by shop or guild
Fusible web with paper backing
Permanent marker
Optional: cardboard tube
Class Prep Instructions
Cut or tear muslin to size
Mark a horizontal line 1/3 up muslin. (Just fold it in thirds and mark the crease.)
Make your background fabric decisions. Arrange your fabrics from light to dark and make sure you’re happy with the value progression. (Don’t save this for class!)
Cut fabrics into 3 x 16 strips and iron them. (You can stack them and iron about 4 at a time.)
Arrange your fabric strips from light to dark and bring them to class in this sequence. (You can roll them around a tube, or hang them on a hanger to avoid wrinkling. Put the lightest fabrics on first and end with the darkest one.)
Use a permanent marker to trace each pattern piece onto the paper side of fusible web. You can loosely cut these shapes out, but leave plenty of extra around the sides.
Check on lunch plans. Do you need to pack a lunch?
*Wondering what accent color to choose? Take a look at a color wheel. Opposite colors often work well, but it’s totally up to you. (Online color wheel: http://tinyurl.com/opposite-colors )
You may want to reference the photo below. Please bring print these pages and bring them to class.

