Stitch and Slash

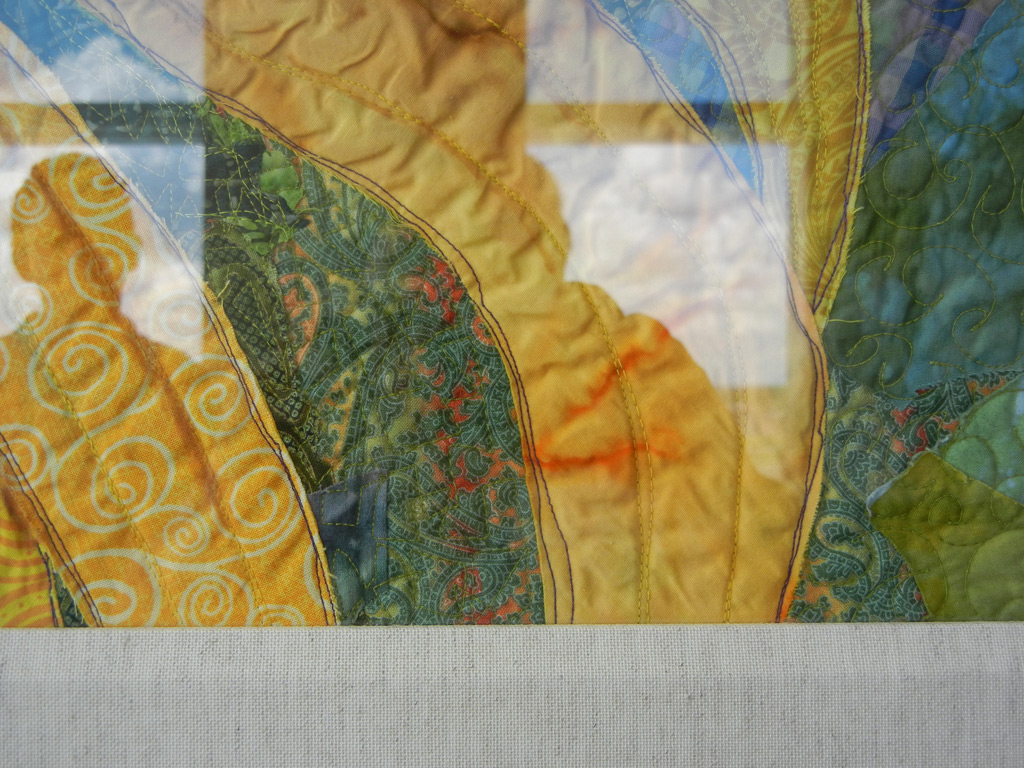
I recently took an online class called “Stitch and Slash.”  Taught by Carol Ann Waugh, it was extremely well done and tons of fun!  As the name implies, the basic idea is to top stitch several layers of fabric, then slash into each one (with a seam ripper,) to reveal subsequent layers.  I have to tell you:  it is WAY fun to rip fabric this way!  And, exposing each new layer and shape is like discovering treasure.

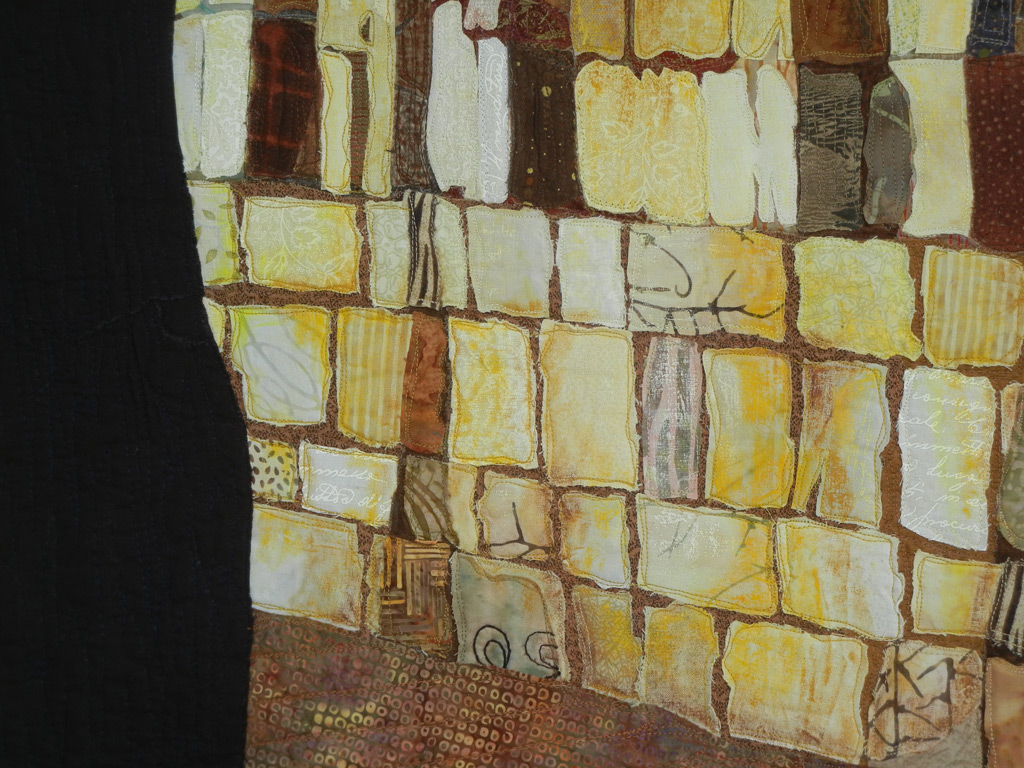
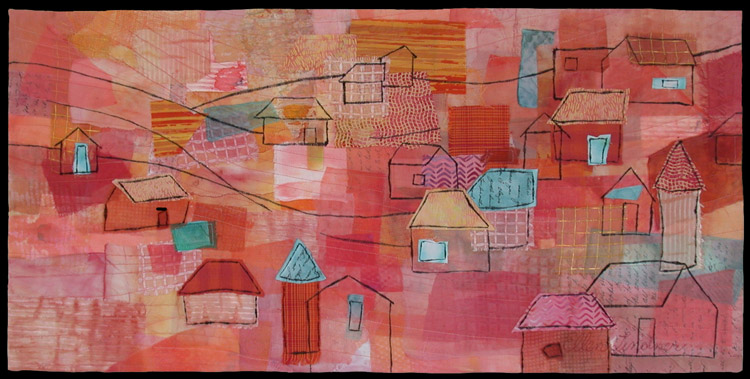
I didn’t have time to devote to a class project, so I decied to just make a small sample.  And here it is:

Click any image for a larger viewstitch-n-slash

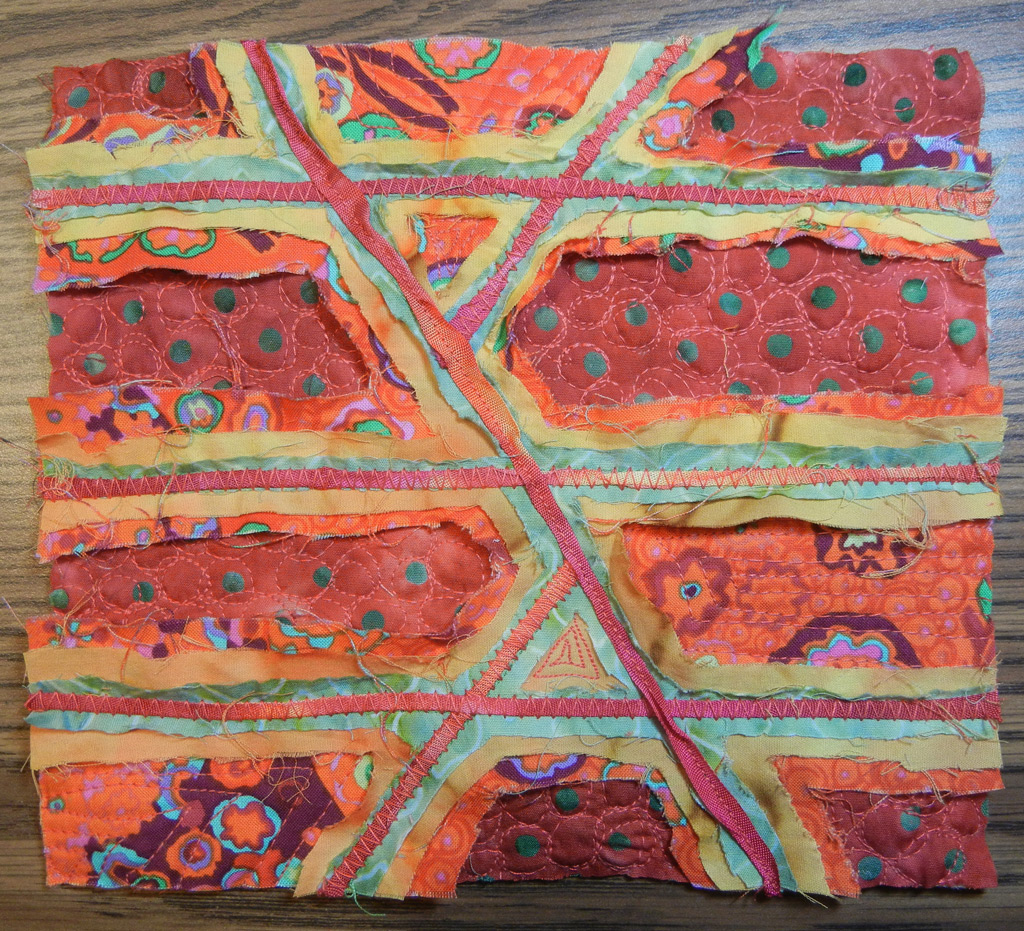
Maybe not that exciting, but full of potential!  I immediately learned to think about the resulting (bottom) shapes and colors, as opposed to the lines I was stitching.  A new way to think.

But, check out the resulting texture.  I love it!

stitch-n-slash-detail

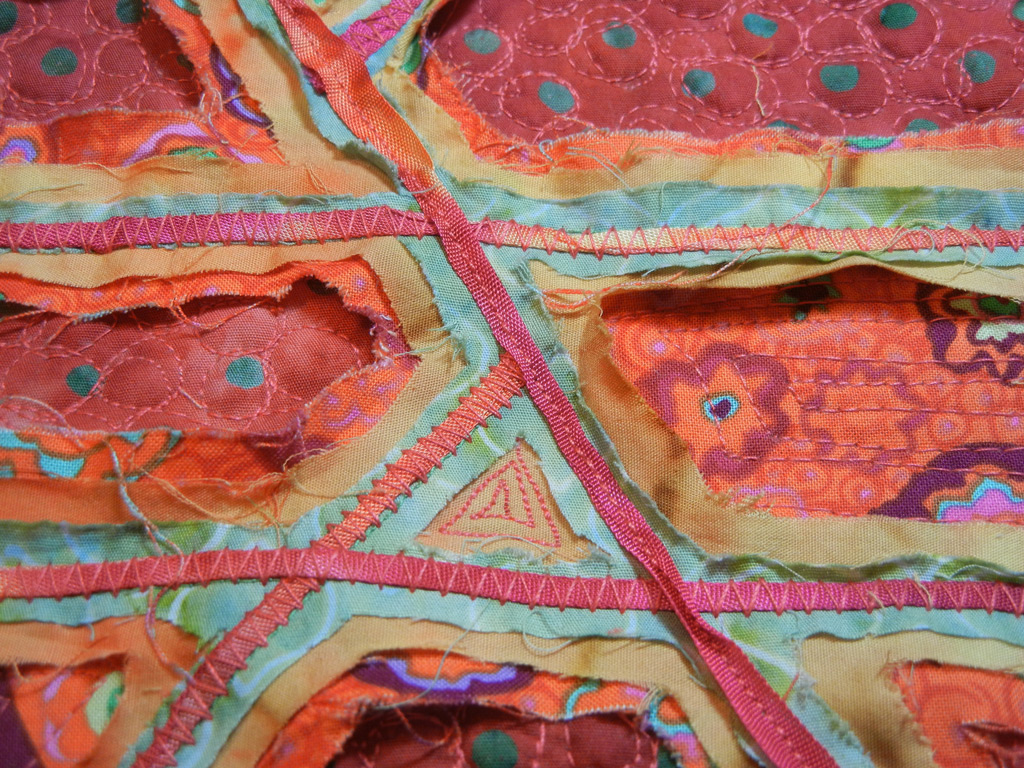
Carol’s class includes lots of useful tips, like how to maximize the texture.  I think I’ll definitely use this technique again.

I’m excited about the convenience and possibilities that online classes offer, both as a student and teacher.  What are some of your favorite online classes?  Do you prefer video content, or text with still photos?

Ellen Lindner
P.S.  See my online class offerings.

Elvis Lives. At Least in Fabric

Do you remember the Elvis fabric used in the fabric bombing of my front yard?  I left it, and the other fabrics, up for a month.  (No complaints from my neighbors, but I didn’t want to risk it much longer.)  I thought you’d like a report on how these fabrics held up to both strong Florida sunlight and heavy downpours.

So here’s Elvis.  And he held up quite well. 
Click on any image for a larger view.

Elvis

 Actually, all the fabrics held up well, except for a couple of older ones.  Like the vertical strip above, on the right of the Elvis panel.  Although it looks like a taupe color now, it started out as navy! 

Overall, however, the entire assembly was still looking good one month later.  About the only noticeable change was the additional sag in the horizontal “clothes lines.” 

overall-post-bomb

Several tree trunks had fabric wrapped around them as decoration.  These slid down somewhat, producing  interesting textures.  The fabrics still held their color well.

saggy-trunk-with-lavendar-p 
 Synthetic fabrics held up especially well, like these prayer flags.

Susans-flags-detail

 When I took it all down many of the fabrics were still damp, due to recent rains.  So, I draped everything on my back porch chairs for drying.  The next morning I discovered an accidental “secondary” installation there.  The early morning sun gave these fabrics a whole new glow.

drying-on-porch

The whole experience was a wonderful, fun, beautiful, and thoughtful one for me.  Very much appreciated.

I’ll be saving many of the components.  A few small ones will hang in my studio.  And some of the fabrics will be used in future art work (after hand washing.) 

Ellen Lindner
P.S.  The photos of the installation show that original navy fabric, near the Elvis panel.

“York Wall” Complete

My latest quilt, York Wall, is now complete.  I’m thrilled with it!

Click any image for a larger view
York-wall-cows

I worked (and reworked) very hard to give it the feeling of reflected light, and I’m now happy with the results.

York-wall-detail

This quilt was inspired by a photo I took in 2002 and I started working on the quilt in 2003.  I quickly got tired of the accuracy required by the architectural imagery and put it away – for NINE years!  When I finally retrieved it, I tried to work much more loosely.  Not only was this more fun, but I think the less accurate colors and patterns give it more interest.

More about that reflected light:  I was well into it when I realized the colors were not glowing like I wanted.  My solution was to pull out my oil pastels, adding a lot of yellow.  You can see some of that process here.

After this quilt I think I’ll stick with non-architectural subjects for a while.

Ellen Lindner

Hospital Quilt Installation

I finally got to see my quilt installed at Nemours Childrens Hospital, in Orlando, FL.  I knew it had been framed, a first for me, and I was anxious to see how it looked.

The building is modern, colorful, and happy.  Definitely designed for children and their families. 

Nemours-ceiling-lights

We noticed kids heading for home, not in wheelchairs, but in red wagons.  And the chairs and benches were soft and low.  My son was with me, and he noticed that the benches included areas of both shallow and deep seating.  Very clever.

andrew-on-orange-bench

I was excited by these observations, thinking that my colorful quilt would fit into this atmosphere very well.  And it did.  Sorta.

Click any image for a larger viewNemours-quilt-in-situ

Here’s Blessings Underfoot, in the infusion center.  I love the way it plays with the berry colored chair, but I was disappointed by the huge amount of glare from the nearby window.

It was impossible to photograph it straight on without significant glare, but here it is shot an angle.  (With yours truly.)  It sure would have been nice if non-glare glass had been used!

ellen-w-Nemours-quilt

I was also puzzled by the use of matting.  I assumed that the quilt would be stitched to mat board with a large border of it showing around the quilt.  Instead, matting was brought right up to (or over) the edge of the quilt.  Darn.  I think the edges help show off the texture of the piece, so I would have rather had them show.

Nemours-framing-detail

But, maybe my artist’s vanity is getting the best of me here.  I do think it looks good, if perhaps not great.  And, I’d definitely accept similar commissions in the future.  But, I think I’ll give some framing and hanging pointers to the next client.

Have you ever framed a quilt?  What are your thoughts on it?

Ellen Lindner

Baby Shoes

Don’t you just love vintage items?  I keep trying to decorate my home with more contemporary pieces, but I’m still drawn to things with a history.

Especially when the history is that of my husband.  Like these baby shoes. 

shoes-best+

He wore all of them.  Aren’t they adorable?  (Click for a larger image.)

The shoes are thanks to my wonderful mother-in-law who’s saved them all these years and who gave them to us recently.  I think they’re very special, and I’ve displayed them in our living room.

She also gave us her high chair, circa 1934.  It’s great to have these family things!

So, about that decorating…can you say “eclectic?”  Or should it be “transitional?”  At any rate, I’m enjoying using a mixture of old and new.

How ’bout you?

Ellen Lindner

Working an Idea

In my earlier post, I showed you a sketch that was inspired by the shapes of a completed quilt.  Did you figure out which quilt provided that inspiration?  This photo should tell you:

H-n-D-shapes

The quilt is called Hopes and Daydreams, and it’s one of my favorites.  (You can see it on the  home page of my website.)

My initial plan for working from this quilt image was to repeat the orange spray of shapes in the top right corner.  But, as I traced shapes, I was attracted to the lovely curve shape that looks almost like a flamingo’s head.  As I played some more, that “head” became a plant of some sort.  Wow!  Our brains are fantastic aren’t they?  It’s amazing to me how a seed of an idea can shoot off into all sorts of interesting directions, if we let it.  It’s exhilarating!  And it’s clear that taking the time to work an idea is absolutely necessary to let these thoughts percolate and diverge.

Next, I played around with two photos of construction fencing.

constr.fence-in-book-1

I traced the major lines of both photos and then selected my favorite parts of each.  I retraced these and hunted for a good arrangement of the two.  This is what I ended up with.

constr_sketch_layers

Hmm.  What colors might look good with this?  Maybe the photo colors should serve as a springboard?

constr.-fence-colored

Or maybe not.  This will require some more experimenting.

And what about the little diamond shapes that are found at each intersection of the grid?  Should they stay or go?  I kinda like them, but maybe I’d have more options without them.

For instance, I could crop down my earlier combo composition.


constr.-fence-sketches-smal

These have a quite different feel.  The one on the right reminds me of irrigation canals.  Another idea that deserves more exploration.

I don’t consider any of these to be designs that are ready to be interpreted in fabric.  But, there are several ideas that I’d like to continue working.  Or should that be “playing.”  They may never evolve into viable designs and that’s completely okay!   The process is very valuable.  Necessary, really.

Ellen Lindner

Drawing Inspiration from Earlier Quilts

In my previous post I told you that my barn sketches were inspired, in part, by an earlier quilt.  However, the idea of drawing inspiration from a completed piece was not my own.  Instead, it came from Elizabeth Barton’s book “Inspired to Design.”   Her suggestion is to look at some of your favorite quilts and let them be a spring board for new ideas.  Once I did that, I got some surprising results.

Click any image for a larger view

organic-sketch-inspired-by-

Like the sketch above.  It looks NOTHING like the original quilt.  In this case, I traced significant shapes from the first quilt, enlarged them, created variations, and then arranged them.  (Again, using tracing paper to play with composition.)

See if you can figure out the quilt that inspired these shapes.  A big hint:  the quilt is on my website, but not on the gallery page.

I’ll reveal the inspiration quilt in the next post.

Ellen Lindner

Sketching Barns

This is a special view for me.  It’s the view from my parents’ home, looking across fields and pastures toward the barns of their dairy farm.  (Actually, they raise beef cattle now, but I still think of it as a dairy farm, since that was its function when I was growing up.)


barn_view_w_tree

I always have to take several shots of this view when I’m visiting my parents.  This July photo shows corn with silks on it.  But, the winter view, with corn stubs sticking up, is appealing in an entirely different way.

And then, of course, there are the barns and silos. I find their shapes very intriguing.  I mean, what other structures are round with either cone shaped or crown shaped roofs?  I’ve always thought about making a quilt with these buildings, and in this 2011 sketch, I exaggerated their sizes.

farm-barn-sketch

But, instead of showing them spread out, I wanted to cluster them one on top of another.  My attempts at composing that had never given me what I wanted.  But then, I decided to mimic the idea of this earlier quilt, By the Baltic Sea.

 Click any image for a larger view
Balt.-Sea--on-black-MED

 Why not show some of the barns as outlines only?  And let them infringe on other barn shapes?  I liked the idea and began to play.  I traced each barn shape and scaled them all up and down.

 barn-tracing-paper-shapes-i

I liked the arrangement above.  To reproduce each tracing paper shape onto my sketch book, I turned each one into a little carbon paper sort of thing.  With a pencil, I simply traced the lines on the back of each one.  Then, I could put it in place, trace the lines again from the front and I’d get the impression on my paper.

For the next sketch, I added the shadows.  That’s another interesting idea! 

barn-sketch-w-shadows

  Or, maybe I should consider cropping, even after arriving at a composition I like.

barn-sketch-smaller

Yep, that’s also very valid. 

Gee, it’s fun to take my time with this sort of thing and to allow ideas to develop.

Ellen Lindner
P.S.  Since I grew up on a dairy farm as the oldest child, my play pen was, at one point, at the barn.  Can you guess my first word?  Yep.  It was moo.

The Value of Non-Productivity

Recenlty, after completing a problematic quilt, I just wasn’t ready to tackle the next one.  I wanted some instant gratification, plus I felt like I needed to exercise my creative “muscles.”  Knowing the value of design and creativity exercises, I decided to spend some time working through a few.

First, I played around with abstracting a zinnia.  In the sketchbook pages shown below, you can see a somewhat stylized zinnia, top right, that drew quite some time ago.  From there, I played with just the shadows and the outline.  I think the bottom right sketch is pretty viable.

Click any image for a larger viewzinnia-sketching 

Although I mentioned the viability of the sketch above, let me make it clear that producing a usable design is NOT my goal when working through such exercises.  For me, I’ve found that such a mindset generates too much pressure to “get it right.”  Instead, I have to tell myself that I’m completely playing, simply for the sake of experimentation.  I’m NOT trying to be productive.  IF a design plan happens to come from this exploration, it’s a bonus.

Such an attitude made it easy for me to see the merit in this two-handed drawing exercise, below.  I definitely want to do more of these! 

2-handed-drawing     
Next, I worked with some favorite photos.  This photo of stone steps on a trail was an excellent candidate for exploring shadows.  (Although I didn’t finish it,) simply tracing shapes onto tracing paper made it easy to accurately depict the dark values.

stone-steps-pages

I also did some rough sketches of this palm frond detail shot.  I really like the intersecting lines.

palm-frond-1
I’ve often made sketches inspired by photos.  But this time I added something new, prompted by Elizabeth Barton’s book “Inspired to Design.”  She suggests adding notes about the entire experience that goes with each photo.  Sounds, emotions, occasions, etc.  A very valid idea, I think.

What have I produced during this time?  Not much: a bunch of sketches, most of which will never become quilt ideas.  But, I’ve also produced: 
– More creativity.
– More joy in the design sketch process.
– More ideas for future exploration.
– More enthusiasm for the next quilt.

I think this is a great (and fun) way to spend my time!  What “non-productive” art activities do you enjoy?

Ellen Lindner
P.S.  I’m really enjoying Elizabeth’s book.  You’ll be hearing more about it.

Florida SAQA Event

Adrenalin surge.  That’s what I got when I was able to meet up with a bunch of other fiber artists.  As far as I’m concerned, the combination of new friends, socializing, and quilts is almost as good as it gets.  So, when a recent event provided me with such a mixture I was on cloud nine!

pod-3-galscropped

Dij Pacarro, Gabrile DiTota, Susan Rienzo, and Ruth Anne Parker enjoying animated conversation

Sponsored by SAQA (Studio Art Quilt Associates,) and held in Melbourne, FL it was open to current and prospective members.  Following a wonderful gallery walk through the Masters 2 exhibit, about 25 of us met in an adjacent class room for more fun and information.  We started off with a panel discussion featuring Sandy Donabed, Jayne Gaskins, and Martha Sielman, and led by Nancy Billings.  Questions dealt with websites, pricing, gallery representation, and much more.  It was interactive and very informative.

After a snack break, we launched into Show and Tell.  It was wonderful to see work produced by Florida fiber artists, and to hear a little about their processes.

Jayne Gaskins creates heavily stitched, photo realistic pieces.  But, what’s more amazing is the depth she adds with trapunto.  Can you tell that the heel below actually sticks out of the piece?

Click any image for a larger view.
Jayne-with-piece

Kay Smith’s large liturgical piece includes colors and symbolism representing Lent through Easter.  There’s even an actual crown of thorns.

kay-smith-with-piece 
Candice Phelan loves to represent 3D spheres.  Can you believe this piece is actually flat?  She uses hundreds (thousands?) of tiny circles, paying careful attention to value placement.  Each circle is cut with a die cut machine and is sewn on by machine.

candice-phelan-w.-piece

These are just a few of the great pieces we saw.  It was an informative and exhilirating event!

BTW, if you’re an art quilter who’d like to turn that into income, SAQA can really help.  The resources and opportunities are plentiful!  Online articles, an email forum, a quarterly journal, and many exhibition options.  Check it out.  (Hey, list me as a referral if you join.)

Ellen Lindner
P.S.  Additional websites and blogs for those in the first picture:
Dij Pacarro
Susan Rienzo
Ruth Anne Parker