Archive | October, 2017

Getting Close

I’m FINALLY winding down on the quilt featuring my brothers.  It’s not ready for a full photograph yet, but here are the two faces.  I spent  A LOT of time on these and I’m happy with them.

Close detail of facial features. Ellen Lindner, AdventureQuilter.com/blog

My brother Todd


Close detail of facial features. Ellen Lindner, AdventureQuilter.com/blog

My brother Ricky

I plan to show the quilt to some of my family members this week.  I know they’ll love it.

Ellen Lindner

0

Making Gun Barrels

Woohoo, the background of my current quilt is finally complete!  Composed and glued and ready for stitching, (but without the green hexie in the center of the photo.)

Making Gun Barrels. Ellen Lindner, AdventureQuilter.com/blog

In the photo above, I was considering adding some hexies to the background.  Just because I’ve been making a lot of them and to give a nod to traditional quilts.  Here’s a better look at them in the sky.

Making Gun Barrels. Ellen Lindner, AdventureQuilter.com/blog

They were kinda interesting, but I eventually decided that they drew attention to the background, making it look overly chunky.  I didn’t think either aspect would help the quilt, so I left them out.

On to making guns. Here’s Ricky’s finished.

Making Gun Barrels. Ellen Lindner, AdventureQuilter.com/blog

Actually, I had to tweak it a little.  The grey on the barrel was too high contrast, so I went over it with a little light grey pastel.  Also, I decided that the barrel was not properly aligned with the stock, so I straightened that out. (See the improvements below.)

On to Todd’s gun.  Due to the angle at which they’re holding their guns, the barrel of his appears longer than Ricky’s.

Making Gun Barrels. Ellen Lindner, AdventureQuilter.com/blog

I composed the guns onto muslin, with glue.  I think I should have fused them, since some of the pieces are pretty small and could ravel.  Next time.

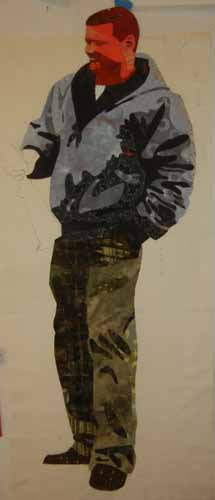
Don’t they look handsome?  Just like themselves, I think: relaxed and at ease.  Next, I’ll get to place them on the background.  I think their orientation is about right above, but I know I’ll need to do some tweaking.

I’m getting excited with these results!

Ellen Lindner

13

Double Reverse Applique Available for Immediate Download

Have you seen the awesome results that can be achieved with Double Reverse Appliqué?

Like very accurate portraits.

Made using Ellen Lindner's Double Reverse Applique technique. AdventureQuilter.comMarch Journal: Ellen, by Ellen Lindner

Ellen Lindner. AdventureQuilter.com

The portrait above was the FIRST thing I ever did with this technique!  That’s how easy it is.


Ellen portrait - detail. AdventureQuilter.com

 Now, I have an eBook about this technique, which uses this awesome apple to teach you the concepts.

Learn from Ellen Lindner with an e-book. AdventureQuilter.com

My students and  readers have had really good results with this technique. See what I mean:

Made using Ellen Lindner's Double Reverse Applique technique. AdventureQuilter.com

Baxter, by Diane Hamburg


Made using Ellen Lindner's Double Reverse Applique technique. AdventureQuilter.com

by Marge Lehrer


Made using Ellen Lindner's Double Reverse Applique technique. AdventureQuilter.com

by Barbara Bilbo

The download is only $9.95.  Find full details here.

Enjoy,
Ellen Lindner


0

750 Pins Later

I own 750 pins: 3 boxes of 250 each.  But, that wasn’t enough to compose my current quilt!

I use A LOT of smallish pieces of fabrics, so that’s why I use so many pins.

750 Pins Later. Ellen Lindner, AdventureQuilter.com/blog

See what I mean?

Still, I’m very happy with the barns and trees I recently created.

750 Pins Later. Ellen Lindner, AdventureQuilter.com/blog

I’m especially pleased with the two trees on the left.  A clean up cloth provided lots of little smudged lines that I was able to manipulate.  I think it works.

750 Pins Later. Ellen Lindner, AdventureQuilter.com/blog

How will I complete my composition without more pins?  Well, I’ll eventually buy more.  But in the meantime, I started gluing things in place in order to free up pins.  I still need to create the grass that’s needed in the foreground.

It seems like this quilt is taking longer than usual, but I should be stitching on it soon.

Ellen Lindner
P.S. This page lists some of my favorite products, including my favorite pins.

6

Corn Fields and Such

After separately creating the two men for my “brothers quilt,” it was time to work on the background.

I finished up the rough draft of the sky and added the far tree line, (with a piece of blue fabric marking a future silo.).

Corn Fields and Such. Ellen Lindner, AdventureQuilter.com/blog

Next it was on to the corn field in the foreground. Since the reference photo was taken in November, the corn had already been harvested and the short golden stalks were all that was left.

My Brothers - making faces. Ellen Lindner, AdventureQuilter.com/blog

I wanted to create the texture of the messy corn stalks, but not too exactly.  So, I used lots of print fabrics to convey the vegetation.  My plan was to use large scale prints in the foreground, like those shown below, and smaller scaled ones in the background.  I hoped this would add a sense of depth.

Corn Fields and Such. Ellen Lindner, AdventureQuilter.com/blog

It worked, but required a good bit of tweaking. (And a lot of pins!) Here is what I think will be the final corn field, below.

Corn Fields and Such. Ellen Lindner, AdventureQuilter.com/blog

Distant fields had much more subtle texture, so I auditioned near-solid fabrics for them.

Corn Fields and Such. Ellen Lindner, AdventureQuilter.com/blog

Here they are, complete.  I’m happy with the sense of depth.  That will be enhanced when I add the small buildings in the distance.

Corn Fields and Such. Ellen Lindner, AdventureQuilter.com/blog

Next it was time to start adding the green fields and grasses. Here it is, in-progress.

Corn Fields and Such. Ellen Lindner, AdventureQuilter.com/blog

I’m getting close to completing the design of this background.  I still need to add the foreground grass and the buildings.  Then, I’ll have to glue it all in place.

FYI, here’s another quilt where I used the scale of fabrics to add to the sense of depth.

Ellen Lindner

6

My Brothers: Clothing

I’m happy with the way the quilt featuring my two brothers is developing.  Here’s my brother Ricky almost complete.

Clothing in-progress. Ellen Lindner, AdventureQuilter.com/blog

After making the face of my other brother, Todd, it was time to work on his jacket.  First, auditioning fabric.

Clothing in-progress. Ellen Lindner, AdventureQuilter.com/blog

Here it is, in-progress.

Clothing in-progress. Ellen Lindner, AdventureQuilter.com/blog

All these little pieces were eventually glued to the muslin base and to each other.

Selecting fabrics for Todd’s pants was more challenging. They were sort of Army green; not a color I tend to stock.  My first attempt:

Clothing in-progress. Ellen Lindner, AdventureQuilter.com/blog

No.  I decided the color was too bright.  This was my solution.  Much better, I think.

Clothing in-progress. Ellen Lindner, AdventureQuilter.com/blog

Now that I’ve completed the two men I’m just getting started on the background.  I’ll make it much looser, which I’m looking forward to.

So far, I’ve just worked on the sky. Some of it looks a little strong to me, but I’ve learned not to cast judgement until I can see everything together.

Clothing in-progress. Ellen Lindner, AdventureQuilter.com/blog

As you can see in the photo above, I’ve drawn the background fields and barns onto the muslin base.  I’ll reference these as I continue.

Ellen Lindner

11