Archive | June, 2017

“Growth” Part Three

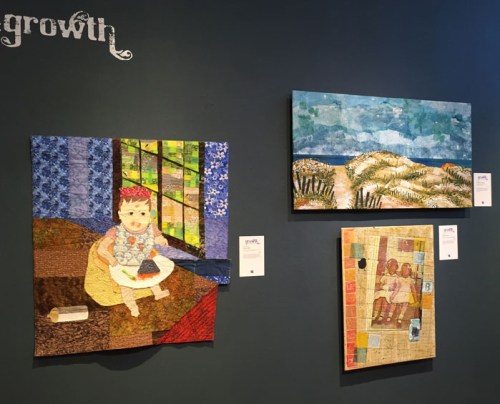
These are the final pieces that make up the “Growth” exhibit, currently on display in Dunedin, FL.  As you can see, the Florida members of SAQA (Studio Art Quilt Associates) are very talented!

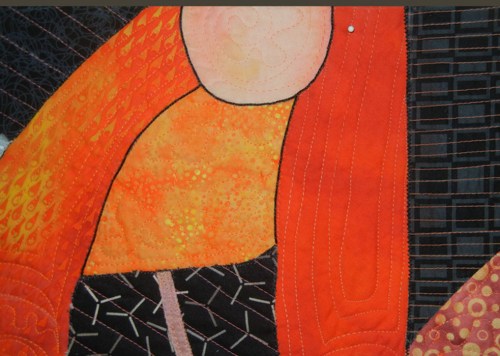
This piece by Susan Rienzo was front and center.

Growth: Part Three. Ellen Lindner, AdventureQuilter.com/blog

Doris Hulse made this piece, which includes references to Alice in Wonderland and other fairy tales.

"Growth" Exhibit in Dunedin

Gabrile DiTota used little girls dresses as a resist on her work, below right.

The two pieces on the left were made by (top) Gail Cassaday, and (bottom) Leslie Cohen.  You can probably tell that the lower piece references a hurricane.  Something we’re all too familiar with here in Florida.

"Growth" Exhibit in Dunedin

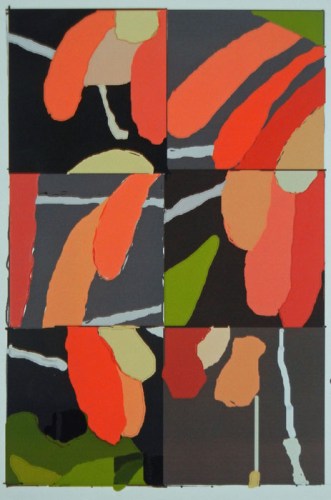
Gayle Wolfe’s piece, “WAGACA” is shown below.  The title stands for “What goes around comes around.”

"Growth" Exhibit in Dunedin

The pieces below were made by (top) Kathryn Robinson, (bottom) Regina Dunn, (left) Linda Hoffmeister.

"Growth" Exhibit in Dunedin

And, finally, these two pieces were made by (L-R) Ellen Nepustil and Barbara Watler.

"Growth" Exhibit in Dunedin

Actually, looking at my catalog I see that I neglected to get photographs of three more pieces made by these artists: Karol Kusmaul, Maya Schonenberger, Patricia Turner.  My apologies, ladies.

I think you’ll enjoy this exhibit.  Especially since THREE other art quilt exhibits are also on display in this arts center!  Especially delightful is Karol Kusmaul’s “Shirt Tales” exhibit, consisting of 47 fabric portraits.  Karol uses primarily thrift store fabrics, which add a wonderful folksiness.  Here’s a sneak peek.

Artwork by Karol Kusmaul. Ellen Lindner, AdventureQuilter.com/blog

As you can see, her pieces are hand stitched.

Artwork by Karol Kusmaul. Ellen Lindner, AdventureQuilter.com/blo

I know the top one is her dad and I believe the bottom left one is, too.  They’re so narrative: personal, yet universal at the same time.

These exhibits will be up all summer, through August 18th.  Find full details here.

Ellen Lindner

4

“Growth” Exhibit: Part Two

Continuing with the great art included in the “Growth” exhibit, these pieces (L-R) were made by Annette Boncek and Marianne Williamson.

"Growth" Exhibit in Dunedin

The piece on the left, below, is one of my favorites, by Maggie Dillon.  The one on the right was made by Jann Warfield.

"Growth" Exhibit in Dunedin

(L-R) these 2D pieces were made by Becky Stack, Gretchen Brooks, and Loreen Leedy. The 3D piece in the foreground was sitting on a pedestal and it was made by Annette Boncek.

"Growth" Exhibit in Dunedin

"Growth" Exhibit in Dunedin

Here’s a close up view of the inside.

"Growth" Exhibit in Dunedin

Maya Schonenberger created this lovely piece.

"Growth" Exhibit in Dunedin

And here’s another Barbara Watler piece, also with heavy stitching.


"Growth" Exhibit in Dunedin

One of my favorite pieces in the show was this one, by Pam Lowe.

"Growth" Exhibit in Dunedin

I really like the round shapes against the ripples of vertical hand quilting.

"Growth" Exhibit in Dunedin

I’ve now shown you all the quilts hanging on the outside perimeter of the room.  But, there’s still more to see!  In the next post, I’ll show you the pieces hanging on the interior partition.

Ellen Lindner
P.S. I’d love it if the artists shown would comment on this post and tell us more about their pieces, (including titles.)

10

“Growth” at Dunedin Fine Arts Center

I sure had fun attending the opening reception for “Growth”, in Dunedin, FL.  It was held at the Dunedin Fine Arts Center.  It’s a beautiful facility with TONS of activities.

"Growth" Exhibit in Dunedin

This is the view as you first step into the gallery.  Impressive, right?  It’s hard to tell in this photo but the walls are a very dark and deep blue-green.

"Growth" Exhibit in Dunedin

The piece front and center was made by Susan Rienzo. All pieces were made by Florida members of SAQA, and specifically selected for this exhibit by juror Pamela Allen.

Working around the room, these are the first pieces you come to.  Starting top left and going clockwise, they were made by Patricia Turner, Cathy Daffinee Heeter, Susan Lumsden, and Becky Stack.

"Growth" Exhibit in Dunedin

Artists were asked to interpret the theme of growth in a variety of ways: urban, social, personal, organic, etc.  I think the juror did a great job  including a wide range of pieces.

Starting top left and going clockwise, the pieces below were made by Karol Kusmaul, Patricia Turner, and Suzanne Evenson.

"Growth" Exhibit in Dunedin

This piece was made by Barbara Watler, and was created entirely by stitching.  (All HAND stitching, I think.)

"Growth" Exhibit in Dunedin

Check out this detail shot. Amazing, right?

"Growth" Exhibit in Dunedin

The left piece below was made by Loree Jackson.  The two on the right were made by Bobbi Baugh.

"Growth" Exhibit in Dunedin

And here’s mine, on the left.  Top to bottom, the two pieces on the right were made by Susanna Hotchkiss and Pamela Morris.

"Growth" Exhibit in Dunedin

Here I am with my piece Dancing Toward the Sun.

"Growth" Exhibit in Dunedin

Thus far I’ve only shown you about 1/3 of the pieces in this exhibit.  More to come in future posts.

Ellen Lindner
P.S. I’d love it if the artists shown would comment on this post and tell us more about their pieces, (including titles.)
P.P.S. There’s a lovely catalog for this exhibit, featuring all the pieces.  Purchase info.

8

“Back Yard Beauty” Complete

My flame vine quilt is now complete.  I’ve named it Back Yard Beauty.

"Back Yard Beauty" Complete. Ellen Lindner, AdventureQuilter.com/blog

I’m quite happy with it.  Here’s a detail shot.

"Back Yard Beauty" Complete. Ellen Lindner, AdventureQuilter.com/blog

You can see more about how I made it in the previous posts.

On to the next quilt, a red bud tree!

Ellen Lindner

0

Gabriele DiTota: Fabrications

If you’re near Melbourne, FL you’ll definitely want to stop in at Fifth Avenue Art Gallery, where “Gabriele DiTota: Fabrications” is currently on display.  Gabriele is a friend and a wonderful fiber artist.  She creates intriguing art quilts and amazing art dolls.

Here she is at the opening, looking poised and welcoming.

Gabriele DiTota: Fabrications. Ellen Lindner, AdventureQuilter.com/blog

I think you can see that she use often uses black paint in her work.

Her work was very popular at the opening, but I managed to get a few photos.

Gabriele DiTota: Fabrications. Ellen Lindner, AdventureQuilter.com/blog

The piece on the left, below, was the Best in Show in last year’s “100% Pure Florida” exhibit.  In addition to a monetary prize, she won the right to have this one month solo show.  Isn’t that a great prize?

Gabriele DiTota: Fabrications. Ellen Lindner, AdventureQuilter.com/blog

Gabriele did a very good job staging her dolls with her quilts. And aren’t they intriguing?

Gabriele DiTota: Fabrications. Ellen Lindner, AdventureQuilter.com/blog

Gabriele DiTota: Fabrications. Ellen Lindner, AdventureQuilter.com/blog(Yes, she dyed the fabric above, shown under the chair.  She’s got skills!)

One of her most interesting dolls is one that riffs off Little Red Riding Hood.

Gabriele DiTota: Fabrications. Ellen Lindner, AdventureQuilter.com/blog

Gabriele DiTota: Fabrications. Ellen Lindner, AdventureQuilter.com/blog

This is the tag explaining it.

Gabriele DiTota: Fabrications. Ellen Lindner, AdventureQuilter.com/blog

Isn’t she creative?

However, my favorite of Gabriele’s dolls is “Mosely Miner,” who just happens to be in front of my favorite quilt, “Locked in Love.”

Gabriele DiTota: Fabrications. Ellen Lindner, AdventureQuilter.com/blog

Aren’t they wonderful?  Gabriele is especially good at telling a story with her work.

Here’s a close up of Mosely.  That nose!

Gabriele DiTota: Fabrications. Ellen Lindner, AdventureQuilter.com/blog

I hope you’ll get to see this exhibit, which is on display through July 1st.

Ellen Lindner – who runs with some talented ladies!

8

Suzanne Sanger’s Work

Back in October, I wrote about creating torn paper collages in order to loosen up and to work more abstractly.  Like this:

Original photo
Ti Plants inspiration photo. Ellen Lindner, AdventureQuilter.com/blog

Torn paper collage
Because the paper is torn, you can’t be too accurate, so you
HAVE to focus on the largest shapes.
Ti plants torn paper collage. Ellen Lindner, AdventureQuilter.com/blog

The fabric interpretation, Ti Party.
Ti Party, an art quilt by Ellen Lindner. AdventureQuilter.comOne of my readers, Suzanne Sanger, decided to give it a try and was kind enough to share her results with me (and with you.)

Her original photo, taken in Bermuda
Suzanne Sanger's Work. Ellen Lindner, AdventureQuilter.com/blog
The paper collage, with part of the original photo overlapping.
Suzanne Sanger's Work. Ellen Lindner, AdventureQuilter.com/blog
And, her final quilt, called Dozing in Bermuda.

Suzanne Sanger's Work. Ellen Lindner, AdventureQuilter.com/blog

I think it’s great.  And don’t you love the way she’s matted and framed it?

Suzanne says, “I want to thank you for inspiring me! Like you, I’ve been challenging myself to work more abstractly, and have dabbled with a range from just barely to totally non representational. Your blog post from last October about torn paper collage sent me right into the studio to tear up the only magazine I had in order to recreate a photo I took in Bermuda a few years ago. Then I did my semi-annual house switch, life intervened, I took a great abstraction class from Lisa Call, all the while leaving my torn paper start hanging on my design wall. Now I’ve switched back to my summer house, and needed a project to get myself back into the studio. Ah hah! It was time to return to my dozing man. He’s a bit more realistic than I would like, but still a move in the right direction. I LOVE this process! Hmmm. I guess I’ll have to subscribe to an image heavy magazine again, pain though that is what with changing mailing addresses twice a year. LOL. Anyway, thanks for a great idea! You always give me new things to think about.”

I love this!  So much so that it makes me want to reach for my magazines again, too. It’s a FUN way to work!

Ellen Lindner


3

Working on My Flame Vine Quilt

The quilt I’ve been working on is inspired by a friend’s flame vine, which cascades down her back porch.  In the strong Florida sun, it’s especially striking when seen against the dark porch screening.

After finishing the orange flowers, I went on to the leaves.

Project Resurrected. Ellen Lindner, AdventureQuilter.com/blog

Next, I tackled the long skinny pieces.  I’m not sure what they are, but they’re some part of the plant. Let’s call them twigs.   At any rate, they were in the original photo and I liked the graphic quality they added to the abstraction.  To audition sizes I started tearing fabrics and I liked the fuzzy quality I got with some of them.  So, I just left them that way.

Working on my Flame Vine Quilt. Ellen Lindner, AdventureQuilter.com/blog

Finally, it was time to glue everything to the muslin and start stitching.  I added black zigzag around each block unit.

Working on my Flame Vine Quilt. Ellen Lindner, AdventureQuilter.com/blog

For the petals and leaves I chose an organic quilting pattern that, in part, followed the shape of the piece.  For the background, I selected parallel lines.  In each case, they follow the angle of one of the twigs.  I really like the effect.

Working on my Flame Vine Quilt. Ellen Lindner, AdventureQuilter.com/blog

After all of this, I thought some of the petals merged a little bit too much.  To add definition, I drew around the edges with a Sharpie.  That helped, but it was partially covered by fuzzy threads, so I looked for something more significant.  I found it with a thin black cord which I hand couched on.  It gave the perfect outline.

Working on my Flame Vine Quilt. Ellen Lindner, AdventureQuilter.com/blog

On to finishing!  I faced the quilt and sprayed marked areas with water, to remove the chalk marks.
But, oops, one area bled.

Working on my Flame Vine Quilt. Ellen Lindner, AdventureQuilter.com/blog

I decided to hide it by adding more of the same.  Like this:

Working on my Flame Vine Quilt. Ellen Lindner, AdventureQuilter.com/blog

I used water soluble wax pastels, adding a little yellow and orange.  Plus, I think the extra water added faded the original spot.  Voila!  On to photo taking.

Ellen Lindner

0

Project Resurrected

Remember the “project that wasn’t?”  After sketching it I decided not to proceed with it.  My issue was that it looked too jumbled, and therefore didn’t accurately depict the plant that inspired me.

My inspiration photo:The Project that Wasn't. Ellen Lindner, AdventureQuilter.com/blog

The initial sketch:

The Project that Wasn't. Ellen Lindner, AdventureQuilter.com/blog

However, I was slow to put the sketch away so it lived on my design wall for a while.  That gave me time to consider it further and I thought, “Why work so hard at making it just an abstract design?  Why not let it look more like the subject?” So, I rearranged my six squares a good bit and came up with this.

Project Resurrected. Ellen Lindner, AdventureQuilter.com/blog

There. That was more like it.  Definitely abstracted, but with the nice curve and drape of a few flower petals.  I was happy enough to continue.

Next came a computer sketch.

Project Resurrected. Ellen Lindner, AdventureQuilter.com/blog

Still happy.  Time to audition fabrics.  Starting with “black” for the six backgrounds.

Project Resurrected. Ellen Lindner, AdventureQuilter.com/blog

I constructed this piece in a very non-standard way using reverse applique.  That is, I cut the black fabric to the needed shapes, so other fabrics could be tucked underneath. Like this first block, bottom left.

Project Resurrected. Ellen Lindner, AdventureQuilter.com/blog

Why use this technique?  One reason: to avoid the black fabric from shadowing through the lighter ones.  Putting black on top got rid of this issue.

From a technical standpoint this worked well.  The only issue is that it was difficult to change my mind, since the first version would be cut before I realized I wanted a change.  Thankfully, my design explorations meant that I needed only a couple of very minor changes.  Whew!

Project Resurrected. Ellen Lindner, AdventureQuilter.com/blog

Above, most of the black cuts were done.  Time to audition petal fabrics.

Project Resurrected. Ellen Lindner, AdventureQuilter.com/blog

Auditioning is extremely important.  I always tell my students “everything affects every other.”  Which means you can’t make a decision in isolation.  You have to see how each fabric, item, or placement will work with those around it.  For instance, look at the middle two fabrics above, in the left center block.  Can you see that they blend together a little bit?  So, I changed one of them, which you can see below.

Project Resurrected. Ellen Lindner, AdventureQuilter.com/blog

The photo above shows the flower petals partially complete.  They were pretty easy to do, since most of the shaping had already been done with the black fabric.

Here the flowers are, complete.

Project Resurrected. Ellen Lindner, AdventureQuilter.com/blog

Green leaves and other details would happen soon.  I’ll show you next time.

Ellen Lindner


6