Archive | March, 2019

AQS Daytona: Special Techniques

At any good quilt show you’ll find amazing workmanship and creativity. The Daytona Beach show was no exception. This amazing trapunto quilt was made by Jan Hutchison.

Click any image for a larger view

(It looks slightly green under the lights, but was really a taupe color.)
AQS Daytona: Special Techniques. Ellen Lindner, AdventureQuilter.com/blog

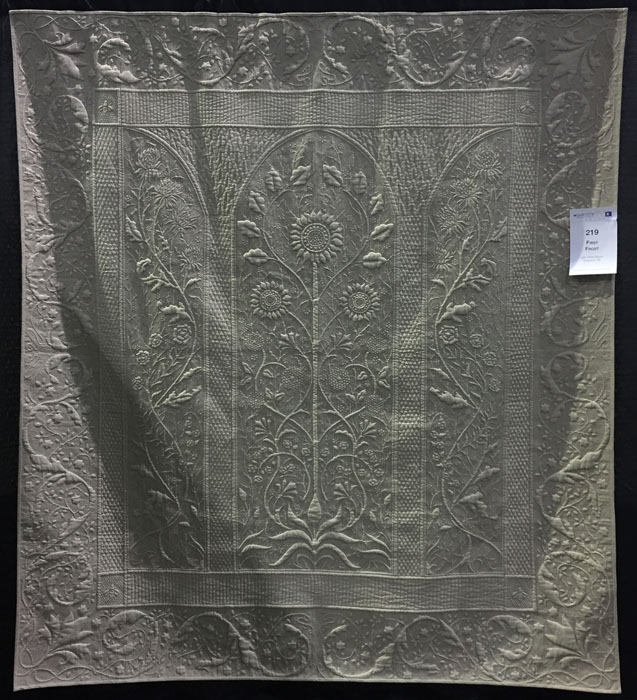
Check out these fabulous details!

AQS Daytona: Special Techniques. Ellen Lindner, AdventureQuilter.com/blog

AQS Daytona: Special Techniques. Ellen Lindner, AdventureQuilter.com/blog
Isn’t it amazing?

This next “quilt” was sort of mesmerizing. The very light layers moved around as people walked by or the air conditioning came on, making it hard to look away.

AQS Daytona: Special Techniques. Ellen Lindner, AdventureQuilter.com/blog

I’ll bet you can’t guess what it inspired it: a glass of a pale yellow wine. I think it must be a very light and subtle wine.

AQS Daytona: Special Techniques. Ellen Lindner, AdventureQuilter.com/blog

This piece was part of a small exhibit about foods, created by a South American husband and wife. (I hate that I didn’t record their names!)

Each piece was very creative and very different from one another. What surprised me was that they depicted things like texture, smell, and taste, but nothing about appearance. Talk about subtle!

AQS Daytona: Special Techniques. Ellen Lindner, AdventureQuilter.com/blog

My friend, Laura Ruiz, has quite a few unique tricks up her own sleeves. For several years she’s been painting onto silk before stitching it.  But, recently, she learned to paint on paper, as well.  She painted this cardinal and then loved it so much she had printed, much larger, through an online company.

AQS Daytona: Special Techniques. Ellen Lindner, AdventureQuilter.com/blog

Next, she pieced the “9 patches” around the edges and joined them to the central motif. To help visually merge the two together she lightly painted triangles into the background of the bird.  Brilliant! And then look at that quilting.  She’s a master! This quilt has won quite a few prestigious awards.

Finally, here’s a look at Andrea Brokenshire’s work.  She also paints onto whole cloth and then adds lots of thread painting.

AQS Daytona: Photo Quilts. Ellen Lindner, AdventureQuilter.com/blog

A beautiful piece, and a very nice show.

Ellen Lindner

0

AQS Daytona: Photo Quilts

Lately, we’ve been seeing lots of quilts that are photos printed onto fabric and then stitched. Although often stunning from across the room, I’m not always enamored with these quilts.  That’s because I want to see something more than the photo. I want to see some added texture, drawing with the quilting line, or thread painting that really ADDS something to the image. I want to see “the hand of the artist.” That is, some way in which the artist has expanded or reinterpreted the photo. Otherwise, why not just print it on paper and frame it? This is a quilt. I want to see something that elevates the image.

Not surprisingly, there were several of these photo quilts at the AQS show in Daytona this year. I’m showing you several I think were especially well done.

This magnificent quilt by Sue de Vanny, is a prime example.

Click any image for a larger view

AQS Daytona: Photo Quilts. Ellen Lindner, AdventureQuilter.com/blog

I don’t believe this one was printed on the fabric. Instead, she used a variety of fabrics to create the basic design, and she then used additional stitching to really bring it to life. My photo is a little out of focus, but I think you can make out the abundant zigzag stitching she has done to soften the edges of the fabrics and to add detail. Beautiful!

AQS Daytona: Photo Quilts. Ellen Lindner, AdventureQuilter.com/blog

Constanze Botel started with a wonderful high contrast photo printed onto fabric.

AQS Daytona: Photo Quilts. Ellen Lindner, AdventureQuilter.com/blog

She added lots of personality and details with the quilting. The word “photographer” is stitched into the background. You can just make out the g to the left of his ear.

AQS Daytona: Photo Quilts. Ellen Lindner, AdventureQuilter.com/blog

This bird quilt was made by  Nancy Sterett Martin. The feathers begged for stitching to help make them stand out.

AQS Daytona: Photo Quilts. Ellen Lindner, AdventureQuilter.com/blog

Nancy took it one step further, however, by adding lots of textured fabric, as well. I think it’s very successful.

AQS Daytona: Photo Quilts. Ellen Lindner, AdventureQuilter.com/blog

I think I read that this next quilt did not have a printed photo as a starting point. Instead, each subtle bit of shading and detail was achieved with fabric and thread. It was made by Barbara Binotto.

AQS Daytona: Photo Quilts. Ellen Lindner, AdventureQuilter.com/blog

Now, check out some of her fabulous textured details: 3D Branches!

AQS Daytona: Photo Quilts. Ellen Lindner, AdventureQuilter.com/blog

And water with textured bits used to great effect.

AQS Daytona: Photo Quilts. Ellen Lindner, AdventureQuilter.com/blog

I hope we’ll see more quilts like these in future shows. To me, they’re MUCH more interesting than just thread painting.

Ellen Lindner
P.S. I fully understand that heavy thread painting is an art and I greatly respect the workmanship.

0

Correcting and Dyeing and Correcting Some More

Ellen Anne Eddy says, “If something’s worth doing, it’s worth doing badly.” In other words, don’t expect yourself to master something right away.  If it’s worth doing it’s worth your practice time and whatever  mediocre results you get along the way. Well, I think maybe I was the poster child for this philosophy in my last dyeing session. It seemed like nearly everything I did was correcting something I’d done earlier.

Like this ugly green fabric.

Click any image for a larger view

Correcting & Dyeing & Correcting Some More. Ellen Lindner, AdventureQuilter.com/blog

I over painted it with fabric paint, using a commercial stencil and I got this. Much better!

Correcting & Dyeing & Correcting Some More. Ellen Lindner, AdventureQuilter.com/blog

Now, the paint shows more than the original ugly fabric and that became the norm as I worked through some other fabrics.

You may remember this GARISH one from an earlier dye session. That UGLY chartreuse needed to be covered! I made a stencil which would print most of the screen, leaving only a few dots of the underneath fabric showing. I tried mixing a deep berry/burgundy color, (which looked black when still wet,) and screened it on.

Correcting & Dyeing & Correcting Some More. Ellen Lindner, AdventureQuilter.com/blog

And it worked! After washing it out this is what I got. Just what I wanted. Woohoo! I love the imperfections.

Correcting & Dyeing & Correcting Some More. Ellen Lindner, AdventureQuilter.com/blog

Now I was on a roll. I began to look for ugly fabrics, like this clean up rag (CUR), and to figure out how I could mostly cover them. For this “stencil” I tried something new. I cut circles from freezer paper and lightly ironed them onto the back of my screen. I wasn’t sure if they’d stay, but they did (until I later washed the screen.) In the example below I screened on what I hoped would be a dark teal. (Since dyes are transparent, there’s often a good bit of guess work involved in such scenarios.)

Correcting & Dyeing & Correcting Some More. Ellen Lindner, AdventureQuilter.com/blog

And this is what I got when I washed it out. Yes!

Correcting & Dyeing & Correcting Some More. Ellen Lindner, AdventureQuilter.com/blog

I tried repeating my good results with the same technique, this time mixing what I hoped was navy blue and adding it to this bright, and very ugly CUR.

Correcting & Dyeing & Correcting Some More. Ellen Lindner, AdventureQuilter.com/blog

As you can see, the yellow below affected the color and it ended up being a greenish brown.  No worries. This will be very usable and is actually one of my favorite fabrics.

These are the results of my 2 week dyeing session: 42 pieces ranging in size from “hand towel” to 30 x 42. I’m, very happy with them.

Correcting & Dyeing & Correcting Some More. Ellen Lindner, AdventureQuilter.com/blog

I’m learning that this dyeing business requires some luck, a good bit of color theory, and an attitude of exploration. My kind of thing, for sure!

Ellen Lindner

2

Floral Improv in Charlotte

Gee, I’ve been teaching so much that I haven’t had time to update my blog with all the great student results.

These are the results from a February “Floral Improv” class in Charlotte, NC. With only 7 students, we had plenty of room to spread out and within the first few minutes colorful flowers were developing.

Click any image for a larger view

Floral Improv in Charlotte. Ellen Lindner, AdventureQuilter.com/blog

Floral Improv in Charlotte. Ellen Lindner, AdventureQuilter.com/blog

They look great on dark backgrounds, don’t they? And here are the resulting quilts at the end of the day, made by Eve and Judy, respectively.

Floral Improv in Charlotte. Ellen Lindner, AdventureQuilter.com/blog

TFloral Improv in Charlotte. Ellen Lindner, AdventureQuilter.com/blog

Those colors POP!

Of course, softer colors work equally well. As demonstrated beautifully by Robin and Liz, below.

Floral Improv in Charlotte. Ellen Lindner, AdventureQuilter.com/blog

Floral Improv in Charlotte. Ellen Lindner, AdventureQuilter.com/blog

And why not have use blue flowers? Sara and Marguerite did so very effectively.

Floral Improv in Charlotte. Ellen Lindner, AdventureQuilter.com/blog

Floral Improv in Charlotte. Ellen Lindner, AdventureQuilter.com/blog

Rounding out the selection is this great quilt made by another Judy.

Floral Improv in Charlotte. Ellen Lindner, AdventureQuilter.com/blog

The quilting is very important on these quilts.  Especially on the poppies, which need some additional definition. See how much the black stitching helps? I recommend a double pass with a rather sketchy line.

Floral Improv in Charlotte. Ellen Lindner, AdventureQuilter.com/blog

Another successful class, with marvelous results!

Ellen Lindner

2

Traveling with Quilts

One third personal, one third class stuff, and one third quilts: that’s about the ratio of my luggage contents when I travel to teach. Since I want the quilts to arrive with a minimum of wrinkles, so I’ve developed a way to let each one pad the crease of another.

I start with the one medium-large quilt I’m taking. I put it in the cavity of my  partially packed suitcase, but leave it fully open.

Traveling with Quilts. Ellen Lindner, AdventureQuilter.com/blog

Next, I add the quilts that are a little smaller. These are too big to lie flat in the suitcase, but narrow enough to fit within the width of my luggage. I lay these in the cavity with one end flat, but the remainder of the quilt opened up and hanging over the edges. See the numbered sequence below.

Traveling with Quilts. Ellen Lindner, AdventureQuilter.com/blog

Next, come the very small quilts that are small enough to fit flat into the suitcase. I put in a few of these, but hold two out.

Traveling with Quilts. Ellen Lindner, AdventureQuilter.com/blog

Now it’s time to start folding up the quilts which have already been laid in place, working in approximately reverse order. In the photo below, the purple quilt has been folded up, with the smallest quilts acting as padding for that crease.

Traveling with Quilts. Ellen Lindner, AdventureQuilter.com/blog

Eventually, all of these quilts are folded up.  See the folded red quilt, below.  Remember that it was the second one to go in. So, it’s time to address the largest quilt which was placed in first. Of course, it needs to have its folds padded too, and this is where the remaining two small quilts come in. In the photo below, the quilt with the oranges was placed with this in mind.

Traveling with Quilts. Ellen Lindner, AdventureQuilter.com/blog

Now the largest quilt can be folded right to left.

Traveling with Quilts. Ellen Lindner, AdventureQuilter.com/blog

And top to center, with the oranges quilt sandwiched in between the folds.

Traveling with Quilts. Ellen Lindner, AdventureQuilter.com/blog

Finally, the last small quilt is added to cushion the final fold and I’m ready to go.

Traveling with Quilts. Ellen Lindner, AdventureQuilter.com/blog

My students and the audience members at my lectures really love to see quilts up close and personal, so these are always a big hit.

I’d love to come show them off at your guild!

Ellen Lindner

2