Tag Archives | Floral

Designing a Red Bud Quilt

After viewing blooming Red Buds in Virginia in April, I was inspired to make a quilt.  I thought I’d have a difficult time depicting them from a distance, so I decided to feature their blossoms close up.  To that end, I took a bunch of photos.

Designing a Red Bud Quilt. Ellen Lindner, AdventureQuilter.com/blog

Gorgeous, right?

Designing a Red Bud Quilt. Ellen Lindner, AdventureQuilter.com/blog

Designing a Red Bud Quilt. Ellen Lindner, AdventureQuilter.com/blog

Designing a Red Bud Quilt. Ellen Lindner, AdventureQuilter.com/blog

Designing a Red Bud Quilt. Ellen Lindner, AdventureQuilter.com/blog

I think it’s so interesting the way the blossoms pop directly out of the bark.

I spent quite a bit of time merging and resizing photos on the computer and finally came up with this as a sketch.

Designing a Red Bud Quilt. Ellen Lindner, AdventureQuilter.com/blog

The sky and branches should be pretty straight forward, but what about those blossoms?  I think some experimenting will be in order.

Ellen Lindner
P.S. Check out some of the other flowers I’ve created in this gallery.

2

“Back Yard Beauty” Complete

My flame vine quilt is now complete.  I’ve named it Back Yard Beauty.

"Back Yard Beauty" Complete. Ellen Lindner, AdventureQuilter.com/blog

I’m quite happy with it.  Here’s a detail shot.

"Back Yard Beauty" Complete. Ellen Lindner, AdventureQuilter.com/blog

You can see more about how I made it in the previous posts.

On to the next quilt, a red bud tree!

Ellen Lindner

0

Project Resurrected

Remember the “project that wasn’t?”  After sketching it I decided not to proceed with it.  My issue was that it looked too jumbled, and therefore didn’t accurately depict the plant that inspired me.

My inspiration photo:The Project that Wasn't. Ellen Lindner, AdventureQuilter.com/blog

The initial sketch:

The Project that Wasn't. Ellen Lindner, AdventureQuilter.com/blog

However, I was slow to put the sketch away so it lived on my design wall for a while.  That gave me time to consider it further and I thought, “Why work so hard at making it just an abstract design?  Why not let it look more like the subject?” So, I rearranged my six squares a good bit and came up with this.

Project Resurrected. Ellen Lindner, AdventureQuilter.com/blog

There. That was more like it.  Definitely abstracted, but with the nice curve and drape of a few flower petals.  I was happy enough to continue.

Next came a computer sketch.

Project Resurrected. Ellen Lindner, AdventureQuilter.com/blog

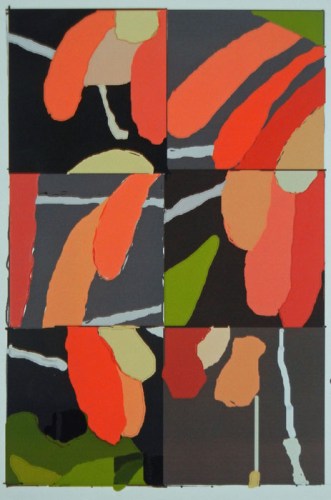
Still happy.  Time to audition fabrics.  Starting with “black” for the six backgrounds.

Project Resurrected. Ellen Lindner, AdventureQuilter.com/blog

I constructed this piece in a very non-standard way using reverse applique.  That is, I cut the black fabric to the needed shapes, so other fabrics could be tucked underneath. Like this first block, bottom left.

Project Resurrected. Ellen Lindner, AdventureQuilter.com/blog

Why use this technique?  One reason: to avoid the black fabric from shadowing through the lighter ones.  Putting black on top got rid of this issue.

From a technical standpoint this worked well.  The only issue is that it was difficult to change my mind, since the first version would be cut before I realized I wanted a change.  Thankfully, my design explorations meant that I needed only a couple of very minor changes.  Whew!

Project Resurrected. Ellen Lindner, AdventureQuilter.com/blog

Above, most of the black cuts were done.  Time to audition petal fabrics.

Project Resurrected. Ellen Lindner, AdventureQuilter.com/blog

Auditioning is extremely important.  I always tell my students “everything affects every other.”  Which means you can’t make a decision in isolation.  You have to see how each fabric, item, or placement will work with those around it.  For instance, look at the middle two fabrics above, in the left center block.  Can you see that they blend together a little bit?  So, I changed one of them, which you can see below.

Project Resurrected. Ellen Lindner, AdventureQuilter.com/blog

The photo above shows the flower petals partially complete.  They were pretty easy to do, since most of the shaping had already been done with the black fabric.

Here the flowers are, complete.

Project Resurrected. Ellen Lindner, AdventureQuilter.com/blog

Green leaves and other details would happen soon.  I’ll show you next time.

Ellen Lindner


6

Revamping Artificial Flowers

I have a white “silk” orchid that was very realistic looking when I purchased it several years ago.  Over time, however, it has yellowed badly.

Revamping Artificial Flowers. Ellen Lindner, AdventureQuilter.com/blog

Revamping Artificial Flowers. Ellen Lindner, AdventureQuilter.com/blog

I considered several ideas about how to best revamp these pretty petals.  Eventually, I decided just to paint them, with ordinary acrylic paint.

Revamping Artificial Flowers. Ellen Lindner, AdventureQuilter.com/blog

This worked well.  I left the fiddly centers yellow and was happy with the results.

Revamping Artificial Flowers. Ellen Lindner, AdventureQuilter.com/blog

Revamping Artificial Flowers. Ellen Lindner, AdventureQuilter.com/blog

Not bad, right?  No one’s going to think they’re real, but they’re definitely pretty.

What have you painted lately?

Ellen Lindner
P.S.  What I really wanted to do was to decoupage black and white fabrics onto the petals.  It only took a little experimenting to realize that would be too difficult.  But if I ever create some from scratch?  Who knows.

11

“Fragrant Climb” Complete

Here’s my challenge piece, complete.  I call it Fragrant Climb.

Fragrant Climb, an art quilt by Ellen Lindner. AdventureQuilter.com

Fragrant Climb

Detail:

Fragrant Climb - detail, an art quilt by Ellen Lindner. AdventureQuilter.com

In a nod to the small flowers near the stairs in the inspiration photo, I drew on additional open-petal ones (above.)  I liked the effect and will use it again.

I’m pretty happy with this piece.  Especially since I wasn’t that crazy about the inspiration photo.  But, then, that’s why it’s called a challenge, right?

I encourage you to view a slide show showing all ten pieces made for this challenge.

Ellen Lindner

7

Welcome to Provence – Part Two

Once I had the background and leaves finished, it was time to focus on the flowers.  First, I auditioned fabrics.

Welcome to Provence. Ellen Lindner, AdventureQuilter.com/blog

I had quite a big selection of fabrics to choose from, so it was easy to use a different fabric for each petal.

Welcome to Provence. Ellen Lindner, AdventureQuilter.com/blog

Next, I started adding white flowers with open petals.  I love these and I’ve been using them a lot lately.

Welcome to Provence. Ellen Lindner, AdventureQuilter.com/blog

They add a nice “variety of scale,” don’t you think?

Welcome to Provence. Ellen Lindner, AdventureQuilter.com/blog

I stitched them on with contrasting orange thread.

Welcome to Provence. Ellen Lindner, AdventureQuilter.com/blog

The inspiration photo had a lot of small flowers at the bottom left of the stairs.  I gave them an artistic nod with a variety of orange circles.

Welcome to Provence. Ellen Lindner, AdventureQuilter.com/blog

Finishing touches in the next post!

Ellen Lindner

6