Tag Archives | Paints and Markers

At Least I Learned Something

After so much experimentation with paint and collage I was anxious to see if and how it might translate to fabric.  I gave myself this assignment:
– Make 4 small collages, each with paint used at least once.
– Experiment with different ways to get a sheer/transparent effect.
– Start with materials immediately on my work table.
– Start by adding something sheer to every stage.

These were my initial materials, all of which were lying around, (i.e. not properly put away.)  They included some hexies which had been stitched to a background piece of muslin, small fused scraps and sheer fabrics.

At Least I Learned Something. Ellen Lindner, AdventureQuilter.com/blog

I cut up the hexies and used them as part of the backgrounds.

At Least I Learned Something. Ellen Lindner, AdventureQuilter.com/blog

I expected the finished compositions to be about 5 x 7.  I used a paper frame (above) to help me arrange the hexies for each.  These were my starting compositions.

At Least I Learned Something. Ellen Lindner, AdventureQuilter.com/blog

I’ll show you some of what I did.  However, I don’t consider any of them finished.  As a matter of fact, I wasn’t very happy with any of them.  But, I managed to answer my questions, so then I felt find about putting them away.

This is as far as I got on the orange one.  As you can see, a layer of organza greatly obscured the layer below.  It’s also got paint on top of everything you see here.  Except for the little black line which I added with stitching.

At Least I Learned Something. Ellen Lindner, AdventureQuilter.com/blog

This red and green one got a transparent layer with over printing.  I liked that effect.  Yellow lines were fused on and organza was added to the right side only.

At Least I Learned Something. Ellen Lindner, AdventureQuilter.com/blog

This blue one was pretty much a dud.  I added a gridded sheer and then melted parts of it with a heat gun.  I didn’t like the wounds.  I also used heavy stitching as a transparent layer.  It worked pretty well, but was too much work for my liking.

At Least I Learned Something. Ellen Lindner, AdventureQuilter.com/blog

This one was quickly getting overworked and it had questionable color choices.  But, I did like the line I added with two lines of stitching.

At Least I Learned Something. Ellen Lindner, AdventureQuilter.com/blog

And here it is when it got so ugly I couldn’t face it anymore!

At Least I Learned Something. Ellen Lindner, AdventureQuilter.com/blog

With all this ugliness, what did I learn?
– I don’t really like sheer fabrics as translucent layers.  They tend to obscure the lower layers too much.
– I DO like allover printing as a textural/sheer layer.  I can see myself using it again.
– I like adding a black line with machine stitching.  I’d like to explore hand stitching it too.

I think I’ve now well and thoroughly put this episode of exploration to bed.  On to the next thing!

Ellen Lindner


10

Online Class with Jane Davies

After getting so much out of Jane Davies’ book about abstract elements I decided to take an online “class” with her.  I put class in quotes, because this was not interactive.  You just download the content and do the exercises on your own.  More like a book – although she does have interactive classes, too.

This was MUCH more challenging, primarily because it involved a lot of – to me – tricky painting techniques I wasn’t familiar with.

The first exercise was easy enough, however: paint a lot of paper in a monochromatic colorway, then combine it in a gridded collage.

An online class with Jane Davies. Ellen Lindner, AdventureQuilter.com/blog

I made two.

An online class with Jane Davies. Ellen Lindner, AdventureQuilter.com/blog

The ease stopped there.  The next assignment was to make a horizontal collage with different background colors top and bottom.  That part was fine.  But then, I was supposed to sort of merge the background and foreground.  This is what Jane does so brilliantly that is completely foreign to me!

An online class with Jane Davies. Ellen Lindner, AdventureQuilter.com/blog

I did 4 of these, with my most successful 2 shown above.  In places, I pulled the color of the collage into the background and in other places I painted a background color onto the collage.  I had no idea what I was doing!  But, it WAS interesting.

Next came an assignment that started with a cruciform composition.  That part was okay, but the quadrants were each supposed to be different, and again, the two were supposed to be merged with paint.  Again, lots of completely random attempts on my part.

An online class with Jane Davies. Ellen Lindner, AdventureQuilter.com/blog

This next 3 examples are so hideous I hesitate to show them to you.  Ugh!

An online class with Jane Davies. Ellen Lindner, AdventureQuilter.com/blog

Again, these were cruciforms, with paint added everywhere and then wiped off.  I completely overworked these three!

Finally, it was time to put it all together.  After watching her video twice I was ready to start.  First, I referenced my earlier sample papers showing a variety of ways to make marks with paint.

An online class with Jane Davies. Ellen Lindner, AdventureQuilter.com/blog

For this assignment I followed Jane’s example of painting over every single layer, (until I got to the last few elements.)  Here, the orange circle and the black lines are not painted over.  Everything else is.

An online class with Jane Davies. Ellen Lindner, AdventureQuilter.com/blog

Finally, I had a little bit of success I think.

Things I learned:
– I  love the look of partially veiled paint, but I don’t know how to do it.
– I love the idea of foreground and background merging, but I don’t know how to do that with paint either.  Maybe with fabric?
– I continue to be entranced with skinny wild lines, inspired by some of Jane’s work.

Questions going forward:
– Can I get a veiled look with fabric?  Maybe with sheers or overprinting with paint?
– What’s the best way to add those skinny lines to my fabric art?
– Can I successfully  merge both fabric and paint in my art???

You know me: I’ll HAVE to do some more experimenting as I try to answer these questions.  Stay tuned.

Ellen Lindner

8

Working on My Flame Vine Quilt

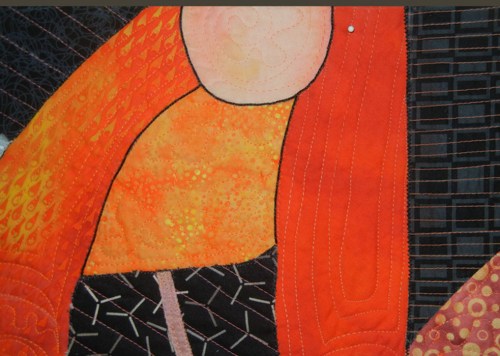
The quilt I’ve been working on is inspired by a friend’s flame vine, which cascades down her back porch.  In the strong Florida sun, it’s especially striking when seen against the dark porch screening.

After finishing the orange flowers, I went on to the leaves.

Project Resurrected. Ellen Lindner, AdventureQuilter.com/blog

Next, I tackled the long skinny pieces.  I’m not sure what they are, but they’re some part of the plant. Let’s call them twigs.   At any rate, they were in the original photo and I liked the graphic quality they added to the abstraction.  To audition sizes I started tearing fabrics and I liked the fuzzy quality I got with some of them.  So, I just left them that way.

Working on my Flame Vine Quilt. Ellen Lindner, AdventureQuilter.com/blog

Finally, it was time to glue everything to the muslin and start stitching.  I added black zigzag around each block unit.

Working on my Flame Vine Quilt. Ellen Lindner, AdventureQuilter.com/blog

For the petals and leaves I chose an organic quilting pattern that, in part, followed the shape of the piece.  For the background, I selected parallel lines.  In each case, they follow the angle of one of the twigs.  I really like the effect.

Working on my Flame Vine Quilt. Ellen Lindner, AdventureQuilter.com/blog

After all of this, I thought some of the petals merged a little bit too much.  To add definition, I drew around the edges with a Sharpie.  That helped, but it was partially covered by fuzzy threads, so I looked for something more significant.  I found it with a thin black cord which I hand couched on.  It gave the perfect outline.

Working on my Flame Vine Quilt. Ellen Lindner, AdventureQuilter.com/blog

On to finishing!  I faced the quilt and sprayed marked areas with water, to remove the chalk marks.
But, oops, one area bled.

Working on my Flame Vine Quilt. Ellen Lindner, AdventureQuilter.com/blog

I decided to hide it by adding more of the same.  Like this:

Working on my Flame Vine Quilt. Ellen Lindner, AdventureQuilter.com/blog

I used water soluble wax pastels, adding a little yellow and orange.  Plus, I think the extra water added faded the original spot.  Voila!  On to photo taking.

Ellen Lindner

0

Revamping Artificial Flowers

I have a white “silk” orchid that was very realistic looking when I purchased it several years ago.  Over time, however, it has yellowed badly.

Revamping Artificial Flowers. Ellen Lindner, AdventureQuilter.com/blog

Revamping Artificial Flowers. Ellen Lindner, AdventureQuilter.com/blog

I considered several ideas about how to best revamp these pretty petals.  Eventually, I decided just to paint them, with ordinary acrylic paint.

Revamping Artificial Flowers. Ellen Lindner, AdventureQuilter.com/blog

This worked well.  I left the fiddly centers yellow and was happy with the results.

Revamping Artificial Flowers. Ellen Lindner, AdventureQuilter.com/blog

Revamping Artificial Flowers. Ellen Lindner, AdventureQuilter.com/blog

Not bad, right?  No one’s going to think they’re real, but they’re definitely pretty.

What have you painted lately?

Ellen Lindner
P.S.  What I really wanted to do was to decoupage black and white fabrics onto the petals.  It only took a little experimenting to realize that would be too difficult.  But if I ever create some from scratch?  Who knows.

11

Trying New Things

Do you like to try new things?  I do.  Especially as they relate to art and quilting.  Whether it’s a tool, a technique, or a color palette, I consider experimenting with such things to be adventures.  (As a matter of fact, that’s why I call my website Adventure Quilter.)

I recently discovered a new white pen.  It’s permanent and it works pretty well on fabric.  One coat is sort of faded looking, but two passes make a nearly opaque mark.

Trying New Things. Ellen Lindner, AdventurQuilter.com/blog

The pen is called Uniball Signo broad tip.  (The last is a misnomer, since the tip is about like that of an ordinary ink pen.)  Note:  The pen doesn’t cover quite as well as in this photo.

Do you have one of those favorite t-shirts or sweaters that’s so comfortable you want to wear it no matter how ratty it gets?  I have a t-shirt like that, which has been developing holes.  They finally got bad enough that I decided to do something about them.  Namely, mend them in a rather exaggerated way.

Trying New Things. Ellen Lindner, AdventurQuilter.com/blog

I enlarged the holes, patched them with contrasting fabric scraps and embroidered around them.  Now, I sorta feel like I’m wearing an odd work of art.  And I like it.

Have you done any creative mending?

Ellen Lindner

4

Making Angel Ornaments

After seeing some angel ornaments for sale I got the idea of making something similar as gifts.  But my idea was to add the faces of the recipients to their respective angels. Doesn’t that sound like fun?

I painted the bodies red and added a little shading on the sides.  As you can see, these primitive figures have no shoulders or arms.  Which I kinda love.  It will make the angels almost cartoon-like, giving me lots of artistic latitude.

Making angel ornaments. Ellen Lindner, AdventureQuilter.com/blog

The halos got a gold leaf treatment.  Don’t you love the way the black underneath shows through?  I think that sort of imperfection adds a LOT of character and interest.

Making angel ornaments. Ellen Lindner, AdventureQuilter.com/blog

The wings got a rather “fancy” country-style treatment:  cream paint, stained edges, and lace.  Perfect, I think!

Making angel ornaments. Ellen Lindner, AdventureQuilter.com/blog

Before assembling the angels, I spent some time on Photoshop tweaking photographs in order to get heads to the right size, etc.  Here’s my first prototype, with me as the subject.

Making angel ornaments. Ellen Lindner, AdventureQuilter.com/blog

Isn’t it a hoot?

I’ve now given away the other three, and I can’t believe I forgot to photograph them first!  But, my friend, Lynn, photographed hers.  As you can see, I tried to match the text to the expression on the face.

Making angel ornaments. Ellen Lindner, AdventureQuilter.com/blog

(This is what she gets for striking such a goofy pose in the original photo!)

These were a lot of fun to make and I’ll be making several more.

What craft/art projects are you doing for Christmas?

Ellen Lindner
P.S.  I ordered the angel kits from retrocafeart.com

2

InkTense Blocks

Have you tried InkTense pencils and blocks yet?  They’re water soluble ink in either pencil or block form and I’ve been seeing them on all sorts of quilts.  I got a chance to play with the blocks recently and they were a ton of fun.

My first experiment was to test their “smear-ability,” or how much they’d bleed.  I sprayed the top 2/3 of my fabric with water and used Aloe Vera gel to moisten the bottom 1/3.  Then I drew over both parts with the end of the blocks, as well as with the blocks laying flat for lots of coverage.

Working with InkTense blocks. Ellen Lindner, AdventureQuilter.com

As you can see, the water areas bled pretty well and the Aloe Vera part did not.  Good to know.  Now, I can select the best one based on the desired results.

Next, I dipped the end of a block into water and drew on dry fabric. The amount of saturated color that comes from these blocks is amazing!  As soon as my mark looked dry, I’d wet the end again and continue.  The end just sort of melted into wonderful ink.  It was very cool, and this was the result.

Working with InkTense blocks. Ellen Lindner, AdventureQuilter.com

Finally, I tried blending colors directly onto wet fabric.  Hmm, that was much less controllable.  It bled more than I wanted, so then I decided to encourage bleeding by adding more water.  Yep, it bled alright.  Finally, I drew a design on, trying to control what I had.  Not too successful, I’m afraid.  But, that’s why I was experimenting.

Working with InkTense blocks. Ellen Lindner, AdventureQuilter.com

When I’m on the ball I remember to write notes about my techniques directly onto my samples.

I’ve heard a lot about the InkTense inks being permanent once dried.  So, I added the step of heat setting these samples and set out to see if all of this was true.  It turns out:  not so much.  Here’s the cotton swab after rubbing it over my dry sample – in the area where water was used.

Working with InkTense blocks. Ellen Lindner, AdventureQuilter.com

It seems like a lot of color, but maybe it wouldn’t be enough to transfer.  So I tried it.  It’s subtle, but it did transfer.  (This actually shows up more in person.)

Working with InkTense blocks. Ellen Lindner, AdventureQuilter.com

 So, what about the area with the aloe vera?  What would that do?

Working with InkTense blocks. Ellen Lindner, AdventureQuilter.com

Same thing.  I think these are still very viable for use on quilts, but it’s good to know what their properties really are.

What have you experimented with lately?

Ellen Lindner

7