Tag Archives | Oops

I Ruined It

If you’ve been following me for a while you know that I’ve occasionally cut up quilts and rearranged them. So, when I decided this quilt needed some revision, I decided to give it a go.

The starting quilt, Beet Salad. Certainly not terrible, but it wasn’t exciting me either.

Beet Salad, an art quilt by Ellen Lindner, AdventureQuilter.com

Beet Salad

Usually, when I cut something up I do it with great intention. I aim for diagonal cuts that will show off the best parts of the quilt. This time, however, I cut it up into approximately 5″ squares. That’s probably where I went wrong.

Cutting up and rearranging "Beet Salad." Ellen Lindner, AdventureQuilter.com/blog

This photo shows an early rearrangement. It doesn’t look that different, right?

Soon, I decided to use only the pieces that had two colors. This is what I came up as my piecing plan.

Cutting up and rearranging "Beet Salad." Ellen Lindner, AdventureQuilter.com/blog

I wasn’t sure that it was better, but it did have more energy and I planned to add applique here and there. But then I got confused as I was piecing and created something different.

Cutting up and rearranging "Beet Salad." Ellen Lindner, AdventureQuilter.com/blog

It was really too hideous for me to even take a photo. But, above you can probably tell that I added a border using those singe color pieces. And I stitched over it with a lot of black thread. It was all UGLY!

I briefly entertained the idea of trying to improve it. Which is the only reason I took the photo above. In it I was auditioning some lighter versions of pink and purple. Ugh! By now I had lost my interest in this experiment and was a little bit mad at the result. I didn’t want it hanging around any more and decided to toss it. (Actually, I saved it just for free motion quilting practice.)

Oh well, on to the next project.

Have you ever cut anything up?

Actually, I did it again, recently. I’ll show you that soon.

Ellen Lindner


0

Two Steps Back

Well, I just wasn’t happy with the in-progress quilt I showed you last time. It seemed a little static.

Three Steps Forward. Ellen Lindner, AdventureQuilter.com/blog

I tried to analyze what needed to change and I referenced my original black and white sketch.

Two Steps Back. Ellen Lindner, AdventurQuilter.com/blog

Wait a second.  It was different from the working sketch I’d been using:

It all Started with a Beautiful Fabric. Ellen Lindner, AdventureQuilter.com/blog

At some point I had switched the values of the two loosely horizontal lines.  I had worked with the one showing the lower line dark and the top one very light.  But now, looking at what was currently in my sketch book, I thought the other (top) version was definitely better.  Could such a subtle thing make that much difference?  Well, in my mind it clearly did.

So, I decided to make some changes.  In addition to the value shift I wanted to really play up the red as the primary motif color and to make the lines fatter and more irregular.  (Again, more like the sketch.) I took all the motif pieces off and started again on the plain background. (Two steps back.)

My redo was much easier than my first attempt, probably because I had a clearer idea of what I wanted to achieve.  “Play up the red” was my first priority.

Two Steps Back. Ellen Lindner, AdventurQuilter.com/blog

Bam!  As soon as I put this up I liked it SO much better!  There was the drama I had been missing!  After auditioning some red fabrics, I came up with this.

Two Steps Back. Ellen Lindner, AdventurQuilter.com/blog

Yes!  A definite improvement.  From here my goal was to add interest without detracting from these strong red lines.  Which meant that most of the lines would be low contrast. Like the aqua lines I was adding below.

Two Steps Back. Ellen Lindner, AdventurQuilter.com/blog

Auditioning green for the lower line: I was liking it better than the previous yellow. Of course, it needs to tuck under at least some of those lines to avoid getting too much attention.  Did you notice that I tweaked the red “horizontal” line?

Two Steps Back. Ellen Lindner, AdventurQuilter.com/blog

But, should I add some yellow somewhere?  I was still fiddling at this point, but getting very close to finalizing everything.

There you have it: 3 steps forward in my previous post and 2 steps backward in this one.  But, I don’t let that bother me, especially since I eventually moved forward  I figured out what was wrong and corrected it.  There’s often some trial and error in art making and I don’t let it discourage me.  In fact, sometimes I think I just have to get that wrong thing out of my head before I can properly entertain something better.  Does anyone else have that experience?

Ellen Lindner

4

Working on My Flame Vine Quilt

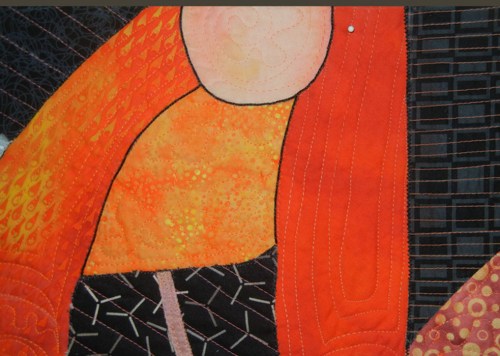
The quilt I’ve been working on is inspired by a friend’s flame vine, which cascades down her back porch.  In the strong Florida sun, it’s especially striking when seen against the dark porch screening.

After finishing the orange flowers, I went on to the leaves.

Project Resurrected. Ellen Lindner, AdventureQuilter.com/blog

Next, I tackled the long skinny pieces.  I’m not sure what they are, but they’re some part of the plant. Let’s call them twigs.   At any rate, they were in the original photo and I liked the graphic quality they added to the abstraction.  To audition sizes I started tearing fabrics and I liked the fuzzy quality I got with some of them.  So, I just left them that way.

Working on my Flame Vine Quilt. Ellen Lindner, AdventureQuilter.com/blog

Finally, it was time to glue everything to the muslin and start stitching.  I added black zigzag around each block unit.

Working on my Flame Vine Quilt. Ellen Lindner, AdventureQuilter.com/blog

For the petals and leaves I chose an organic quilting pattern that, in part, followed the shape of the piece.  For the background, I selected parallel lines.  In each case, they follow the angle of one of the twigs.  I really like the effect.

Working on my Flame Vine Quilt. Ellen Lindner, AdventureQuilter.com/blog

After all of this, I thought some of the petals merged a little bit too much.  To add definition, I drew around the edges with a Sharpie.  That helped, but it was partially covered by fuzzy threads, so I looked for something more significant.  I found it with a thin black cord which I hand couched on.  It gave the perfect outline.

Working on my Flame Vine Quilt. Ellen Lindner, AdventureQuilter.com/blog

On to finishing!  I faced the quilt and sprayed marked areas with water, to remove the chalk marks.
But, oops, one area bled.

Working on my Flame Vine Quilt. Ellen Lindner, AdventureQuilter.com/blog

I decided to hide it by adding more of the same.  Like this:

Working on my Flame Vine Quilt. Ellen Lindner, AdventureQuilter.com/blog

I used water soluble wax pastels, adding a little yellow and orange.  Plus, I think the extra water added faded the original spot.  Voila!  On to photo taking.

Ellen Lindner

0

If You Never Make a Mistake

Have you ever been to a class and realized  you left the most appropriate fabrics at home?  This happened to me when I took a class from Elizabeth Barton.  I learned a lot about abstracting and designing and had a great paper “sketch” I wanted to interpret in fabric.

It Doesn't Always Work. Ellen Lindner, AdventureQuilter.com/blog

Per Elizabeth’s instructions, I worked up my design in paper with three different value variations.  I decided to work with the one on the left, above.

But, I didn’t bring enough of my two colors, blue-green and orange.  As a result, I had to fill those areas with lots of different fabrics.  I worked hard at getting them to play well together.

I tried ignoring color and working only with value.

I persevered and got this far.

But I just hated it.  WAY too splotchy!  At this point, I bagged the whole thing.

I still love the design and intend to use it for a quilt, but I’ll have a MUCH better selection of fabrics when I do!

I’m philosophical about this sort of thing.  By being open-minded I’ve helped myself be more open-minded next time.  And the things I learned will stay with me.  I didn’t waste my time or my fabric.  It was useful.

I saw a great quote, but I don’t know who said it:  If you never make a mistake it’s because you’re not experimenting enough.  Yes!  I believe that.  Here’s to making plenty of mistakes.

Ellen Lindner


4

So, I Whacked the Corner Off

In my previous post, I showed you a big orange/rust blob on my current quilt that needed to be dealt with.  Eventually, I decided just to whack it off.  Like this.

I Whacked off a Corner. Ellen Lindner, AdventureQuilter.com/blog

Knowing that I’d need to attach new batting before continuing, I put the batting under my quilt before cutting into it.  That way, the batting had exactly the same edge shape as the portion removed.  I butted it up next to the quilt and hand basted them together.

I Whacked off a Corner. Ellen Lindner, AdventureQuilter.com/blog

Then, I recollaged the corner and was MUCH happier with it.

I Whacked off a Corner. Ellen Lindner, AdventureQuilter.com/blog

Finally, I stitched all the squares in place.  (Did you notice the ones in the background too?)  I also did some undulating stitching around the flower petals.

I Whacked off a Corner. Ellen Lindner, AdventureQuilter.com/blog

And this is where is stands:  completely finished except for facing, etc.  I started doing that and realized it’s TOO SMALL for the exhibit I had intended to enter it in.  Oh no!  So, I quickly switched gears and started on the next quilt, leaving this one to wait for my attention.

Oh well.  I’m just thankful I have time to do another one!

Ellen Lindner


2

It Was Bound to Happen

 Below, left, is my blue Frixion pen.  I write on fabric with it and then erase it by applying heat.

Oops, that was the wrong pen. Ellen Lindner, AdventureQuilter.com/blog

Above, right is my blue ink pen, with permanent ink.

Until today they lived in the same container.  And then it happened:  I picked up the ink pen instead of the Frixion one and drew on my quilt with blue ink!  GASP!

Thankfully, I was marking an area to be stitched with black thread.  I was able to cover the marks pretty well with SEVERAL passes of black stitching.

Whew.  Heart beating again.

And I moved ALL the ink pens to another drawer.

Ellen Lindner
P.S.  This is NOT the worst mistake I’ve ever made!

2