Tag Archives | Raw Edge Collage

Working on My Flame Vine Quilt

The quilt I’ve been working on is inspired by a friend’s flame vine, which cascades down her back porch.  In the strong Florida sun, it’s especially striking when seen against the dark porch screening.

After finishing the orange flowers, I went on to the leaves.

Project Resurrected. Ellen Lindner, AdventureQuilter.com/blog

Next, I tackled the long skinny pieces.  I’m not sure what they are, but they’re some part of the plant. Let’s call them twigs.   At any rate, they were in the original photo and I liked the graphic quality they added to the abstraction.  To audition sizes I started tearing fabrics and I liked the fuzzy quality I got with some of them.  So, I just left them that way.

Working on my Flame Vine Quilt. Ellen Lindner, AdventureQuilter.com/blog

Finally, it was time to glue everything to the muslin and start stitching.  I added black zigzag around each block unit.

Working on my Flame Vine Quilt. Ellen Lindner, AdventureQuilter.com/blog

For the petals and leaves I chose an organic quilting pattern that, in part, followed the shape of the piece.  For the background, I selected parallel lines.  In each case, they follow the angle of one of the twigs.  I really like the effect.

Working on my Flame Vine Quilt. Ellen Lindner, AdventureQuilter.com/blog

After all of this, I thought some of the petals merged a little bit too much.  To add definition, I drew around the edges with a Sharpie.  That helped, but it was partially covered by fuzzy threads, so I looked for something more significant.  I found it with a thin black cord which I hand couched on.  It gave the perfect outline.

Working on my Flame Vine Quilt. Ellen Lindner, AdventureQuilter.com/blog

On to finishing!  I faced the quilt and sprayed marked areas with water, to remove the chalk marks.
But, oops, one area bled.

Working on my Flame Vine Quilt. Ellen Lindner, AdventureQuilter.com/blog

I decided to hide it by adding more of the same.  Like this:
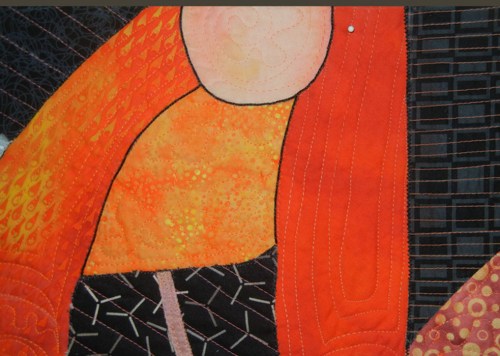
Working on my Flame Vine Quilt. Ellen Lindner, AdventureQuilter.com/blog

I used water soluble wax pastels, adding a little yellow and orange.  Plus, I think the extra water added faded the original spot.  Voila!  On to photo taking.

Ellen Lindner

0

Small Pear Collages

In my last post, I showed you the start of several small pear collages.  I had great fun with them as I continued to work with portions of my original pear picture, vintage linens, papers, and hand stitching.

Here’s the completed version of the one in the last post, Pear Study #1.

Pear Study #1, a small art quilt by Ellen Lindner. AdventureQuilter.com/

This is #2 complete.

Pear Study #2, a small art quilt by Ellen Lindner. AdventureQuilter.com

#3, complete

Pear Study #3, an art quilt by Ellen Lindner. AdventureQuilter.com

And #4, in -progress.  Scroll down to see it completed.

Collage fun. Ellen Lindner, AdventureQuilter.com/blog

Pear Study #4

Pear Study #4, an art quilt by Ellen Lindner. AdventureQuilter.com

Can you see the piece of the original pear applique used in three out of the four?

I’m very happy with these four small collages and I especially like the way they look together.

Pear Study #1-4, by Ellen Lindner. AdventureQuilter.com

Which one is your favorite?

Small works like this often benefit from additional mounting or framing. I’ve got some experience with that and will show you some options in my next post.

Ellen Lindner

12

Something Fun

Every so often I like to spend a week or two doing something artistically different.  Maybe with fabric or maybe not.  At these times, I typically pick up a good art book and spend time reading it and working through some of the exercises.  This time, it was Cas  Holmes’ book, Stitch Stories.

Product Details

If you’re not familiar with her work, she does lots of layered collages, with sheer fabrics, hand stitching, paper, and more.  Her pieces have a lovely fragile look to them.  Which made me want to try something similar. I decided to make some small collages.

This is where I started.  A friend taught our small group of art quilters how to use Inktense pencils and aloe gel.  She went above and beyond, preparing each of us an appliqued sampler to work on.  Mine had 3 pears, which I colored.

Collage fun. Ellen Lindner, AdventureQuilter.com/blog
You can also see my little color swatch, above, onto which I was recording different colors.

This had been sitting on my work table for several months and I didn’t know what to do with it.  So, I decided I would cut it up and use it as the base for several collages.  Fun already!

Following Cas’ example of using vintage linens and papers, I gathered my materials.

Collage fun. Ellen Lindner, AdventureQuilter.com/blog

Do you see that cream crochet above?  It’s part of a table cloth, crocheted by my great grandmother.  Thankfully, I have a very practical aunt, who loves art.  When she came across this stained table cloth, she offered it to me, making it clear that I COULD CUT IT UP and use it in my art!  How progressive is that?

Here’s my first collage, early on.  As you can see, I quickly deviated from a yellow and neutral palette and added green.

Collage fun. Ellen Lindner, AdventureQuilter.com/blog

And here it is, with the second pear drawn on.  I didn’t draw in the third one, since I wanted each collage to have a different number or arrangement of pears.  The drawn outline will be stitched in black.

Collage fun. Ellen Lindner, AdventureQuilter.com/blog

I’m excited about these collages!  I’ll show you more in the next post.

Ellen Lindner

2

“Bush Berries” Complete

Here’s my finished abstract quilt, Bush Berries.

Bush Berries, an art quilt by Ellen Lindner. AdventureQuilter.com

Bush Berries

And a detail shot:

Bush Berries - detail, an art quilt by Ellen Lindner. AdventureQuilter.com

Bush Berries,   ©2017
36h x 24w, $895

It was very enjoyable to make and it went together much faster than most of my quilts.  Click on the links below to see the fun abstracting technique I used.

Ellen Lindner


2

Maybe I Need More Fabric

Maybe I need more fabric.

My husband would LAUGH at the idea!  With about 1000 pieces of fabric SURELY I must have anything I could imagine, right?  Well, maybe not.  I’m used to working with lots of small pieces (think palm-sized to hand-sized,) but my next quilt would probably need much larger pieces.  I needed to check and see if my stash was up to the task.

My design is shown sketched, below left.  The solid and dashed lines indicate fabric changes. Sure enough, at 36 x 24, some of those pieces will need to be fairly large.

Planning a new art quilt with Ellen Lindner. AdventureQuilter.com/blog

First, I drew a rough idea of my design on a base muslin fabric.  This is full scale and will serve as the base of the quilt.

Planning a new art quilt with Ellen Lindner. AdventureQuilter.com/blog

Then, I pinned up my fabrics to check it out.

Planning a new art quilt with Ellen Lindner. AdventureQuilter.com/blog

Hmm.  I have enough fabric to cover the surface, but some of the pieces are either too busy or too small.  (All the ones on the left are too small.)  But don’t you LOVE those colors together?  I do!

So, I did some shopping: first, locally, and then a little online.  As I waited for my fabrics to arrive, I was glad to have enough to get started.

Planning a new art quilt with Ellen Lindner. AdventureQuilter.com/blog

Only two pieces are cut to shape in the photo above: top center and bottom right.  The bottom right piece is hand dyed and is all one piece of fabric.  However, the top center one is a commercial fabric cut up and rearranged.  I’m quite happy with the way I was able to get it to gradate without harsh edges.

Now I wait for the mail.

Ellen Lindner

4

“Deja View” Complete

I finished the little piece for the SAQA trunk show.  Since it was inspired by the current series I’m working on, I named it Deja View.

Deja View, an art quilt by Ellen Lindner. AdventureQuilter.com/blog

And here’s a detail shot.

Deja View - detail, an art quilt by Ellen Lindner. AdventureQuilter.com/blog

At only 10″ x 7″ some of my usual construction methods needed to be modified.  The squares for instance.  In the larger pieces, they were depicted with fabric.  But, there was no way I could cut the tiny squares needed for this scale.  Instead, I drew them in with white pen and added more with hand stitching.

This was a fun little project.  It was SO nice to make something I could finish quickly!

Ellen Lindner

0

“Daydream” Complete

My latest piece, Daydream, is now complete.

Daydream, an art quilt by Ellen Lindner. AdventureQuilter.com

And here’s a detail shot.

Daydream - detail, an art quilt by Ellen Lindner. AdventureQuilter.com

I think the colors are maybe slightly truer in the detail image, since the squares are mostly orange, rather than rust.

I’m kinda in love with this piece!  It’s now one of my favorites.

I encountered  several obstacles along the path to completion.  These included cutting off a corner, and enlarging it with additional batting TWICE.  It wasn’t a straight line journey, but I think it was well worth it.

You’ll find purchase info and other details here.

Ellen Lindner

7

“Second Thoughts” Complete

Finally, here is Second Thoughts, complete.  I had a lot of fun working on it and I’m quite happy with the results.

Second Thoughts, an art quilt by Ellen Lindner. AdventureQuilter.com/blog

Did you notice I turned it upside down?  That was just the jolt it needed.

Here’s a detail shot.

Second Thoughts, an art quilt by Ellen Lindner. AdventureQuilter.com/blog

Notice that I added subtle squares in the background.  I love little things like that which you can only appreciate after studying it closely.

The statement for this piece says:

When designing, my first thoughts get me started. But, as things evolve, I listen to my second (and third and fourth) thoughts to lead me in new directions.

This quilt is 36″ x 24″ and priced at $895.  I hope you like it!

Ellen Lindner

4

Finally, a Quilt

Gee, I haven’t shown you a new quilt in a while.  But, in the midst of teaching, exhibits, and TV shows, I’ve still been able to (intermittently) work on my latest abstract quilt.  When I last showed it to you, the background was complete and I had decided to add some white squares.  I auditioned that idea with some computer sketching.

An abstract art quilt in-progress. Ellen Lindner, AdventureQuilter.com/blog

And then I began to add the white squares.

An abstract quilt by Ellen Lindner in-progress. AdventureQuilter.com/blog

Hmm.  They didn’t show up that well.  Would blue-green be better?

An abstract quilt by Ellen Lindner in-progress. AdventureQuilter.com/blog

I tried it out with fabric scraps and decided this was the way to go.

An abstract quilt by Ellen Lindner in-progress. AdventureQuilter.com/blog

Yes, much better.  That took A LOT of pins.

An abstract quilt by Ellen Lindner in-progress. AdventureQuilter.com/blog

I began to consider where to add the large flower.

An abstract quilt by Ellen Lindner in-progress. AdventureQuilter.com/blog

Maybe something like this.

An abstract quilt by Ellen Lindner in-progress. AdventureQuilter.com/blog

I made some marks, but then lifted it in order to add some other things.

What about a ghost flower?  (Top left.)  It didn’t show up very well, so the jury was still out.

An abstract quilt by Ellen Lindner in-progress. AdventureQuilter.com/blog

I added a navy line for contrast.  I think it helped a lot.

An abstract quilt by Ellen Lindner in-progress. AdventureQuilter.com/blog

I put the flower back (in a slightly new location,) removed the ghost flower, and made a few final additions.  Among them, I added subtle squares in the background, and subtle X shapes in the large rust/orange shape.  Just a little repetition, texture, and interest.

An abstract quilt by Ellen Lindner in-progress. AdventureQuilter.com/blog

Finally, I trimmed it, and began to prep the facing fabric.

An abstract quilt by Ellen Lindner in-progress. AdventureQuilter.com/blog

But wait.  How would this look upside down?

Ellen Lindner


6