AQS Prize Winners

The prize winners at the Daytona Beach AQS quilt show were quite wonderful.  These are some of my favorites.

Claudia Pfeil’s Fern Rising won Best of Show and it was very well deserved.

AQS Daytona Beach winners. Ellen Lindner, AdventureQuilter.com/blog

The shadows added to the fern shapes made it look extremely 3D.  Plus, the use of sheer fabrics (for the spirals) and an abundance of crystals made this quilt literally sparkle.

AQS Daytona Beach winners. Ellen Lindner, AdventureQuilter.com/blog

A Passion for Purple, by Andrea Brokenshire had everyone stopping in their tracks.

AQS Daytona Beach winners. Ellen Lindner, AdventureQuilter.com/blog

It won the award for best workmanship on a home machine.  Appropriate, don’t you think?

AQS Daytona Beach winners. Ellen Lindner, AdventureQuilter.com/blog

Although I’m a machine quilter (or maybe because I’m a machine quilter,) I’m always impressed by dense hand quilting.  And this quilt, by Donna Douglas had it in spades.

AQS Daytona Beach winners. Ellen Lindner, AdventureQuilter.com/blog

It’s called Flourishing on the Vine and it won the award for Best Hand Workmanship.  I can’t begin to imagine how much time went into making this quilt.  It was stunning.

AQS Daytona Beach winners. Ellen Lindner, AdventureQuilter.com/blog

The next quilt, by Lois Podolny was a little awkward to photograph, but I think you can get the idea.

AQS Daytona Beach winners. Ellen Lindner, AdventureQuilter.com/blog

As you can see, she’s carefully cut and pieced symmetrical fabrics to piece these wonderful radiating kaleidoscope designs.

AQS Daytona Beach winners. Ellen Lindner, AdventureQuilter.com/blog

It’s called Magical Moments in Time.

AQS Daytona Beach winners. Ellen Lindner, AdventureQuilter.com/blog

A beautiful and interesting selection of prize winning quilts!

Ellen Lindner

5

“People and Portraits” Exhibit

For me, one of the highlights of the AQS Daytona Beach quilt show was SAQA’s exhibit “People and Portraits.”  Even though I had seen these pieces before, I thoroughly enjoying studying them again.

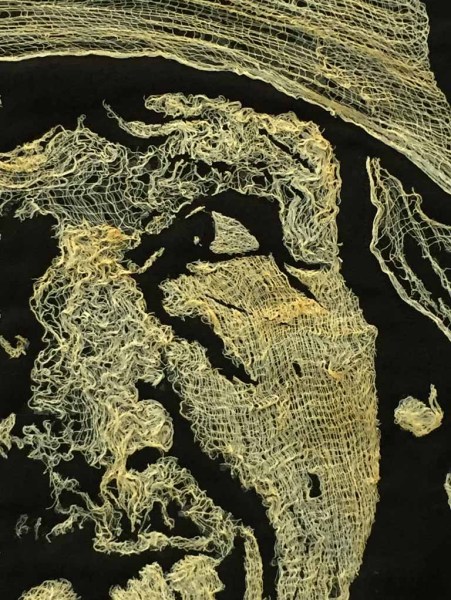
Mary Pal’s cheesecloth portraits were some of my favorites.  This one is called Homeless Love.

People and Portraits exhibit. Ellen Lindner, AdventureQuilter.com/blog

People and Portraits exhibit. Ellen Lindner, AdventureQuilter.com/blog

As you can see, she shapes tiny bits of cheesecloth against a black background to create stunning portraits.  Most of them are of the elderly or homeless.

This one is called Stogie.

People and Portraits exhibit. Ellen Lindner, AdventureQuilter.com/blog

People and Portraits exhibit. Ellen Lindner, AdventureQuilter.com/blog

Aren’t they wonderful?

Joan Sowada is well known for her portraits and images of every day life.  This one is called Flow.

People and Portraits exhibit. Ellen Lindner, AdventureQuilter.com/blog

And this one is Flight Zone.

People and Portraits exhibit. Ellen Lindner, AdventureQuilter.com/blog

Maria Elkins does a fabulous job with a variety of media on fabric.  This is called Windblown and is featured on the cover of the exhibit catalog.

People and Portraits exhibit. Ellen Lindner, AdventureQuilter.com/blog

Check out the quilting in this detail shot!  Although the quilt was beautiful before, this added texture really elevates it to another level.

People and Portraits exhibit. Ellen Lindner, AdventureQuilter.com/blog

Maria has another very touching piece in this exhibit, called Surrender.

People and Portraits exhibit. Ellen Lindner, AdventureQuilter.com/blog

If I remember correctly, this quilt was made as comfort for a family that lost their newborn child.  Can  you see the transparent hands coming in from the right?

On a happier note, Pam RuBert has one of her zany quilts included.  It’s called Towers of Babble.  In it even the dog has a cell phone!

People and Portraits exhibit. Ellen Lindner, AdventureQuilter.com/blog

Another quilt with social commentary is Hmm, by Pat Kumicich.  It’s about the 2008 presidential election.  (I’m thinking she might need to make another one this year.)

People and Portraits exhibit. Ellen Lindner, AdventureQuilter.com/blog

Like Joan Sowada, Lore Lupe Pelish’s quilts always show people in every day situations.  This is called We Were All There.

People and Portraits exhibit. Ellen Lindner, AdventureQuilter.com/blog

This detail shot gives a hint about all the print fabrics she used.

People and Portraits exhibit. Ellen Lindner, AdventureQuilter.com/blog

Finally, this quilt by Jenny Bowker drew my attention.  It’s called Hassan and the Glass.

People and Portraits exhibit. Ellen Lindner, AdventureQuilter.com/blog

The portrait is very well done, but I also think the composition and colors of the rest of the quilt support it very nicely.

People and Portraits exhibit. Ellen Lindner, AdventureQuilter.com/blog

This exhibit was just part of the much larger quilt show that’s still going on through April 27, 2016.  If you’re in the area, I think you’ll enjoy it.

Ellen Lindner

4

Getting Started on Two Green Quilts

After studying my quirky fabrics, I decided to work with the yellow-green silk that had been screen printed.  I knew I wanted to play up the red design with more red accents.  Then, I threw in blue and yellow for good measure.

Ellen Lindner starting 2 green quilts. AdventureQuilter.com

After just a little arranging I remembered, “Oh yeah, I’m not really good at abstract designs.”  (It’s good to know your strengths and weaknesses.)

Knowing that I wanted to make two companion pieces, I did a couple of quick sketches.  And since my fabrics were green, why not leaves?

Ellen Lindner starting 2 green quilts. AdventureQuilter.com

Pretty simple, but I thought I could bring it to life with the right fabrics.

Speaking of fabrics, I started to second guess my original choices, and instead tried something new.

Ellen Lindner starting 2 green quilts. AdventureQuilter.com

Oh, yes!  I definitely preferred this.  See those red squiggles?  I want to feature them.

So, I got started.  I fused a lightweight interfacing on all the silk fabrics and I drew my sketch onto a muslin base.  Next, I began cutting and placing fabrics.  Placement was determined by a desire to mix values, but also by the size of each fabric piece in my collection.

Ellen Lindner starting 2 green quilts. AdventureQuilter.com

Those squiggles are looking pretty good, huh?

Ellen Lindner

4

Using Quirky Fabrics

I’m very comfortable using commercial and hand-dyed fabrics in my creations, but I have a few quirky fabrics that I have to treat differently.  Things that ravel, ones that melt, and thin silks.

I recently pulled out a few of these to think about how I might use them.  The yellow-green fabrics are the result of a deconstructed screen printing play day.  A recent scarf dyeing class produced the blue and blue-green fabrics on the right and top.  The remaining fabrics were scraps given to me by Judith Content.  All of these are silk, most of them very lightweight.

Using quirky fabrics. Ellen Lindner, AdventureQuilter.com/blog

I was hoping I could use them all together, but I quickly abandoned that idea.

But, what about using just the blue-greens, with a healthy dash of burnt orange?

Using quirky fabrics. Ellen Lindner, AdventureQuilter.com/blog

Yes.  That has potential.

What can I do with the yellow-green fabric?  Can I play up the red squiggly parts?

Using quirky fabrics. Ellen Lindner, AdventureQuilter.com/blog

Using quirky fabrics. Ellen Lindner, AdventureQuilter.com/blog

Yes, that shows promise.

Now, where to go from here?

Ellen Lindner


2

Perfectly Flat Quilts

If you’ve done much machine quilting you’ve probably had some “friendly” quilts.  You know, the wavy ones? This is pretty standard for me so I correct the problem by blocking my quilts.

Take this quilt for instance.  Pretty bad, right?

Straighten out those wavy quilts and make them perfectly flat. Ellen Lindner, AdventureQuilter.com/blog

But, a combination of stretching, pinning, and steaming turned it into this perfectly flat quilt.

Straighten out those wavy quilts and make them perfectly flat. Ellen Lindner, AdventureQuilter.com/blog

I recently gave the same treatment to my latest quilt, Coastal Overlook.  Here it is with the top and left edges pinned straight and square.  I stretched them quite a bit  in that process, so the other two sides are still relaxed (and smaller.)

Straighten out those wavy quilts and make them perfectly flat. Ellen Lindner, AdventureQuilter.com/blog

Next, I stretched the bottom right corner to its square position and then pulled the remaining two edges into alignment.  This took A LOT of pins and about an  hour of my time.  Finally, I sprayed the whole thing with water, steam ironed it, and left it overnight to dry.

Here are the final results, nice and square.

Coastal Overlook, an art quilt by Ellen Lindner. AdventureQuilter.com/blog

Coastal Overlook

I highly recommend blocking and I’ve written a tutorial about it.  Read and learn!

Ellen Lindner

Related Post, old blog:
I Don’t Like Friendly Quilts

0

Dyeing Scarves

My sister and I had a great time attending a recent scarf dying class.  Taught by my good friend, Jo-Ann Jensen, she provided me with plain silk, knowing that I’d want to use it in quilts.  Of course!

She first taught us how to do a tie-dye sort of thing.  She calls her geodes.  Well, I just didn’t have enough patience for all those rubber bands!  Plus, I didn’t choose my colors very wisely.  This is what I got, about 12 x 12.

Scarf dying with Jo-Ann Jensen. Ellen Lindner, AdventureQuilter.com/blog

It’s not pretty enough to use as is, but certain parts can be cut and used very effectively.

Scarf dying with Jo-Ann Jensen. Ellen Lindner, AdventureQuilter.com/blog

Next, I tried to paint something that might work as a sky.

Scarf dying with Jo-Ann Jensen. Ellen Lindner, AdventureQuilter.com/blog

I think it will work.  Again, I’ll use localized slivers.

Scarf dying with Jo-Ann Jensen. Ellen Lindner, AdventureQuilter.com/blog

Finally, I did a long folded piece using just two colors.  The designs I got are really pretty, but I think it will need some over dying to add color to all that white.

Scarf dying with Jo-Ann Jensen. Ellen Lindner, AdventureQuilter.com/blog

Scarf dying with Jo-Ann Jensen. Ellen Lindner, AdventureQuilter.com/blog

This was a ton of fun!  If you ever get a chance to take a class with Jo-Ann, I strongly recommend it!

Now thinking about how I might use these fabrics together.  Hmm.

Ellen Lindner

P.S. You might also enjoy this post on  ice dying.

0

“Coastal Overlook” Complete

My latest piece, Coastal Overlook, is now complete.  It’s about 30″ x 40″ and I’m pretty happy with it.

Coastal Overlook, an art quilt by Ellen Lindner. AdventureQuilter.com/blog

  If you’ve been following my blog you know that this quilt was inspired by a drive along the Pacific Coast Highway in California.  I wanted to abstract it and, for me, that’s the tricky part.  I want to hit the sweet spot where the level of abstraction has added interest, but not completely obliterated the image.  I’m never sure if I’ve hit it or not.  Of course, a good title always helps give clues.

To add energy I added lots of off-kilter seams and skinny inserts.  I think it works.

Coastal Overlook - detail, an art quilt by Ellen Lindner. AdventureQuilter.com/blog

When I took my inspiration photos I was standing near the edge of a cliff, with lots of golden grasses at my feet.  I hinted at these with a little piecing and thread painting.

Learn how you can audition this piece in your home.

Now, I’m kinda enjoying slowly folding fabrics, putting away things, and taking time to think about what I want to do next.  As usual, I have several ideas.

Ellen Lindner

2

“Floral Improv” Students Rocked It

To say that my Floral Improv students rocked it is an understatement.  After a little instruction, they jumped right into drawing and cutting free-form flowers.  Then, they learned a little about composition and design considerations and gave that a try.  Along the way they were not afraid to try new things and they received suggestions beautifully.  What a fun group to work with!

And just look at their results!

Barbara’s palette was delightful.  She’ll add definition to the stems and leaves with dark stitching and then it will really pop!

Ellen Lindner's Floral Improv class. AdventureQuilter.com

Sharon’s quilt provides very high contrast, creating a lot of drama.  Most students will define their poppy petals with dark thread, but Sharon will use a light gray.  (But still something dark for the daisies and leaves.)  This is going to be great.

Ellen Lindner's Floral Improv class. AdventureQuilter.com

Margaret selected complementary orange and blue with a happy dose of pink and purple added in.  It’s very bright and cheerful!

Ellen Lindner's Floral Improv class. AdventureQuilter.com

Look at Kathi’s soft colors.  Didn’t she do a good job with them?  And what about the “body language” of her flowers?  She used her curving stems to great advantage.

Ellen Lindner's Floral Improv class. AdventureQuilter.com

Jo-Ann was still experimenting at this stage, but she had some really great things happening.  Like those s-t-r-e-t-c-h-e-d daisies.  They have lots of personality.  I know this is going to be full of life.

Ellen Lindner's Floral Improv class. AdventureQuilter.com

Cindy is fairly new to quilting, but she fully embraced the project.  She did a great job.

Ellen Lindner's Floral Improv class. AdventureQuilter.com

Barbara’s dark background really set off her pastel flowers beautifully.  She only has a little stitching left to do.  I can’t wait to see her finished quilt!

Ellen Lindner's Floral Improv class. AdventureQuilter.com

Bobbi was speedy and she managed to create a lot flowers in a short period of time.  She also fussy cut some shapes from a pink fabric to serve as buds.  A very nice touch.  It’s bright and wonderful!

Ellen Lindner's Floral Improv class. AdventureQuilter.com

Another 3 students packed up before I could photograph their work, but I can assure you it was on a par with these.  I’m SO delighted by these results in the very first offering of this class!

I’m now taking this class on the road.  Let me know if your guild would like to have me add you to my schedule.  (Email link below.)

Ellen Lindner

0

“Floral Improv” Inaugural Class

Color was everywhere as I taught Floral Improv for the first time.  Just look at the backdrop I had for my demo board!

Ellen Lindner's Floral Improv class. AdventureQuilter.com

After only a short while students were making free-form daisies and poppies in a myriad of hues.

Ellen Lindner's Floral Improv class. AdventureQuilter.com

Ellen Lindner's Floral Improv class. AdventureQuilter.com

Ellen Lindner's Floral Improv class. AdventureQuilter.com

Ellen Lindner's Floral Improv class. AdventureQuilter.com

Ellen Lindner's Floral Improv class. AdventureQuilter.com

Ellen Lindner's Floral Improv class. AdventureQuilter.com

v

Oh what fun we were having!  Even the scraps were beautiful.

Ellen Lindner's Floral Improv class. AdventureQuilter.com

This was a “guinea pig” class.  The students got to participate at a greatly reduced price (with the funds going to the shop owner who provided the space and promoted it,) and I got their feedback in return.  They were great about that, and I did identify a few things that could be improved.

Like the sweat shop scene below.  Everyone quilted their backgrounds as part of the class.  We collectively decided this could be done as part of the class prep, freeing up about 30 minutes for more pertinent activities.

Ellen Lindner's Floral Improv class. AdventureQuilter.com

Great input and great fun.  Thanks to my guinea pigs!

Watch for the next post in which I’ll show you my students’ fabulous results.

Ellen Lindner

You may also enjoy:
grow-with-the-flow-debut-class-a-hit


0

A Class with Pat Pauly

You know all the improvisational piecing I’ve been doing lately?  It’s all Pat Pauly’s fault.  When I saw her demonstrate it on Quilting Arts TV, I jumped in and tried it.  Plus, there were several other segments featuring Pat which included a variety of design and creativity exercises.  These really intrigued me and I tried a few of them.  So, when I learned that Pat would be teaching classes about 3 hours from my home, I decided to hit the road and take a class with her.

The class was called “A Dozen Ways:  Designs for Art Quilts.”  The idea was to show us ideas for jump starting quilt designs.  As you might imagine, the pace was VERY quick in order to cover so much material.

Our first assignment was to cut up a photo and rearrange it.  Here’s mine, before and after.  (Of course, the after would need to be tweaked to square it up.)

Artistic exercises in a class with Pat Pauly. Ellen Lindner, AdventureQuilter.com/blog


Next, we made a small 1″ square opening in a piece of paper.  We used this window to audition different compositions within the pictures we had brought.  This was mine.  There are definitely some great little compositions in this photo, although I think only one of mine was viable.  (Did I mention we were moving very quickly?)

Artistic exercises in a class with Pat Pauly. Ellen Lindner, AdventureQuilter.com/blog


At one point she had us sewing on index cards.  We were supposed to just pull scraps out of our bags and stitch them down with no thinking.  My first one is on the right, and I followed the instructions exactly.  But, gee it was ugly.  I decided a little thinking was in order!  At least I could pay attention to colors.

Artistic exercises in a class with Pat Pauly. Ellen Lindner, AdventureQuilter.com/blog

So, I made the next 4, and liked them better.  Pat’s idea is that these can serve as springboards for larger compositions.  And, if the fabric is patterned with a big circle, the large composition will also need a circle.

I kinda liked this next exercise.  We were to select two complimentary images (from calendars we had brought,) cut them up and turn them into two coordinating pieces.  The two pieces should stand alone or also look good butted up next to one another.

Artistic exercises in a class with Pat Pauly. Ellen Lindner, AdventureQuilter.com/blog

These photos were taken by Richard Jensen.  I selected them because they both featured trees, but they were different in the amount of foliage, weather, and vantage point.

This combo/dyptich idea has been rattling around in my brain a little.  I don’t intend to make this into a quilt, but I like the rather poetic marriage of two subjects like this.

At the end of the day, we quickly created a slightly larger collage.  This time she told us we “could think a little.”  This is what I came up with.  I didn’t really have scraps large enough to create an effective background.  But, I like the color palette.  The scale is off, but with larger blue shapes (and lots of tweaking) this might turn into something decent.

Artistic exercises in a class with Pat Pauly. Ellen Lindner, AdventureQuilter.com/blog

Or not.  It doesn’t have to become anything!  The time and thought I spent creating it enhanced both my artistic skill and my creativity.  That’s time well spent!  And the whole day fit that description.  It was a very good class.

Have you taken any good open-ended classes like this?  I’d love to hear about them.

Ellen Lindner


0