Images of New Orleans

What city has jazz music, fantastic food, above-ground cemeteries, Spanish architecture*, huge mardi gras celebration, and evidence of a hurricane?  Why, New Orleans, of course!  There are so many things unique to this city, and that is much of why it’s so interesting.

Let’s start our tour with some iconic images. (Click any image for a larger view.)

This is St. Louis Cathedral on Jackson Square.  If you click the picture, you may be able to tell why the park is named Jackson Square.

A visit to New Orleans, AdventureQuilter.com/blog

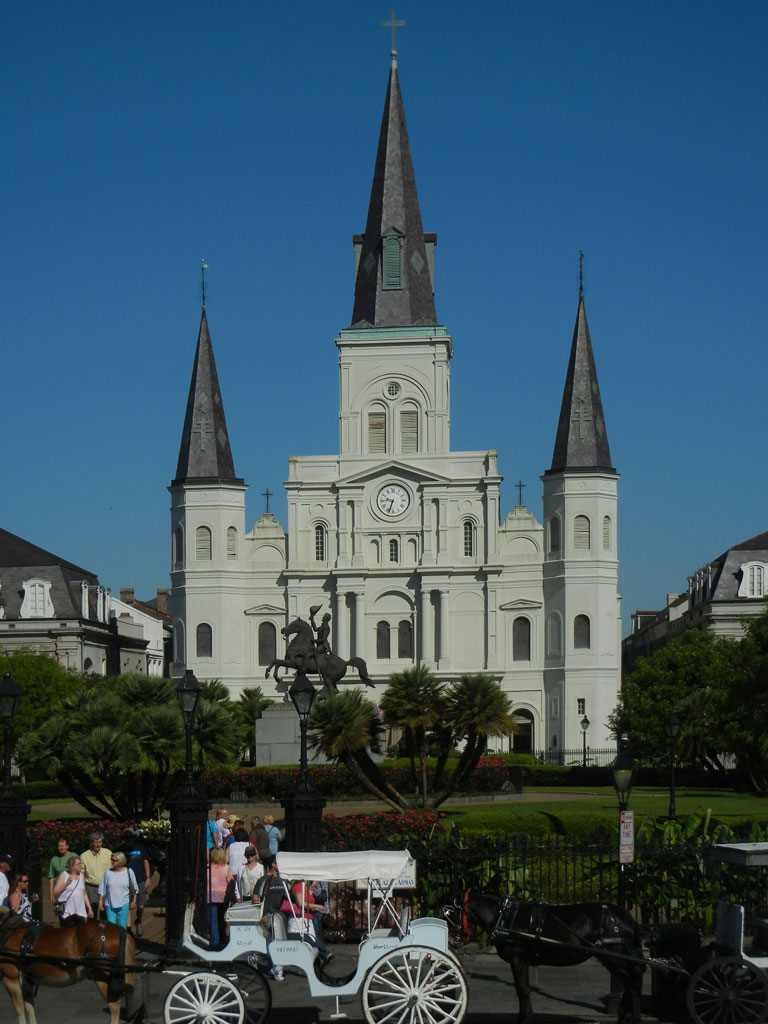
Yes, that’s a stature of Andrew Jackson on his horse.  Speaking of horses, there were the usual tourist offerings of horse-drawn carriages and pedi-cabs.  And the famous Cafe du Monde was also nearby.  Of course, we tried one of their famous beignets and they were good.  (But, we decided they didn’t live up to the hype.)

A classic view of Bourbon street.

A visit to New Orleans, AdventureQuilter.com/blog

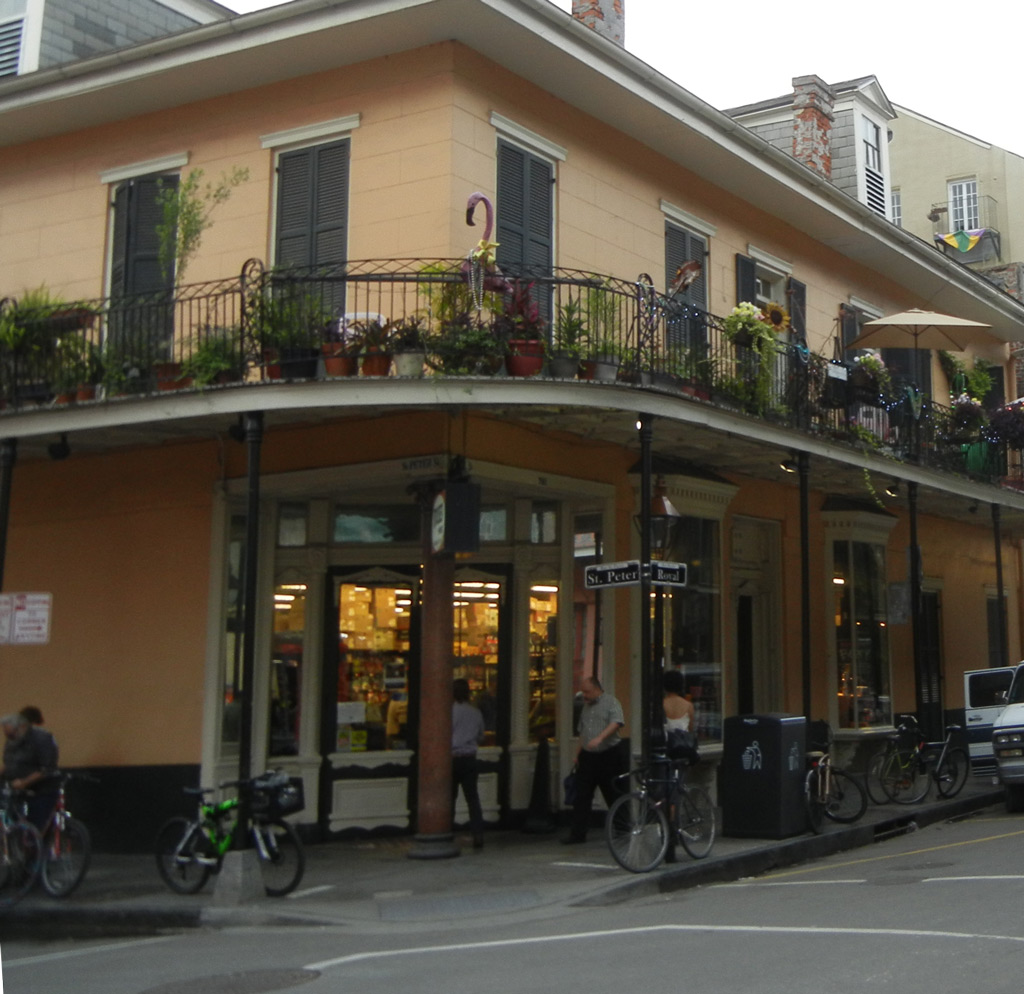
(Or maybe not so classic, since most people visit at night, when it is party central!)

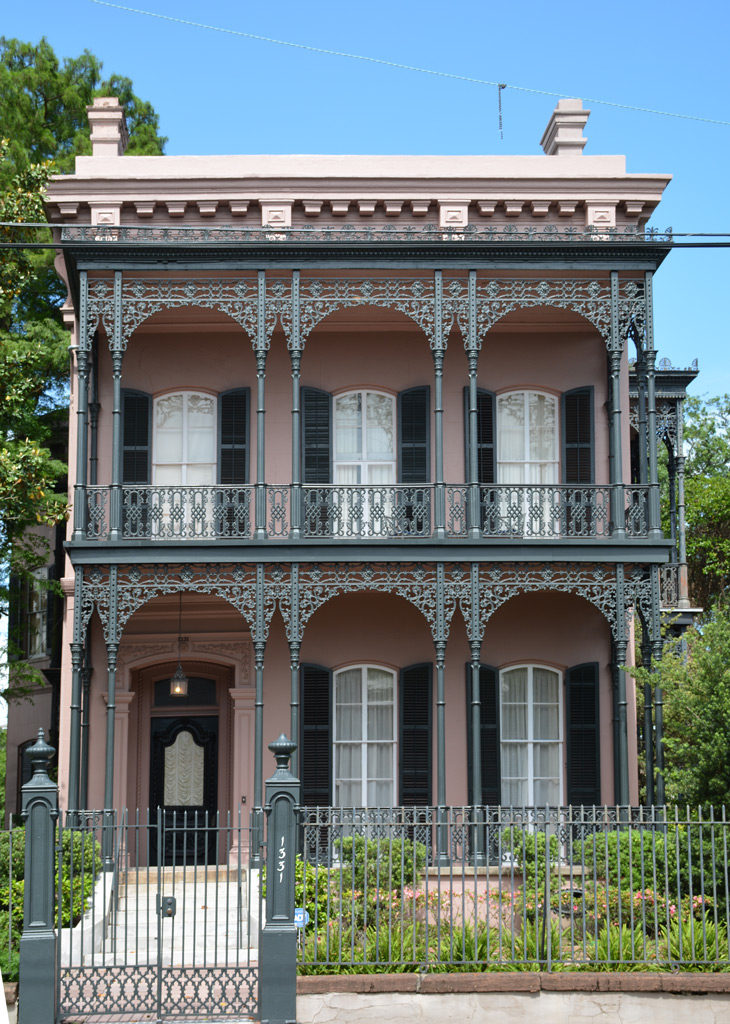
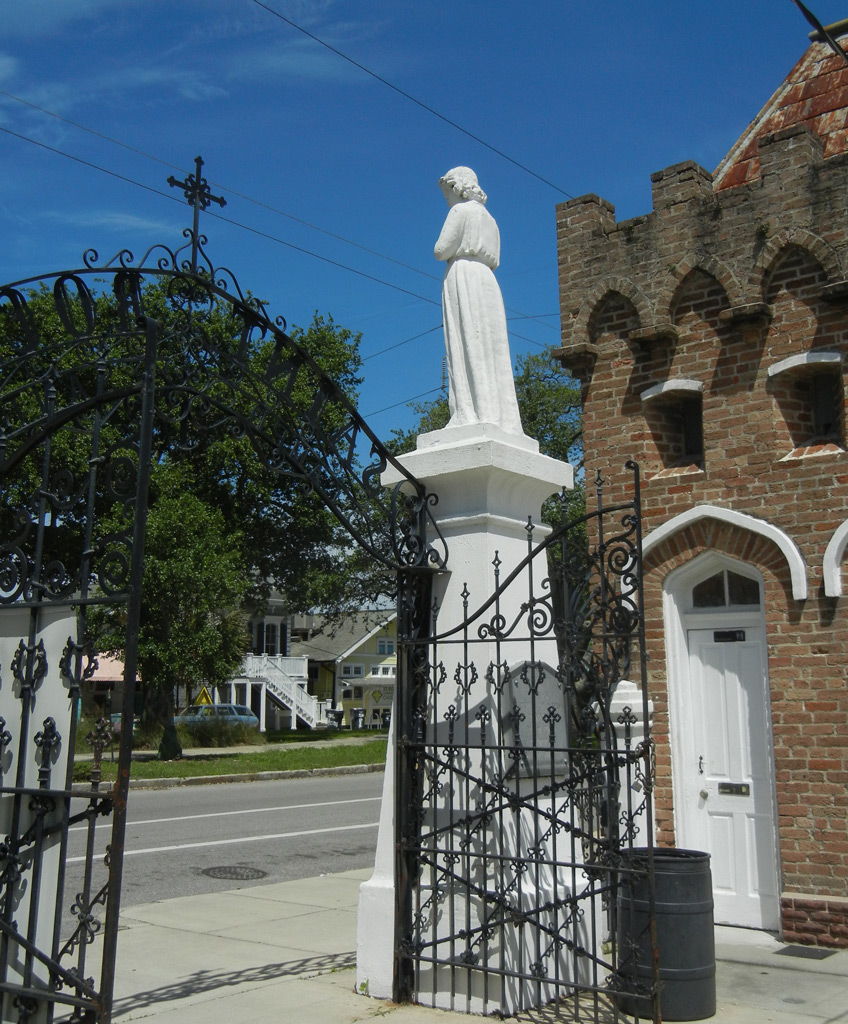
We went on a walking tour of the Garden District.  It featured beautiful Victorian homes with elaborate ironwork.  VERY New Orleans!  Several celebrities live in this area, including Sandra Bullock and Brad Pitt.

A visit to New Orleans, AdventureQuilter.com/blog


There was a mardi gras museum at Jackson Square.  Unfortunately, we didn’t get to spend much time there, but I did get a few shots of some over the top costumes.

A visit to New Orleans, AdventureQuilter.com/blog


A visit to New Orleans, AdventureQuilter.com/blog

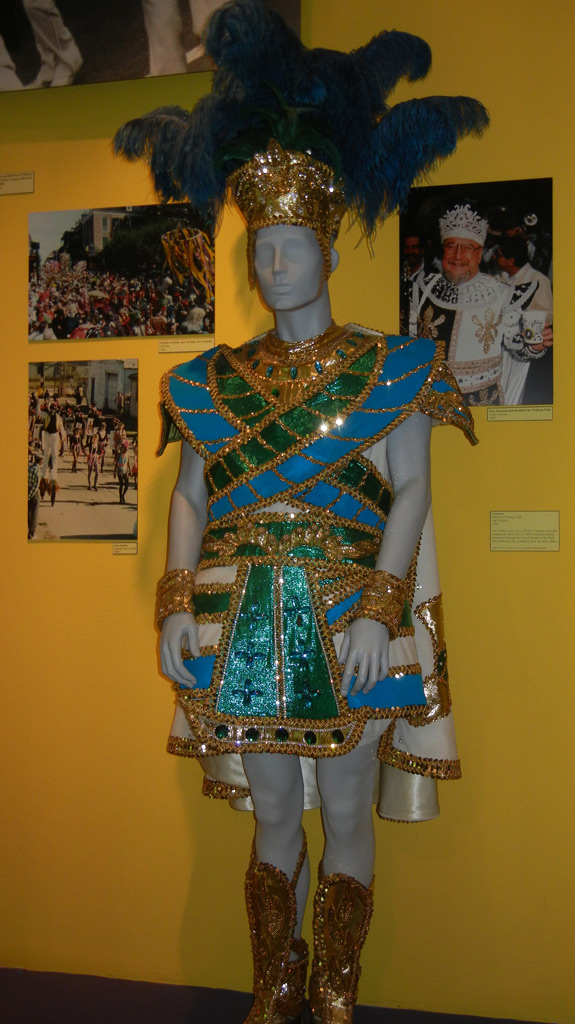
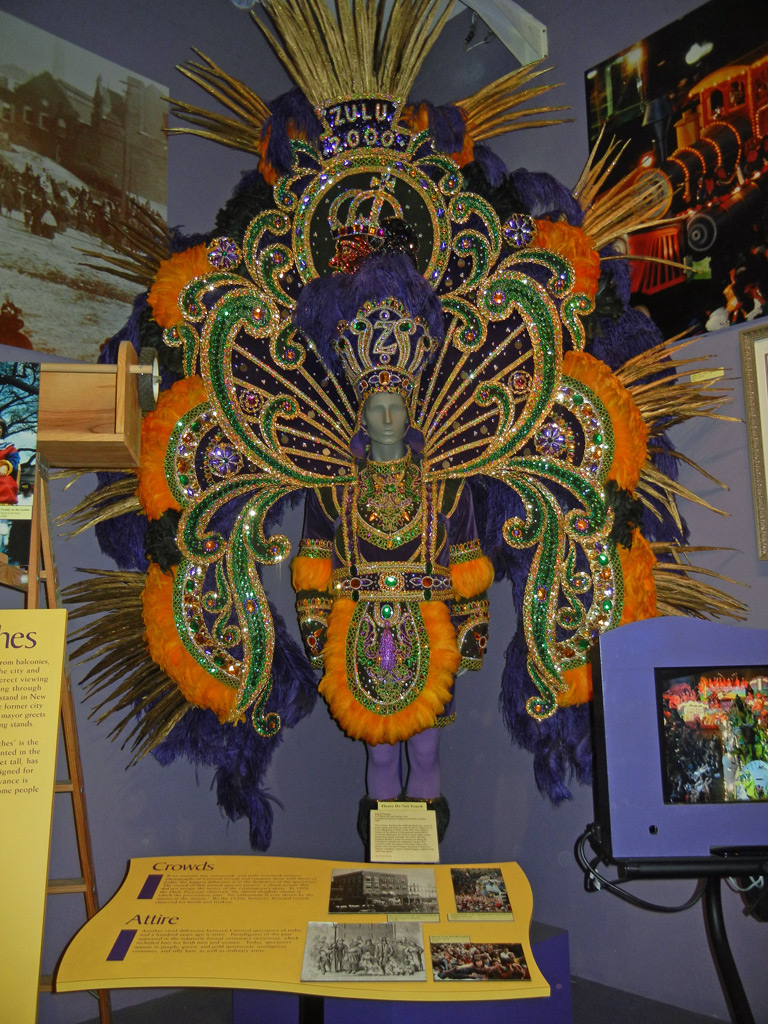
(Click on that one above.)  How much do you think that thing weighs???

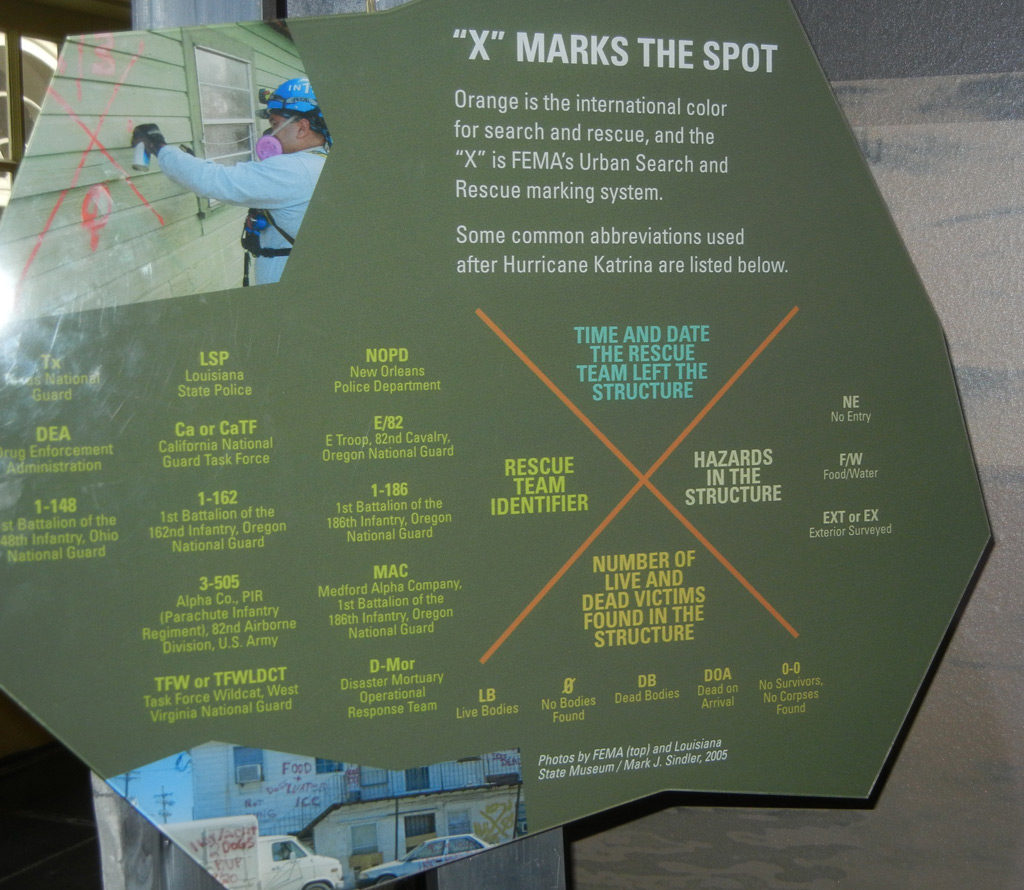
Housed in the same building was a museum about hurricane Katrina.  It was very interesting, but also somewhat sad.  This display explained the notation used on homes during the search and rescue efforts.

A visit to New Orleans, AdventureQuilter.com/blog

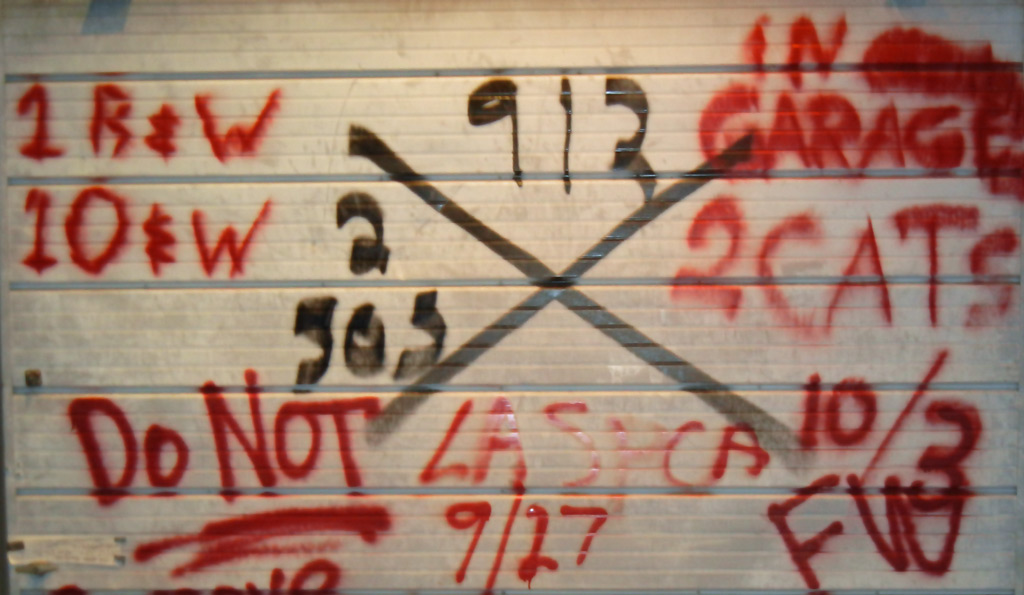
And there was a garage door with such markings on display.  Rather sobering.

A visit to New Orleans, AdventureQuilter.com/blog

But, ALL of this was very interesting and the food was worthy of an entire blog post.  The best I’ve had ANYWHERE!  I highly recommend a visit.

*BTW, the French Quarter actually has Spanish architecture, due to being settled by the Spanish early on.

Ellen Lindner

“Lava to the Sea” Complete

As waves of lava meet waves of water they showcase the power and beauty of nature.

Such was the inspiration for this piece,”Lava to the Sea.”  The central panel suggested the subject and I ran with it.

Click any image for a larger viewLava to the Sea, an art quilt by Ellen Lindner.  AdventureQuilter.com/blog

I added a good bit of hand stitching to the left side for interest.

Lava to the Sea - detail, an art quilt by Ellen Lindner.  AdventureQuilter.com/blog

Although this quilt was, at times, challenging, I’m really happy with the final result!

Find more details, including how to audition it in your home.

Ellen Lindner

Exercise Results

Remember the challenging exercise I gave you?  Here are some results from my art quilt buddies.  (We used pencils only, no color.)

We all worked with this image:
Click any image for a larger view

A challenging art exercise with Ellen Lindner. AdventureQuilter.com/blog

Susan came up with this:

A challenging art exercise with Ellen Lindner. AdventureQuilter.com/blog

This was her other image:

A challenging art exercise with Ellen Lindner. AdventureQuilter.com/blog

And her results:

A challenging art exercise with Ellen Lindner. AdventureQuilter.com/blog

This was Jill’s staring image:

A challenging art exercise with Ellen Lindner. AdventureQuilter.com/blog

And her finished design:

A challenging art exercise with Ellen Lindner. AdventureQuilter.com/blog

Although somewhat challenging, it was a fun and useful exercise.
I hope you’ll give it a try.

Ellen Lindner

The Cemeteries of New Orleans

I REALLY enjoyed a recent visit to New Orleans; my first time there.  We toured around quite a bit and were particularly intrigued by the above ground cemeteries.

This was the entrance to St. Roch’s Cemetery.
Click any image for a larger view

The cemeteries of New Orleans, AdventureQuilter.com/blog


It was very neat and well maintained.

The cemeteries of New Orleans, AdventureQuilter.com/blog

The crypts are above ground due to the high water table in New Orleans.  Each one is owned by a family and has had many people buried there over the years.  Their names are carved on the outside of the front opening.

Cemetery #1 was not as well maintained (a family responsibility) but it was till beautiful.

The cemeteries of New Orleans, AdventureQuilter.com/blog

To my artist’s eye, some of the dilapidated crypts were the most interesting.

The cemeteries of New Orleans, AdventureQuilter.com/blog

Of course, the family members may feel differently.

The cemeteries of New Orleans, AdventureQuilter.com/blog

You can read more about New Orleans’ burial customs here.

Ellen Lindner
P.S.  Did you know my blog is searchable?  See the search box up top in the right corner?  Try typing in “travel” (without the quotes) – or any other word – and see what you get.

A Challenging Exercise for You

Do you like to do artistic exercises?  Little challenges to improve your creativity, composition, and problem solving?  I do.  So, I created a little challenge for myself and my art quilt buddies.  It was inspired by the quilt I’ve been working on.  For it I started with a primary panel and needed to add more.  The tricky part is that the additions need to compliment the original panel without over shadowing it.

So, here’s the task:
1) Find a magazine image with some clear shapes.  Cut out a square, cropping enough so the items in the photograph are not very recognizable items.  The idea is to end up with shapes rather than identifiable objects.  This was my starting image:

Click any image for a larger viewA challenging art exercise with Ellen Lindner.  AdventureQuilter.com/blog

I traced the lines with the black pen I’d be using for the next step.  If you use a pencil this is unnecessary.

2) Glue the magazine image onto drawing paper.  Draw two additional “panels” adjacent to your original image.  They don’t have to be on the sides like I did.

3) Draw in your new panels to complete the composition.  Consider:
– repeating colors
– repeating motifs, but in different quantities or sizes
– repeating lines and/or angles
– extending some lines/shapes, but not all

This was mine:

A challenging art exercise with Ellen Lindner.  AdventureQuilter.com/blog

4) Color in your new design.  Keep contrast in mind.  High contrast areas attract our attention so your starting “star” panel should have the highest contrast.  Keep the value and color contrasts low in the new panels.  This is mine.

A challenging art exercise with Ellen Lindner. AdventureQuilter.com/blog
It’s NOT great art and that’s not the point.  The idea is to visually challenge yourself and to problem solve.

Want to give this a try?  If you need an image to get you started, try one of these:

A challenging art exercise with Ellen Lindner. AdventureQuilter.com/blog

A challenging art exercise with Ellen Lindner. AdventureQuilter.com/blog

I used these two in a recent exercise with my art quilt buddies.  I’ll show you their results soon.

I’d love to see your finished designs!  And, if you use your own image, your starting photo, too.  I’ll even post them if you give me permission to do so.  Jump in!

Ellen Lindner
P.S.  Read about some of the other creative tasks I’ve tackled:
Two-handed drawing, abstracting, and more.
– Zentangles

Gilding the Lily

In earlier posts I showed you the quilt I made entirely with fabrics given to me by Judith Content.  That went together so easily!

Now, I’m working on one that’s much more challenging.  This time I am working with only one panel of Judith’s fabric, the center one shown below.

Click any image for a larger view

Lava to the Sea, in-progress.  An art quilt by Ellen Lindner.  AdventureQuilter.com

I decided not to use the two side pieces, thinking that they didn’t really go together.  (Now, I see that I could have made them work, but that’s not the path I chose.)

So, I decided to work with the largest panel only, and to add some of my own fabrics to the mix.  I always find it challenging to “guild a lily.”  That is, to add to something I like “as is.”  The goal is to add components that compliment the original part, but don’t outshine it.  For me, it requires a lot of thought and some trial and error.

I had several versions of blue ultra-suede fabric and auditioned them.  I thought the royal blue one, bottom left, had promise.

Lava to the Sea, in-progress.  An art quilt by Ellen Lindner.  AdventureQuilter.com

I almost immediately thought of a concept and title, “Lava to the Sea.”  Very helpful!  I began to consider some slanting lines in the right fabric, loosely mimicing the slanted motif in the primary panel.

Lava to the Sea, in-progress.  An art quilt by Ellen Lindner.  AdventureQuilter.com

Maybe some little skinny lines?  I decided the tilt of the new lines should be different than that of the primary ones.  After all, I didn’t want to create chevrons.

Lava to the Sea, in-progress. An art quilt by Ellen Lindner. AdventureQuilter.com

But, I just didn’t like the heavy blue on the right.  Eventually, I scrapped it and used hand dyed fabrics, instead.  Again, I was careful to avoid chevrons. And also, perfectly matched colors.  I just wanted to imply the slope of a volcano, or the flow of lava.

Lava to the Sea, in-progress.  An art quilt by Ellen Lindner.  AdventureQuilter.com

Eventually I completed the right panel to my satisfaction.  Although I avoided matching in most places, I did purposely continue the “lava” line from the main panel to the right one.  And I added a skinny line of that ultra-suede.

Lava to the Sea, in-progress. An art quilt by Ellen Lindner. AdventureQuilter.com

Lava to the Sea, in-progress. An art quilt by Ellen Lindner. AdventureQuilter.com

In the photo above, you can see that I’d also begun to audition dark blue ultra-suede for the left panel.  Since it was solid, I knew I’d need to break it up with fabric or stitching.  I also played with the idea of extending one white shape into the left panel, as well as a fabric line indicating the lava flow.

And here it is, ready for stitching.  As you can see, I did go with the little fabric lava line and the extension of the white shape.

Lava to the Sea, in-progress.  An art quilt by Ellen Lindner.  AdventureQuilter.com

The bottom border will undulate, as shown above.  I’m not sure what will happen with the top border.And the left border will probably get skinnier.

How about you, have you ever gilded a lily?  How did it go?

Ellen Lindner

Final Boca Quilts

And here they are, the final quilts produced in my recent “Grow with the Flow” class, in Boca Raton, FL.

Nancy used several different colors in her background, creating an almost sunset effect.

Nancy's quilt, made in a class taught by Ellen Lindner. AdventureQuilter.com/blog
Jo thought long and hard about her accent fabrics.  Blue was an excellent choice, since it’s the complement/opposite of orange.

Jo's quilt, made in a class taught by Ellen Lindner. AdventureQuilter.com/blog

Mary modified her plant design quit a bit.  I think it has a lot of personality, don’t you?

Mary's quilt, made in a class taught by Ellen Lindner. AdventureQuilter.com/blog

Ellen A. decided her plant didn’t need to be black and white.  A nice idea.  She also inverted one of her leaves.

Ellen A.'s quilt, made in a class taught by Ellen Lindner. AdventureQuilter.com/blog

This photo of Carol’s quilt shows it before her plant is fully placed.  As you can see, she has lots of options.

Carol's quilt, made in a class taught by Ellen Lindner. AdventureQuilter.com/blog

Like Carol, Dot used two different background colors:  one for the ground and one for the sky.

Dot's quilt, made in a class taught by Ellen Lindner. AdventureQuilter.com/blog

Laurie positioned her plant so the bud is pointing straight up.  I think it looks strong and confident.

Laurie's quilt, made in a class taught by Ellen Lindner. AdventureQuilter.com/blog

As you can see, even in a class with a pattern, there are many ways to personalize it and make it your own.  I always encourage that!

Ellen Lindner

P.S. There’s also an online version of this class.

Awesome Quilts from Boca

The students in my Boca Raton “Grow with the Flow” class produced wonderful results!  (Most of these photos were taken at around the 5 hr. point in a 6 hour class. )

Johanna COMPLETELY finished her quilt, with facing and all!  The only thing she still needs to do is to add a label and a hanging sleeve.  How great is that?

Click any image for a larger view

Johanna with the quilt she made in a class taught by Ellen Lindner.  AdventureQuilter.com/blog
Jane chose subtle golds and tans for her background.  They show off her plant very nicely.

Jane's quilt, made in a class taught by Ellen Lindner.  AdventureQuilter.com/blog
Susan’s red value-finder glasses helped her arrange her fabrics perfectly.

Susan's quilt, made in a class taught by Ellen Lindner.  AdventureQuilter.com/blog

Joanne decided she wanted two upturned leaves.  A great variation!

Joanne's quilt, made in a class taught by Ellen Lindner.  AdventureQuilter.com/blog

Pat also got creative, deciding to use a variety of colors for her background.  She still paid attention to value and it worked beautifully.

Pat's quilt, made in a class taught by Ellen Lindner.  AdventureQuilter.com/blog

Marge was delighted with her color  combination.  Me too!

Marge's quilt, made in a class taught by Ellen Lindner.  AdventureQuilter.com/blog
I had great fun working with these women to create their quilts.  They were very excited about the speed at which their quilts went together, as well as the dramatic color combinations.  Their enthusiasm was contagious, as always!

I’ve only shown you six quilts.  In the next post, I’ll show
you that many more.

Ellen Lindner

More Class info here

Growing with the Flow

Want to make a “Grow with the Flow” quilt?  It’s fast and fun.  These photos of my recent class in Boca Raton, FL will give you the general idea.

Step 1:  Create a monochromatic background with strips of fabrics.

Click any image for a larger view

Grow with the Flow student at work.  AdventureQuilter.com/blog

Grow with the Flow student at work.  AdventureQuilter.com/blog

Since value is an important aspect of step 1, you might appreciate value finder tools, like these red glasses.

Grow with the Flow student at work.  AdventureQuilter.com/blog
Actually, the background doesn’t really have to be monochromatic,
and I applaud creativity!

Grow with the Flow student at work.  AdventureQuilter.com/blog

Step 2:  Add skinny accent fabrics to the background.

Grow with the Flow student at work.  AdventureQuilter.com/blog
Step 3:  Glue it all in place.

Grow with the Flow student at work.  AdventureQuilter.com/blog

Grow with the Flow student at work.  AdventureQuilter.com/blog

Step 4:  Quilt the background.

Grow with the Flow student at work.  AdventureQuilter.com/blog

Step 5:  Create the plant pieces in black and white.  (Sorry, no pictures of that.)

Step 6:  Place your plant components to create your design.

Grow with the Flow student at work.  AdventureQuilter.com/blog

Step 7:  Quilt the plant.  Trim and face.

Can you tell we were having fun?  Watch for the next blog post where I’ll show the fantastic results this group produced.

Ellen Lindner
P.S.  You can find more details about this class here.

Teaching in Boca Raton

I received a really warm welcome on a recent teaching trip to Boca Raton, FL.  The first evening I gave a lecture on color.

Ellen Lindner speaking to a group.  AdventureQuilter.com/blog

(Apparently, I’m a very animated speaker.)

I showed slides of my quilt Summer in the South, in-progress.  And, since I had brought it with me, many people wanted pictures of me
with the quilt, afterward.

Ellen Lindner with her fabric collage, Summer in the South.  AdventureQuilter.com/blog


The next day was a teaching day.  During it, former students showed me projects they had completed from previous classes.

Marge Lehrer made her apple and pear in a Double Reverse Applique class with me about EIGHT years ago!  Aren’t they fabulous?  The berry fabric she chose for the background really helps that lime green to POP.

Marge Lehrer with two projects started in a class taught by  Ellen Lindner.  AdventureQuilter.com/blog


Ellen Heimlich made her Grow with the Flow quilt in an
online class, just recently.  Awesome, right?

Ellen Heimlich with her quilt made in a class taught by Ellen Lindner, on right.  AdventureQuilter.com/blog

I love it when my students go out of their way to show me their results.  They’re clearly proud of their results and, (of course,) I think that’s appropriate!

Would you like to have me come teach at your guild?  Find details here.

Ellen Lindner